
Prometheus requires proper configuration of storage paths, user permissions, and network access to function as an effective monitoring solution. This guide demonstrates how to automate Prometheus installation with CloudRay, implementing secure service configuration, proper file permissions, and systemd service management.
Contents
- Adding Servers to CloudRay
- Create the Automation Script
- Create a Variable Group
- Running the Scripts to Install Prometheus with CloudRay
Adding Servers to CloudRay
Before beginning Prometheus deployment, ensure your target servers are connected to CloudRay. If you haven’t done this yet, follow our servers docs to add and manage your server
NOTE
These scripts target Ubuntu/Debian systems. For RHEL-based distributions, replace apt commands with appropriate yum or dnf equivalents. The Prometheus configuration directory path is consistent across Linux distributions
Create the Automation Script
Two Bash scripts are required for complete Prometheus deployment:
- Prometheus Installation Script: This script handles binary installation and filesystem setup
- Prometheus Service Script: This script configures systemd service and runtime parameters
Prometheus Installation Script
This script performs the initial Prometheus deployment with production-ready defaults:
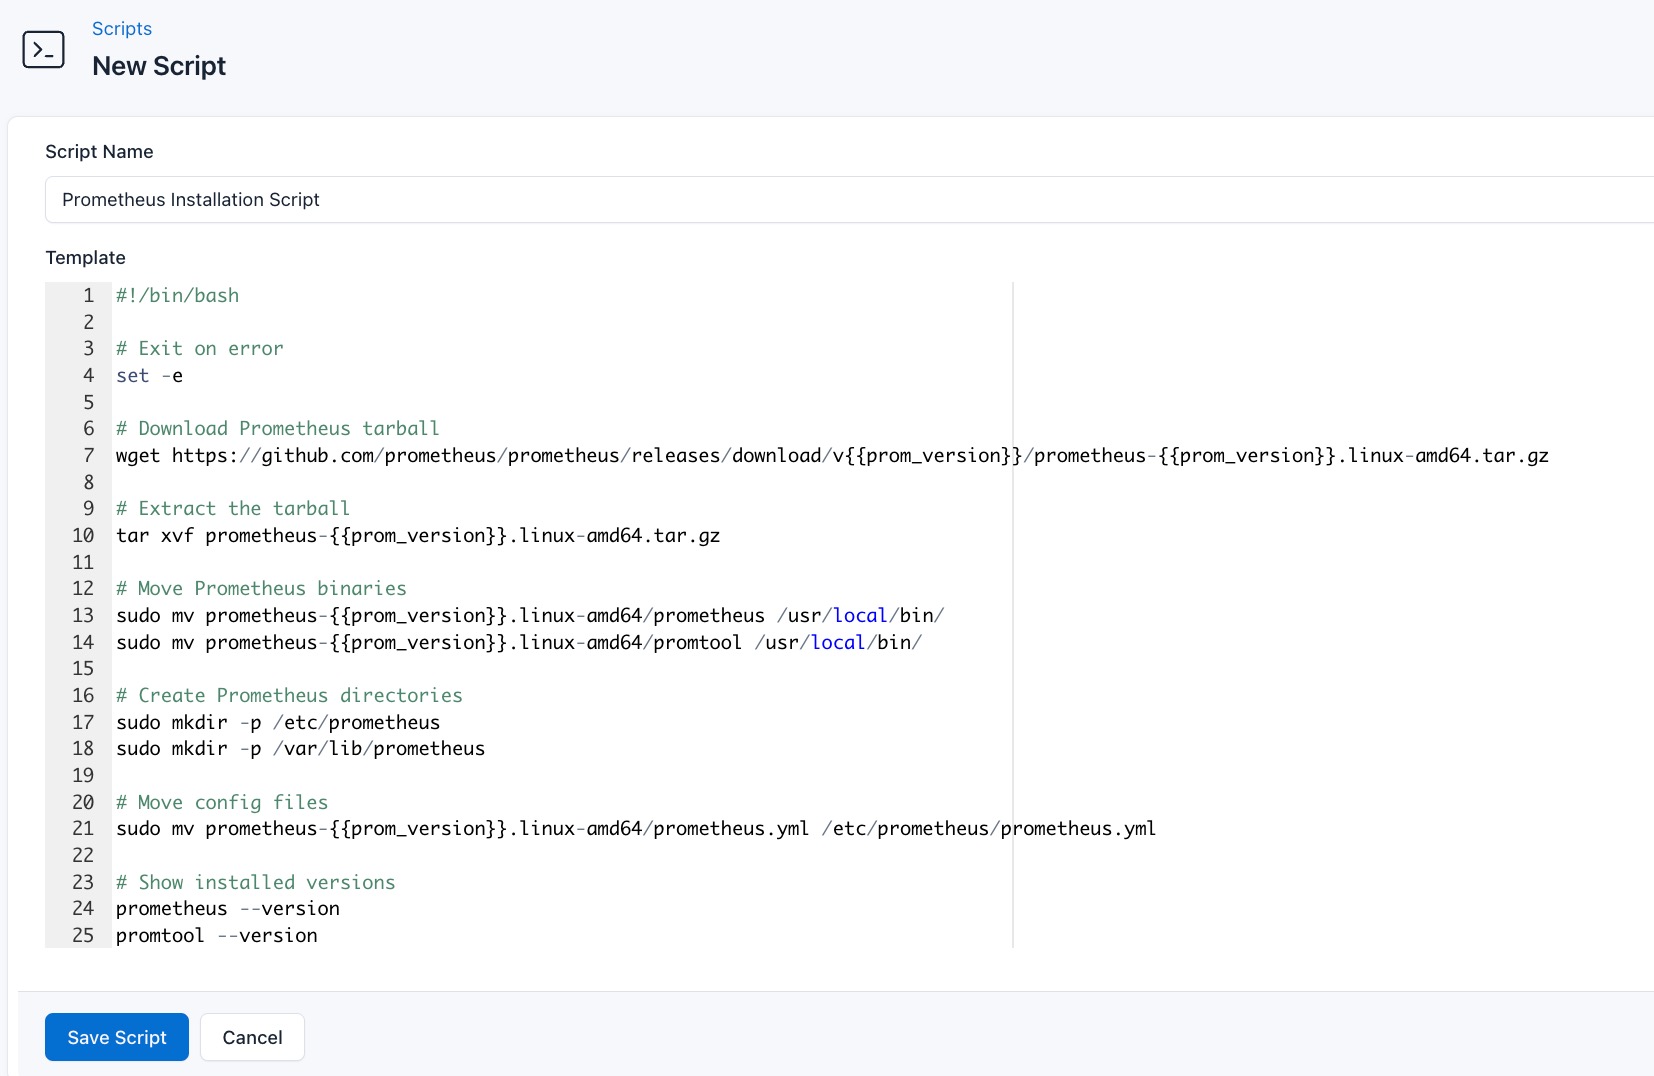
- Go to Scripts in your CloudRay project
- Click New Script
- Name:
Prometheus Installation Script. You can give it any name of your choice - Copy this code:
#!/bin/bash

# Exit immediately on error
set -e

# Update package list
sudo apt update

# Download Prometheus tarball
wget https://github.com/prometheus/prometheus/releases/download/v{{prom_version}}/prometheus-{{prom_version}}.linux-amd64.tar.gz

# Extract the tarball
tar xvf prometheus-{{prom_version}}.linux-amd64.tar.gz

# Move Prometheus binaries
sudo mv prometheus-{{prom_version}}.linux-amd64/prometheus /usr/local/bin/
sudo mv prometheus-{{prom_version}}.linux-amd64/promtool /usr/local/bin/

# Create Prometheus directories
sudo mkdir -p /etc/prometheus
sudo mkdir -p /var/lib/prometheus

# Move config files
sudo mv prometheus-{{prom_version}}.linux-amd64/prometheus.yml /etc/prometheus/prometheus.yml

# Show installed versions
prometheus --version
promtool --version

# Create Prometheus user and group
sudo groupadd --system {{prom_group}}
sudo useradd -s /sbin/nologin --system -g {{prom_group}} {{prom_user}}

# Set permissions
sudo chown -R {{prom_user}}:{{prom_group}} /etc/prometheus /var/lib/prometheus
sudo chmod -R 775 /etc/prometheus /var/lib/prometheus
Here is a breakdown of what the Prometheus Installation Script does:
- Downloads specified Prometheus version
- Installs binaries to
/usr/local/bin - Creates dedicated system user and group
- Sets secure directory permissions
Prometheus Service Script
This script configures Prometheus as a systemd service:
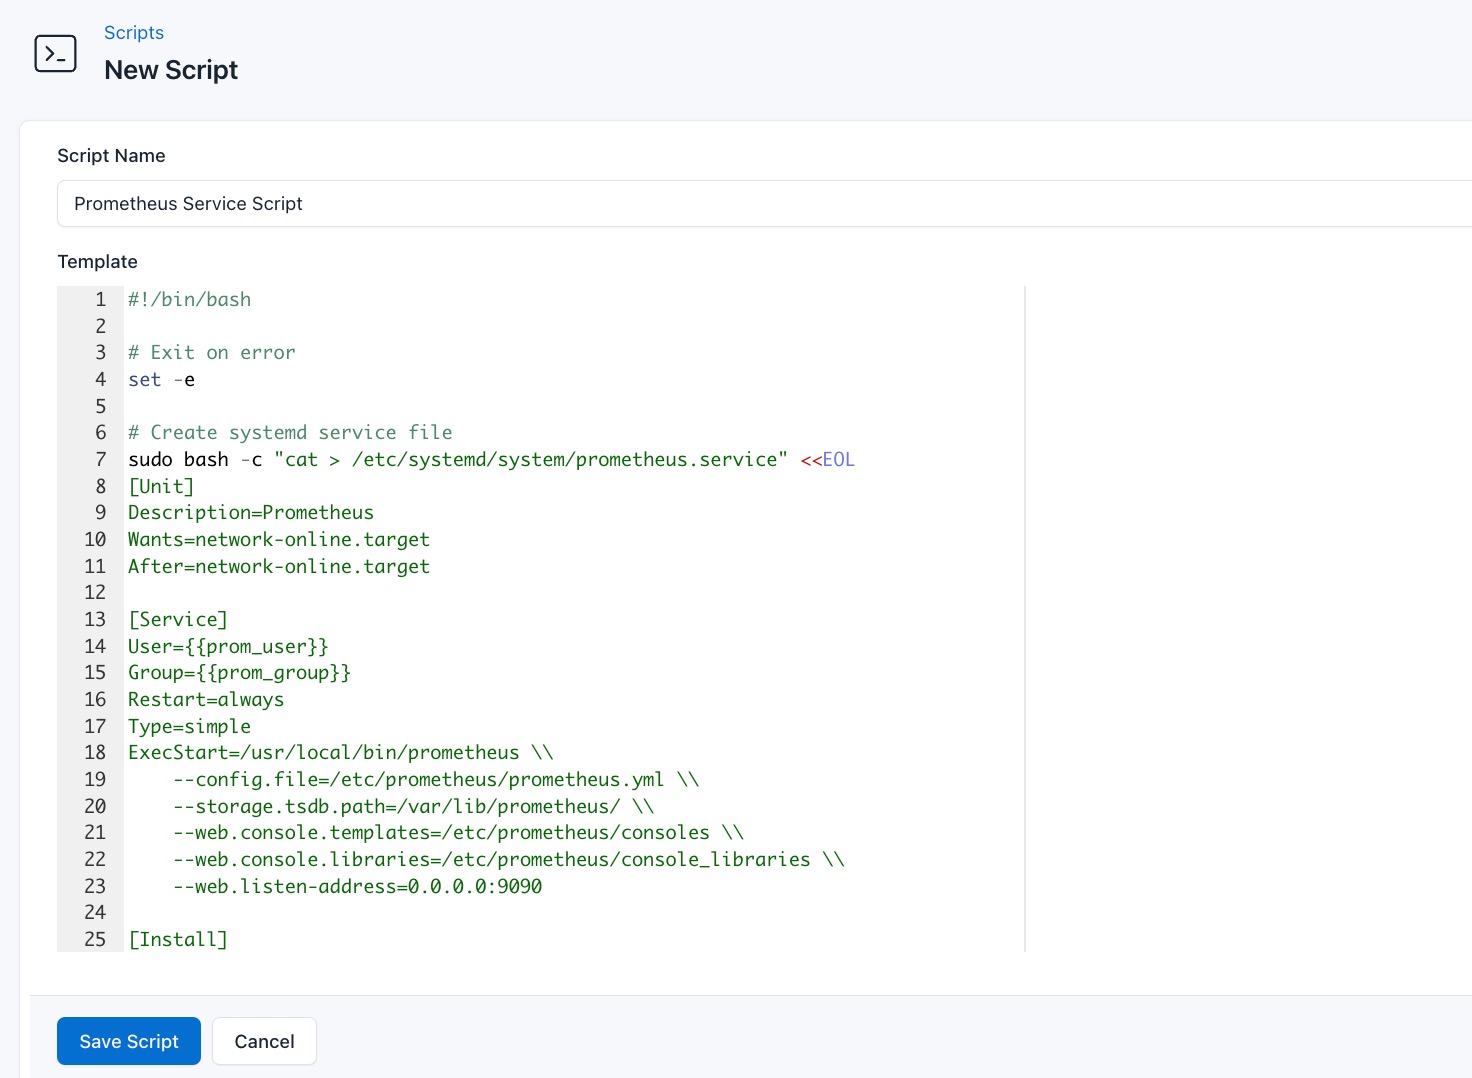
- Go to Scripts > New Script
- Name:
Prometheus Service Script - Add code:
#!/bin/bash

# Exit immediately on error
set -e

# Create systemd service file
sudo bash -c "cat > /etc/systemd/system/prometheus.service" <<EOL
[Unit]
Description=Prometheus
Wants=network-online.target
After=network-online.target

[Service]
User={{prom_user}}
Group={{prom_group}}
Restart=always
Type=simple
ExecStart=/usr/local/bin/prometheus \\
    --config.file=/etc/prometheus/prometheus.yml \\
    --storage.tsdb.path=/var/lib/prometheus/ \\
    --web.console.templates=/etc/prometheus/consoles \\
    --web.console.libraries=/etc/prometheus/console_libraries \\
    --web.listen-address=0.0.0.0:9090

[Install]
WantedBy=multi-user.target
EOL

# Reload systemd daemon configs
sudo systemctl daemon-reload

# Start and enable Prometheus service
sudo systemctl start prometheus
sudo systemctl enable prometheus

# Show service status
sudo systemctl status prometheus --no-pager

echo "✅ Prometheus service created and started."
This is what the Prometheus Service Script does:
- Systemd service unit with automatic restart
- Proper user/group context
- Standard data storage locations
- Network binding on port 9090
Create a Variable Group
Now, before running the scripts, you need to define values for the placeholders {{prom_version}}, {{prom_user}}, and {{prom_group}}, used in the scrips. CloudRay processes all scripts as Liquid templates. This allows you to use variables dynamically across different servers.
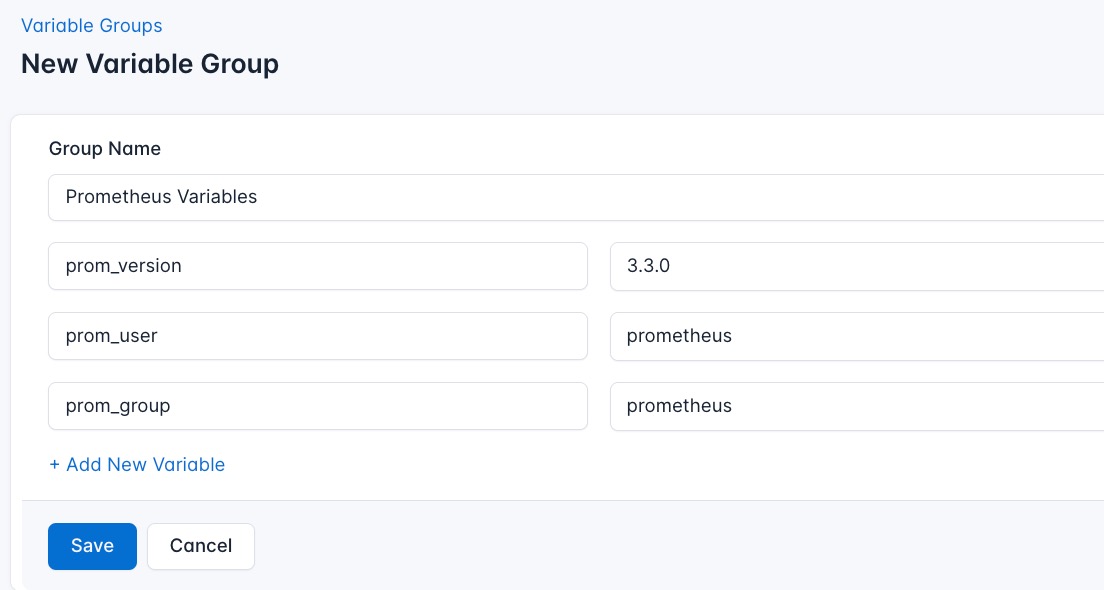
To ensure that these values are automatically substituted when the script runs, follow these steps to create a variable group:
- Navigate to Variable Groups: In your CloudRay project, go to “Scripts” in the top menu and click on “Variable Groups”.
- Create a new Variable Group: Click on “Variable Group”
- Add the following variables:
prom_version: Prometheus release versionprom_user: System user for Prometheusprom_group: System group for Prometheus
Since the variables are setup, proceed to run the scripts with CloudRay.
Running the Scripts to Install Prometheus with CloudRay
Now that everything is setup, you can use CloudRay to automate the installation of prometheus.
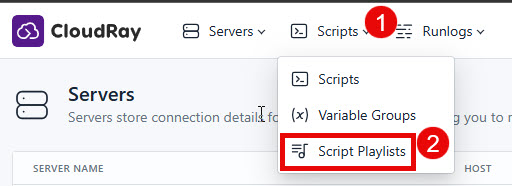
You can choose to run the scripts individually or execute them all at once using CloudRay’s Script Playlists. Since there are multiple scripts, using CloudRay playlists will help automate the execution sequence and save time.
Here are the steps to follow:
- Navigate to “Script Playlists”: Click on the Scripts tab in the CloudRay interface
- Click “Add Script Playlist”: This initiates the creation of a new playlist
- Provide a Name: Give your playlist a unique name (For example “Automate Prometheus Installation”)
- Add Scripts in Order: Select and add the scripts sequentially
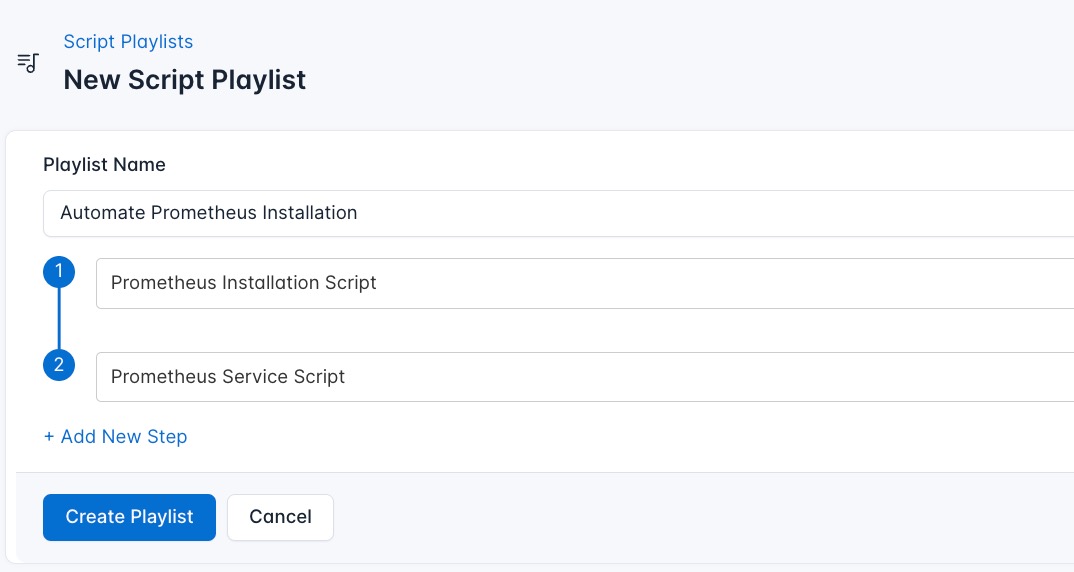
- Save the Playlist: Click “create playlist” to store your new playlist.
Once your script playlist is created, proceed with execution:
- Navigate to Runlogs: In your CloudRay project, go to the Runlogs section in the top menu.
- Create a New Runlog: Click on New Runlog.
- Configure the Runlog: Provide the necessary details:
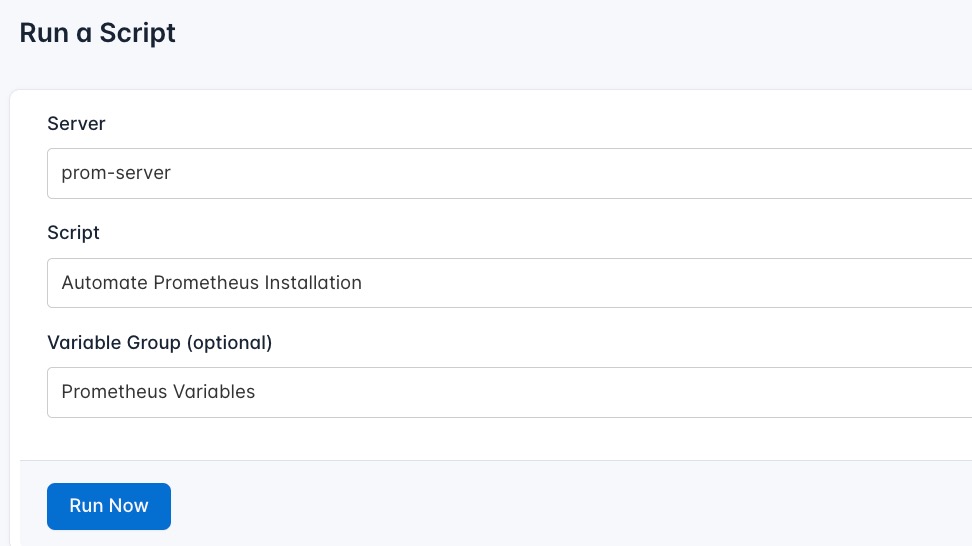
- Server: Select the server where Prometheus will be installed (For example “prom-server”)
- Script Playlist: Choose the playlist you created (For example “Automate Prometheus Installation”)
- Variable Group: Select the variable group you set up earlier
- Execute the Script: Click on Run Now to start the execution
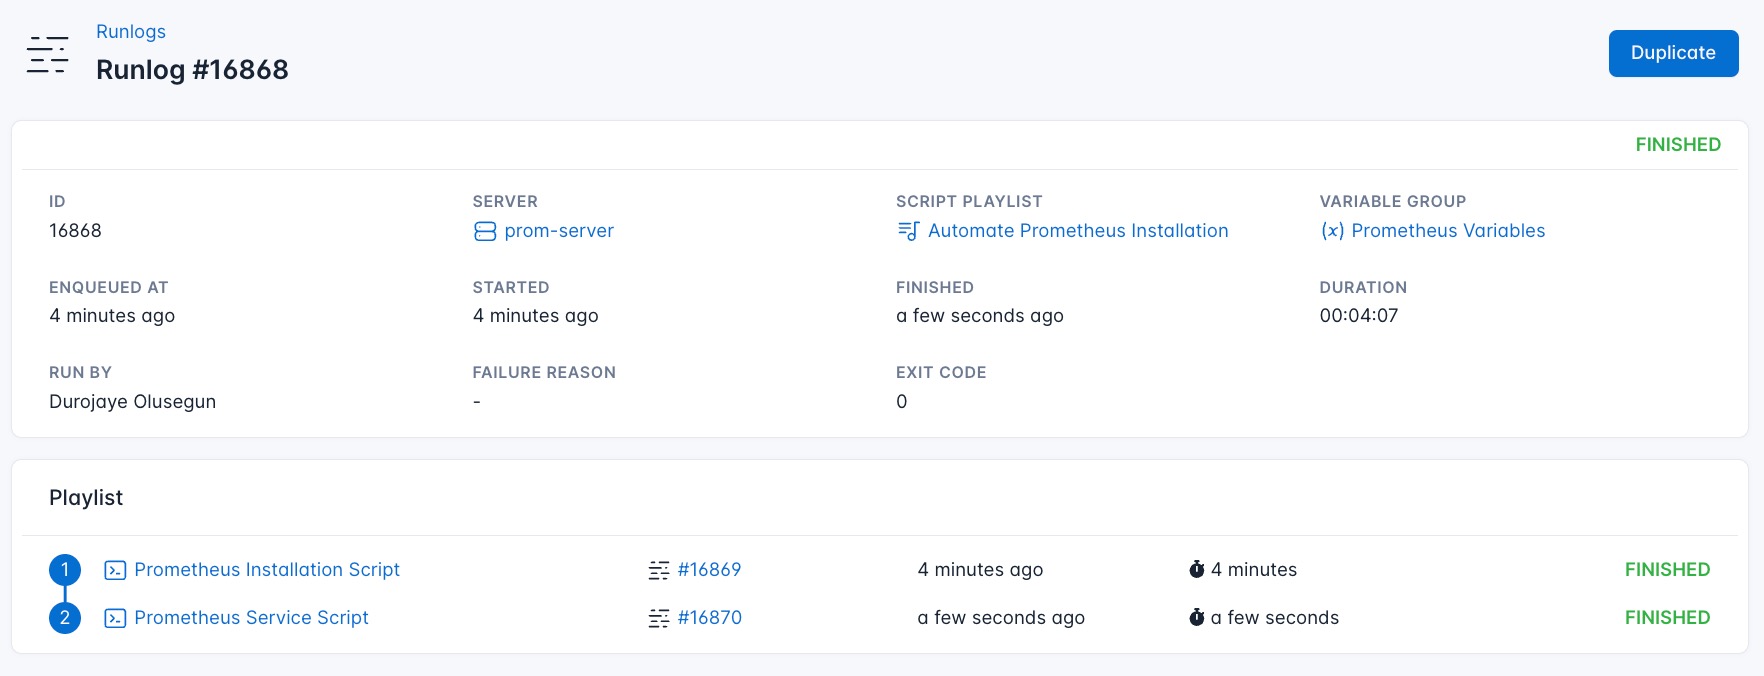
Once the script runs successfully, your Prometheus will be fully installed. You can now visit your Prometheus using your server IP on port 9090 (server-IP:9090).
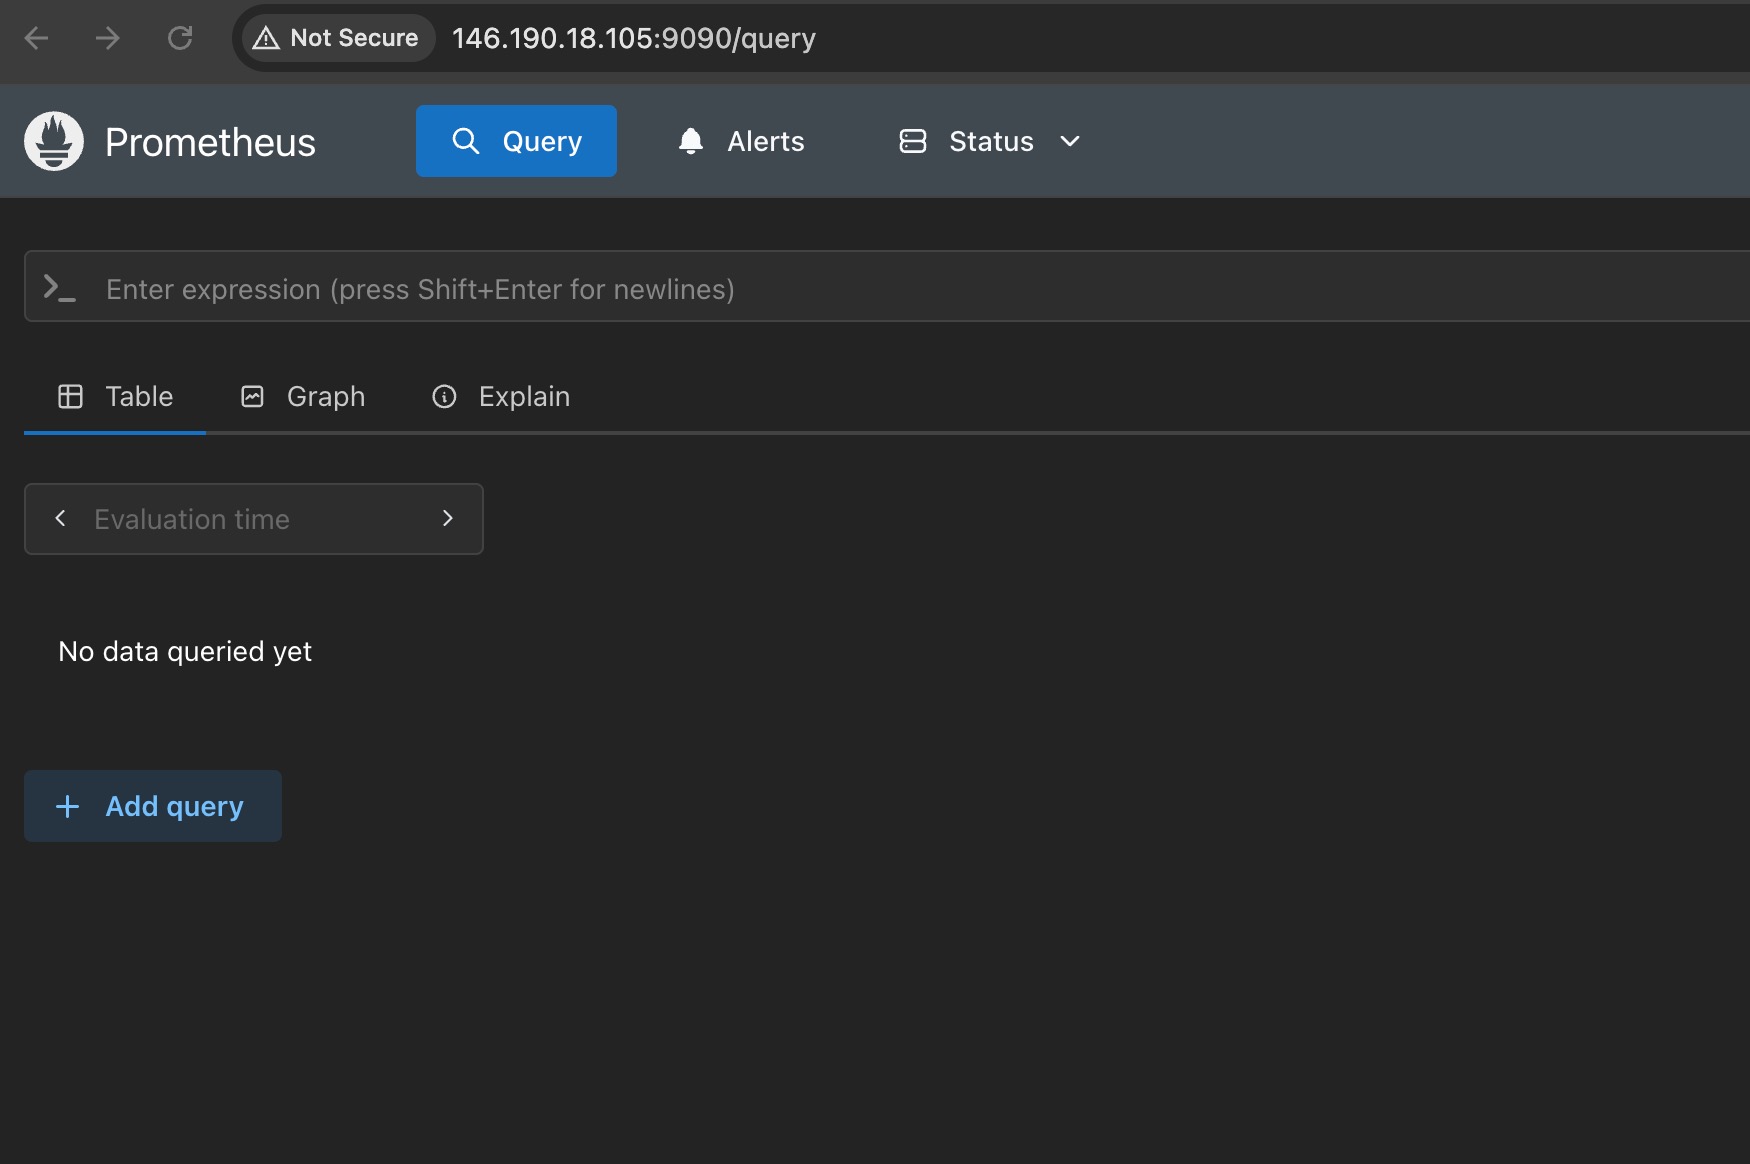
This show that Prometheus is working successfully.

Olusegun Durojaye
CloudRay Engineering Team