
Automating AWS infrastructure is a key practice for modern DevOps teams and cloud engineers. While Infrastructure as Code (IaC) tools like Terraform and CloudFormation have become the industry standard, Bash scripting remains a powerful and accessible way to automate AWS tasks. Bash scripts is especially useful for teams that wants lightweights, fast, and scriptable workflows without the overhead of learning a new Domain Specific Languages (DSL).
In this article, you will learn how to automate common AWS tasks using plain Bash scripts combined with AWS CLI. Whether you’re launching EC2 instances, taking automated EBS snapshots, or setting up monitoring scripts to track CPU utilisation, Bash provides a direct and flexible approach to get things done quickly. At the end, you will learn real-world use case on how to use bash script based automation more effectively using CloudRay a centralised platform for managing, scheduling, executing, and organising your scripts across environments.
Contents
- Automation Use Cases
- Real World Use Case of Automating AWS Infrastructure using CloudRay
- Wrapping Up
Automation Use Cases
AWS automation is not limited to large-scale infrastructure provisioning. With just Bash and the AWS CLI, you can automate a variety of real-world tasks such as launching of instances, backing up data, and monitoring system performance. These use cases are useful when you need a quick scripts to integrate into cron jobs, CI/CD pipelines, or even internal tools.
To follow along, ensure that your AWS CLI is properly installed and configured. If not, refer to the AWS CLI Setup Guide for a complete walkthrough on installing the CLI, creating key pairs, and configuring credentials.
Below are some of the most practical AWS automation tasks you can implement using Bash scripts.
1. Automating EC2 Instance Launch with Bash Script
Automating the creation, termination, and monitoring of EC2 instance is a common use case of AWS infrastructure management. With a simple bash script, you can reduce the manual steps and repeatability especially when managing development, staging, or even short-lived workloads for testing.
To begin, create a bash script file named launch-ec2:
nano launch-ec2Add the following script to the file to launch EC2 instance, wait for it to become available, retrieve public IP address, and list the attached EBS volumes of the instance:
#!/bin/bash

# Launch a new EC2 instance
INSTANCE_ID=$(aws ec2 run-instances \
  --image-id ami-084568db4383264d4 \  # Replace with your preferred AMI
  --count 1 \
  --instance-type t2.micro \
  --key-name my-production-key \      # Replace with your existing key name
  --security-group-ids sg-0269249118de8b4fc \  # Replace with your Security Group ID
  --query 'Instances[0].InstanceId' \
  --output text)

echo "Launched EC2 Instance with ID: $INSTANCE_ID"

# Wait until instance is running
aws ec2 wait instance-running --instance-ids $INSTANCE_ID
echo "Instance is now running."

# Fetch public IP address
PUBLIC_IP=$(aws ec2 describe-instances \
  --instance-ids $INSTANCE_ID \
  --query 'Reservations[0].Instances[0].PublicIpAddress' \
  --output text)

echo "Public IP Address: $PUBLIC_IP"

# Get associated EBS Volume ID
VOLUME_ID=$(aws ec2 describe-instances \
  --instance-ids $INSTANCE_ID \
  --query 'Reservations[0].Instances[0].BlockDeviceMappings[0].Ebs.VolumeId' \
  --output text)

echo "EBS Volume attached to instance: $VOLUME_ID"
Here is what the script does:
- launches an EC2 instance with a specified AMI, instance type, key pair, and security group
- Waits for the instance to become active before proceeding
- Retrieves and display public IP for SSH access or web server testing
- Fetches the EBS Volume ID for later automation (e.g., backup snapshots or monitoring usage)
TIP
Make sure you replace the AMI and security group in the script with your own AMI and security group. To get the AMI, navigate to the EC2 Console, select AMIs from the sidebar, and use filters to locate the Amazon Linux or Ubuntu image you would like to use (copy its AMI ID)
Next, make your script executable:
chmod +x launch-ec2Finally you can run the scripts:
./launch-ec2Your result should look similar to the output below
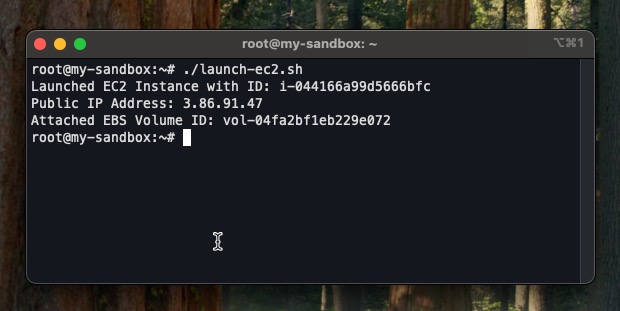
This shows that the instance was created successfully and both the IP address and the EBS volume is displayed. To confirm further, you can check the AWS console.

You can see the EC2 instance running successful.
2. Automating EBS Volume Backups with Bash Script
Another critical automation task is backing up your Elastic Block Store (EBS) volumes. Regular backups ensure you can recover your data in the event of accidental deletion, instance failure, or security breaches.
With a Bash script, you can create snapshots of your EBS volumes on demand or integrate them into a scheduled cron job for automated backups.
To get started, create a script named backup-ebs.sh:
nano backup-ebs.shNow add the following script to automate the creation of a snapshot for a given volume and tag it for easier identification:
#!/bin/bash

# Configuration
VOLUME_ID="vol-04fa2bf1eb229e072"   # Replace with your volume ID
DESCRIPTION="Backup on $(date '+%Y-%m-%d %H:%M:%S')"
TAG_KEY="Purpose"
TAG_VALUE="AutomatedBackup"

echo "Creating snapshot of volume: $VOLUME_ID"

# Create snapshot
SNAPSHOT_ID=$(aws ec2 create-snapshot \
  --volume-id $VOLUME_ID \
  --description "$DESCRIPTION" \
  --query 'SnapshotId' \
  --output text)

echo "Snapshot created with ID: $SNAPSHOT_ID"

# Add tags to the snapshot
aws ec2 create-tags \
  --resources $SNAPSHOT_ID \
  --tags Key=$TAG_KEY,Value=$TAG_VALUE

echo "Snapshot $SNAPSHOT_ID tagged with $TAG_KEY=$TAG_VALUE"
Here is what the script does:
- Takes a snapshot of a specified EBS volume using the AWS CLI
- Adds a human-readable description that includes the date and time of the backup
- Applies tags to the snapshot so you can easily search or filter for it in the AWS console
TIP
To find your EBS Volume ID, go to the EC2 Console → Volumes → and look under the “Volume ID” column. Be sure to copy the correct volume attached to your running instance.
Again, make the script executable:
chmod +x backup-ebs.shFinally, run the script:
./backup-ebs.shIf successful, the output should display the snapshot ID along with a confirmation that it has been tagged
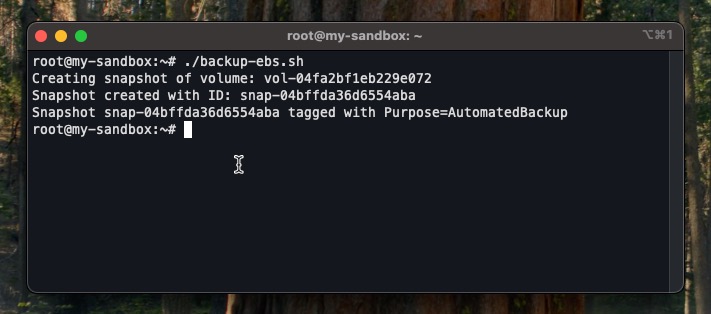
This backup script is a great candidate for CloudRay’s scheduler feature allowing you to run it every day, week, or hour without needing a separate server or cron job setup.
3. Monitoring EC2 CPU Utilisation with Bash Script
System performance monitoring is essential for maintaining the health and stability of your applications. While AWS CloudWatch provides detailed metrics and dashboards, you can also automate metric checks using a simple Bash script
One common metric to monitor is CPU utilisation. By querying CloudWatch, we can track when an EC2 instance’s CPU usage spikes above a defined threshold and respond accordingly.
Start Start by creating a script file named monitor-cpu.sh:
nano monitor-cpu.shThen paste the following code into the file:
#!/bin/bash

# Configuration
INSTANCE_ID="i-044166a99d5666bfc"    # Replace with your instance ID
CPU_THRESHOLD=70                     # Trigger alert if CPU > 70%
TIME_RANGE_MINUTES=60                # How far back to check

# Fetch CPU Utilisation
CPU_UTILISATION=$(aws cloudwatch get-metric-statistics \
  --namespace AWS/EC2 \
  --metric-name CPUUtilisation \
  --statistics Maximum \
  --period 300 \
  --start-time $(date -u -d "$TIME_RANGE_MINUTES minutes ago" +%Y-%m-%dT%H:%M:%S) \
  --end-time $(date -u +%Y-%m-%dT%H:%M:%S) \
  --dimensions Name=InstanceId,Value=$INSTANCE_ID \
  --query 'Datapoints | sort_by(@, &Timestamp)[-1].Maximum' \
  --output text)

# Show retrieved metric
echo "CPU Utilisation for instance $INSTANCE_ID: $CPU_UTILIZATION%"

# Check against threshold
if (( $(echo "$CPU_UTILISATION > $CPU_THRESHOLD" | bc -l) )); then
  echo "⚠️  High CPU alert: $INSTANCE_ID at $CPU_UTILISATION%"
else
  echo "✅ CPU usage is within safe range."
fi
Here is what the script does:
- Retrieves the maximum CPU utilisation from the last hour for a specific EC2 instance using CloudWatch metrics
- Compares it to a defined threshold (For example, 70%)
- Prints an alert if the usage exceeds the threshold, or a success message if within range
Make the script executable:
chmod +x monitor-cpu.shFinally, run the script:
./monitor-cpu.shYour result would be similar to the below
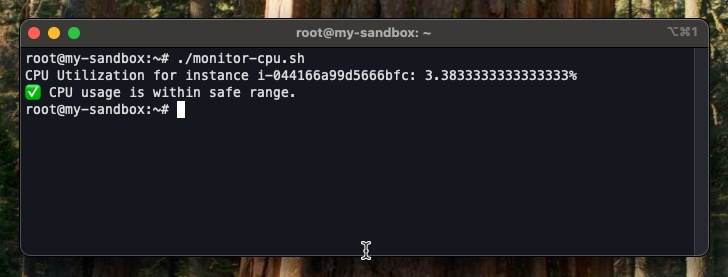
This lightweight monitoring script is perfect for integrating with a scheduled task on CloudRay. You can set it to run every 15 minutes and trigger custom actions like Slack alerts, emails, or remediation scripts whenever thresholds are breached.
Real World Use Case of Automating AWS Infrastructure using CloudRay
While Bash scripting gives you a powerful tool to automate AWS tasks locally, managing and reusing these scripts across environments becomes tedious without a centralised system. That is where CloudRay comes in.
CloudRay provides a Scripts dashboard where you can centrally manage, execute, and reuse your infrastructure automation scripts without relying on manual CLI or scattered cron jobs. it supports scheduling, allowing you to trigger EC2 provisioning or any AWS operation at predefined times.
Let’s walk through a real-world scenario where a DevOps engineer needs to launch a pre-configured EC2 instance every morning for development testing.
EC2 Instance Launch with Auto-Tagging and Bootstrapping
Before getting started, make sure your target servers are connected to CloudRay. If you haven’t done this yet, follow our servers docs to add and manage your server.
You can follow the below steps to create the script in CloudRay:
- Create a CloudRay account at https://app.cloudray.io/
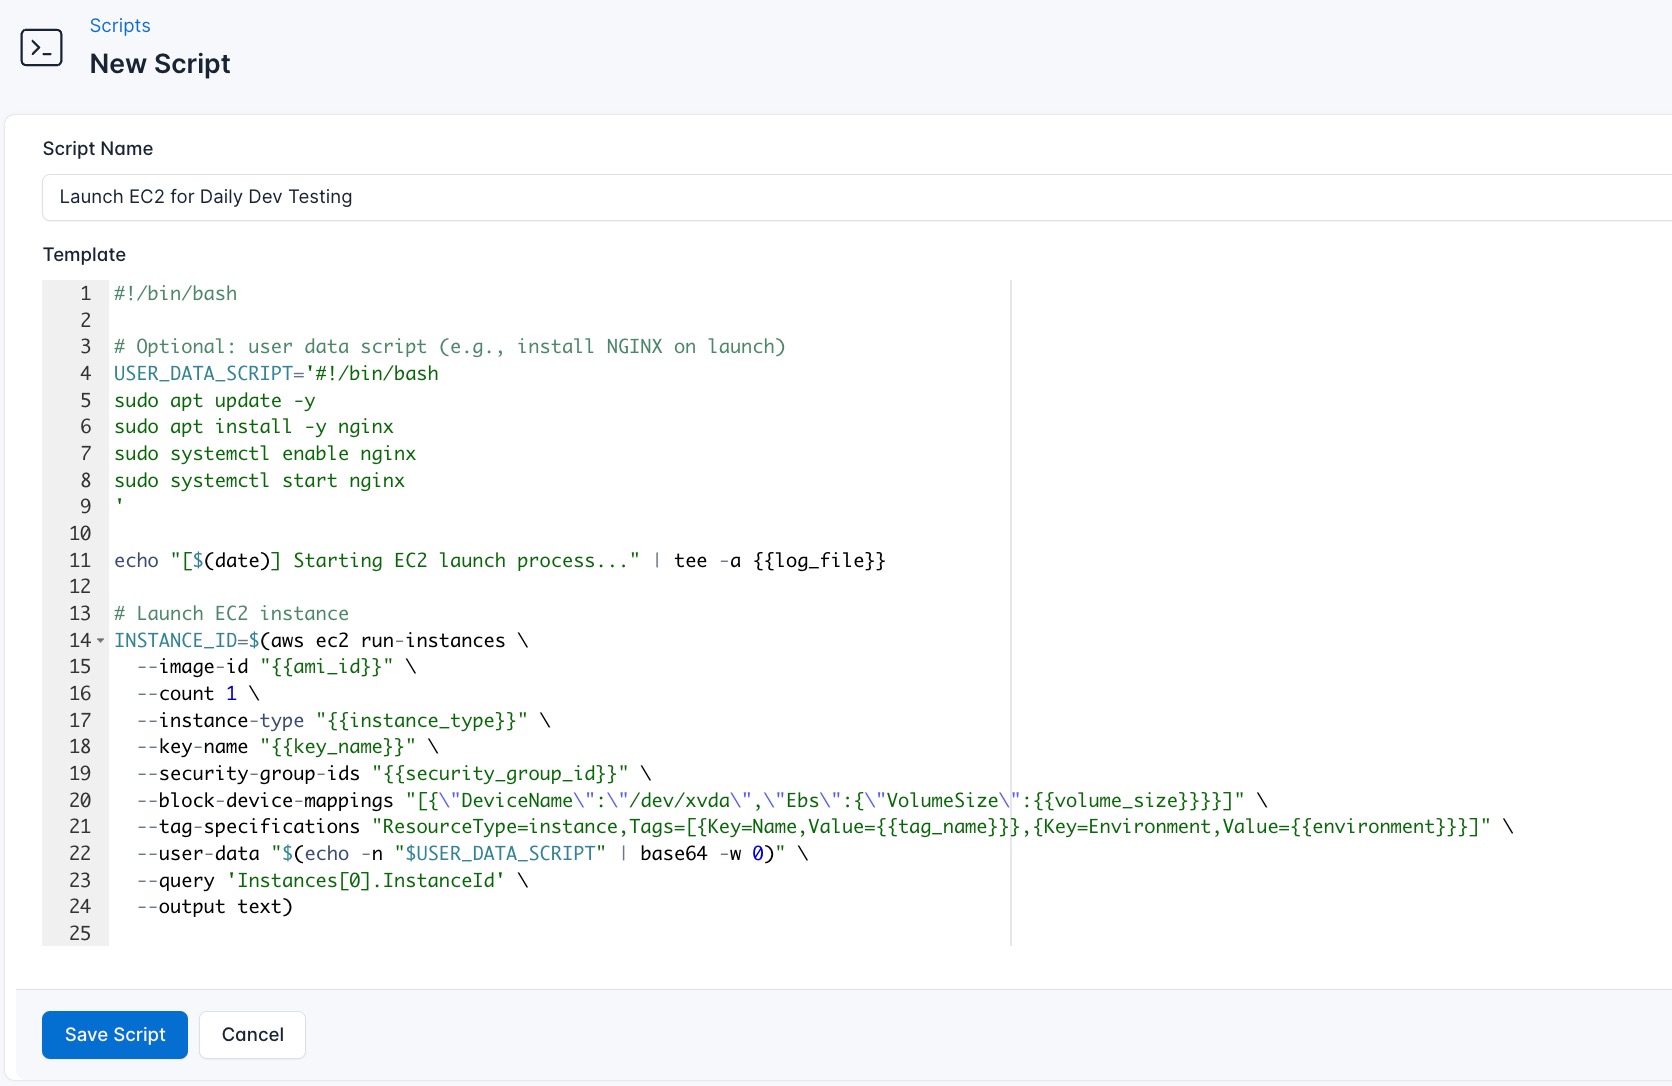
- Go to Scripts > New Script
- Name:
Launch EC2 for Daily Dev Testing - Add code:
#!/bin/bash

# Optional: user data script (e.g., install NGINX on launch)
USER_DATA_SCRIPT='#!/bin/bash
sudo apt update -y
sudo apt install -y nginx
sudo systemctl enable nginx
sudo systemctl start nginx
'

echo "[$(date)] Starting EC2 launch process..." | tee -a {{log_file}}

# Launch EC2 instance
INSTANCE_ID=$(aws ec2 run-instances \
  --image-id "{{ami_id}}" \
  --count 1 \
  --instance-type "{{instance_type}}" \
  --key-name "{{key_name}}" \
  --security-group-ids "{{security_group_id}}" \
  --block-device-mappings "[{\"DeviceName\":\"/dev/xvda\",\"Ebs\":{\"VolumeSize\":{{volume_size}}}}]" \
  --tag-specifications "ResourceType=instance,Tags=[{Key=Name,Value={{tag_name}}},{Key=Environment,Value={{environment}}}]" \
  --user-data "$(echo -n "$USER_DATA_SCRIPT" | base64 -w 0)" \
  --query 'Instances[0].InstanceId' \
  --output text)

if [[ -z "$INSTANCE_ID" ]]; then
  echo "[$(date)] Failed to launch instance." | tee -a {{log_file}}
  exit 1
fi

echo "[$(date)] Launched instance: $INSTANCE_ID" | tee -a {{log_file}}

# Wait until running
echo "[$(date)] Waiting for instance to enter running state..." | tee -a {{log_file}}
aws ec2 wait instance-running --instance-ids "$INSTANCE_ID"
echo "[$(date)] Instance is running." | tee -a {{log_file}}

# Fetch public IP
PUBLIC_IP=$(aws ec2 describe-instances \
  --instance-ids "$INSTANCE_ID" \
  --query 'Reservations[0].Instances[0].PublicIpAddress' \
  --output text)

LAUNCH_TIME=$(aws ec2 describe-instances \
  --instance-ids "$INSTANCE_ID" \
  --query 'Reservations[0].Instances[0].LaunchTime' \
  --output text)

echo "[$(date)] Public IP Address: $PUBLIC_IP" | tee -a {{log_file}}
echo "[$(date)] Launch Time: $LAUNCH_TIME" | tee -a {{log_file}}

# Output summary
echo ""
echo "================= EC2 Instance Launched ================="
echo "Instance ID : $INSTANCE_ID"
echo "Public IP   : $PUBLIC_IP"
echo "Launch Time : $LAUNCH_TIME"
echo "Tag Name    : {{tag_name}}"
echo "Environment : {{environment}}"
echo "========================================================"
This script provisions a fully tagged EC2 instance, installs NGINX on launch, and logs key metadata for auditing or monitoring.
Before running the scripts, you need to define values for the placeholders {{ami_id}}, {{instance_type}}, {{key_name}} {{security_group_id}}, and {{volume_size}} used in the scrips. CloudRay processes all scripts as Liquid templates. This allows you to use variables dynamically across different servers.
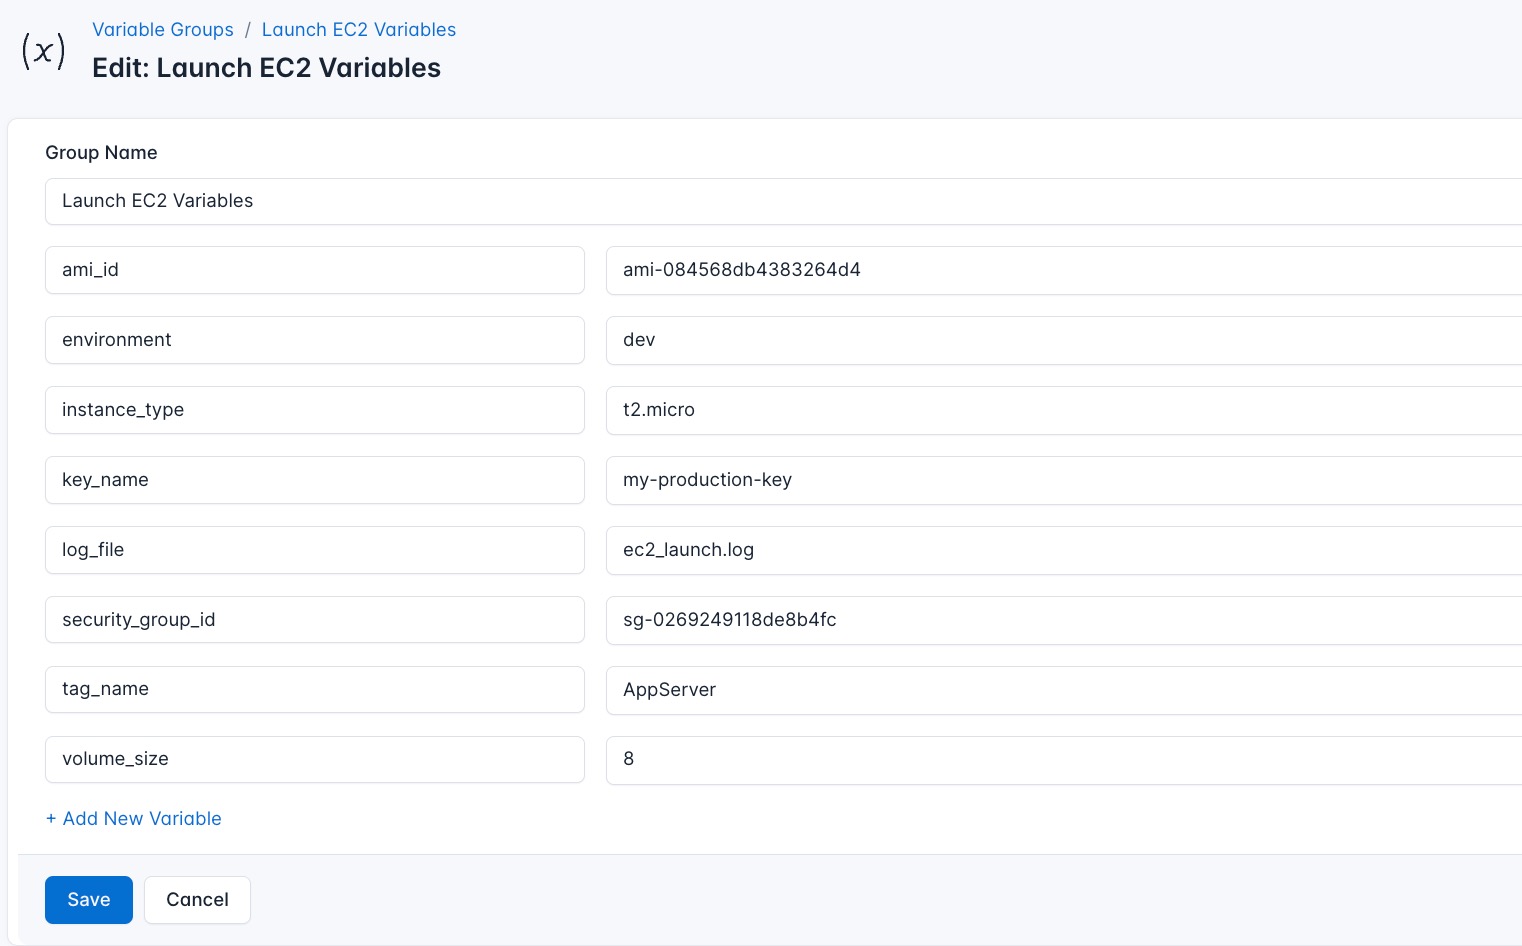
To ensure that these values are automatically substituted when the script runs, follow these steps to create a variable Group:
- Navigate to Variable Groups: In your CloudRay project, go to “Scripts” in the top menu and click on “Variable Groups”.
- Create a new Variable Group: Click on “Variable Group”.
- Add the following variables:
ami_id: This is the AMI ID of your instance type (In this case it could be Ubuntu or any other operating system)instance_type: This is the type of instance you want to usekey_name: The name of your private key in your AWS accountsecurity_group_id: This is your security group IDvolume_size: The size of your EBS volume in GB
You can choose to run the script using CloudRay’s Script Playlists.
CloudRay uses Runlogs to execute scripts on your servers while providing real-time logs of the execution process.
To run the Launch EC2 for Daily Dev Testing, follow these steps:
- Navigate to Runlogs: In your CloudRay project, go to the Runlogs section in the top menu.
- Create a New Runlog: Click on New Runlog.
- Configure the Runlog: Fill in the required details:
- Server: Select the server you added earlier.
- Script: Choose the “Launch EC2 for Daily Dev Testing”
- Variable Group (optional): Select the variable group you created earlier.
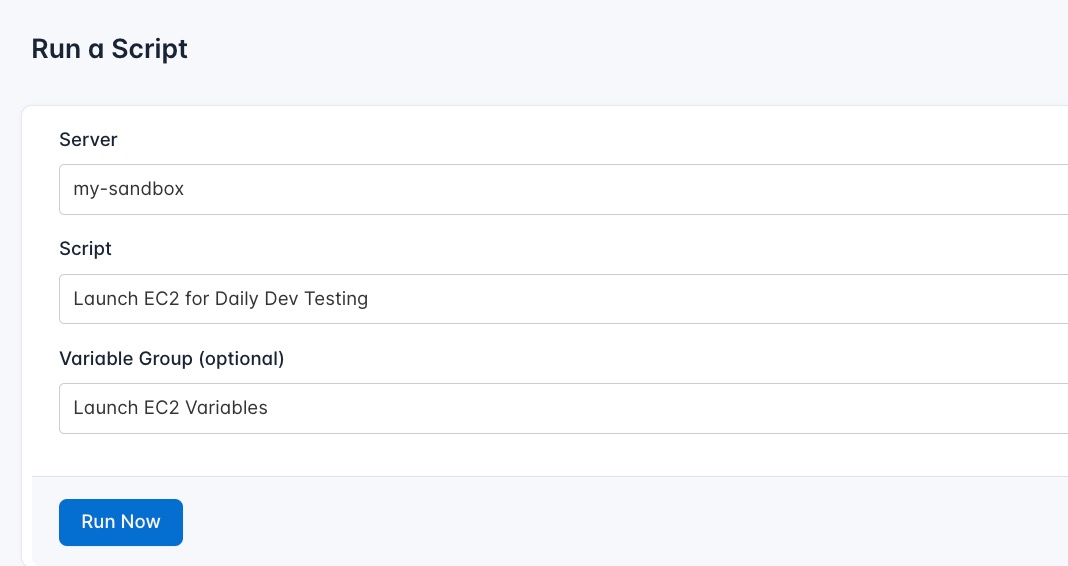
- Execute the Script: Click on Run Now to start the execution.
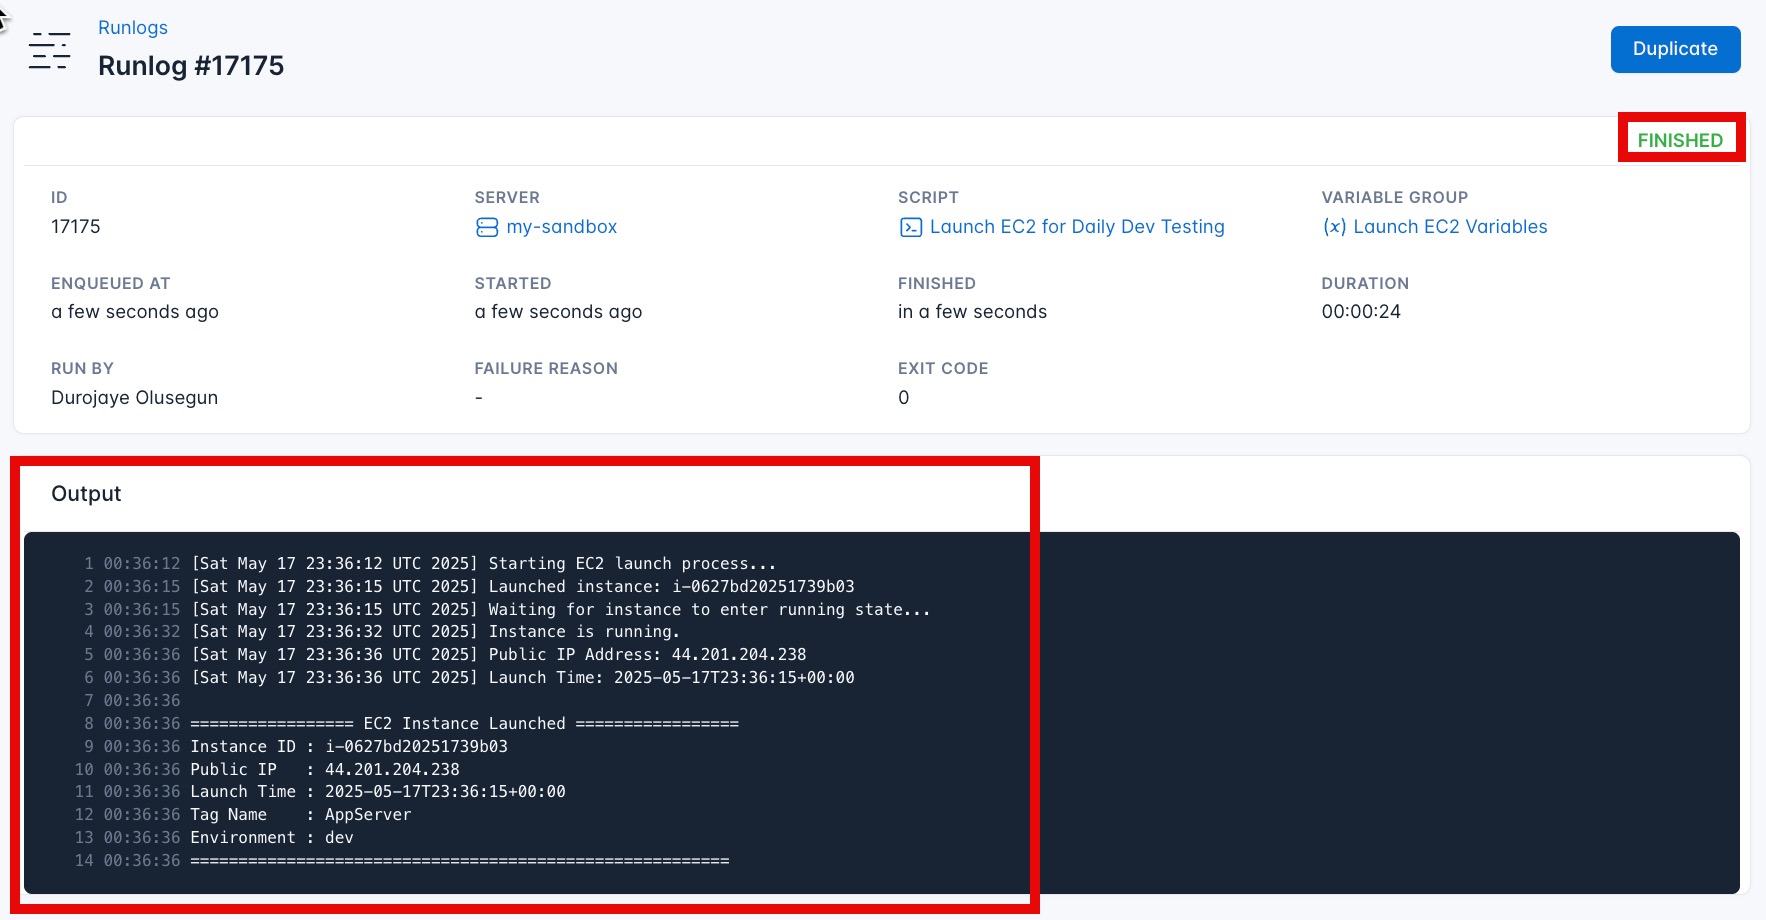
CloudRay will automatically connect to your server, run the Launch EC2 for Daily Dev Testing, and provide live logs to track the process. If any errors occur, you can review the logs to troubleshoot the issue.
You can Verify the instance also from the AWS console.

Running the Script on a Schedule with CloudRay
CloudRay also offers Schedules, allowing you to execute scripts automatically at specific intervals or times.
To execute this script daily at 8:00 AM without manual effort:
- Navigate to Schedules: In your CloudRay dashboard, go to the “Schedules” tab.

- Click “Add Schedule”: Start creating a new schedule.
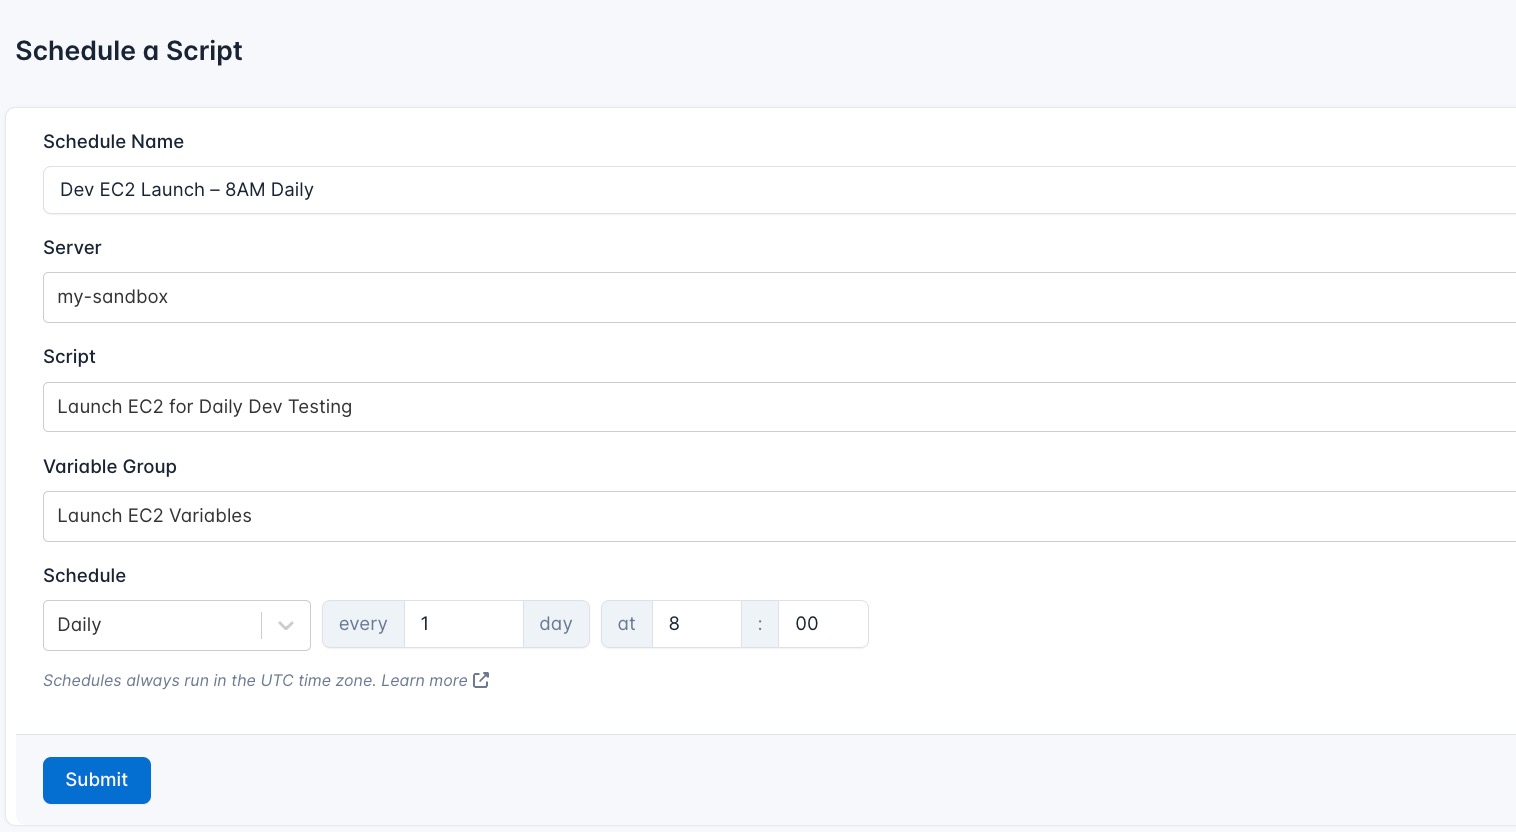
- Submit Schedule: Click “Submit” to activate your new schedule.
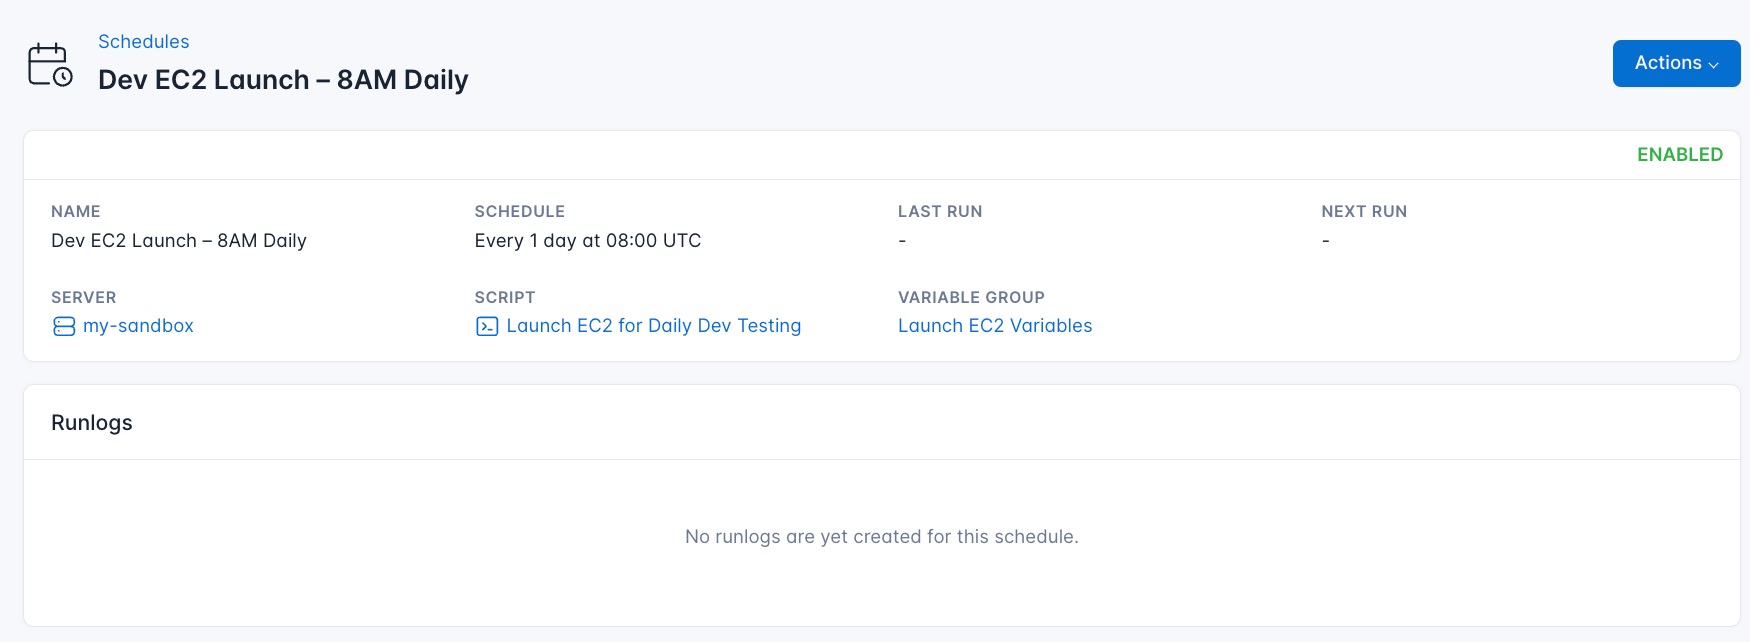
CloudRay will automatically execute the backup script at the scheduled time, ensuring that your EC2 instance is launched regularly everyday at 8AM.
Wrapping Up
Bash scripting provides a lightweight yet powerful way to automate AWS infrastructure tasks like EC2 provisioning, EBS backups, and performance monitoring. By combining these scripts with CloudRay’s scheduling and central management, you can build reliable, automated workflows without complex tooling. Start with the examples provided, customize them for your needs, and explore more automation possibilities.
Start today by signing up at https://app.cloudray.io and manage your bash scripts in a centralised platform.

Olusegun Durojaye
CloudRay Engineering Team