
CloudRay provides an automation-friendly approach to deploying static websites on Ubuntu servers, making it a great choice for hosting static sites.
In this guide, you will learn the process of deploying a simple static website(HTML/CSS) using CloudRay. We’ll create an automation Bash script to set up the website structure, configure Caddy as the web server, and deploy the website with a script. By the end, your website will be live on a custom domain with HTTPS support.
NOTE
If you want to learn how to deploy a static website from GitHub using CloudRay, check out our guide on How to Deploy a Static Website From GitHub Using CloudRay.
Contents
- Adding Servers to CloudRay
- Assumptions
- Create the Automation Script
- Create a Variable Group
- Running the Script with CloudRay
- Troubleshooting
Adding Servers to CloudRay
Before getting started with your automation, make sure your target servers are connected to CloudRay. If you haven’t done this yet, follow our servers docs to add and manage your server
NOTE
This guide uses Bash scripts, providing a high degree of customisation. You can modify these scripts based on your environment and deployment needs
Assumptions
- This guide assumes you’re using Ubuntu 24.04 LTS as your server’s operating system. If you’re using a different version or a different distribution, adjust the commands accordingly.
- Your domain name is “mywebsite.com” (replace it with your actual domain)
Create the Automation Script
This guide is ideal for very small projects or quick prototypes. It involves writing HTML and CSS directly in a script.
To simplify deployment, we will create two Bash scripts:
- Website Setup Script: This script will create the website structure with HTML and CSS files
- Website Deployment Script: This script will install Caddy as a web server and deploy the website
Let’s begin with the simple website setup.
Website Setup Script
To create the website setup script, you need to follow these steps:
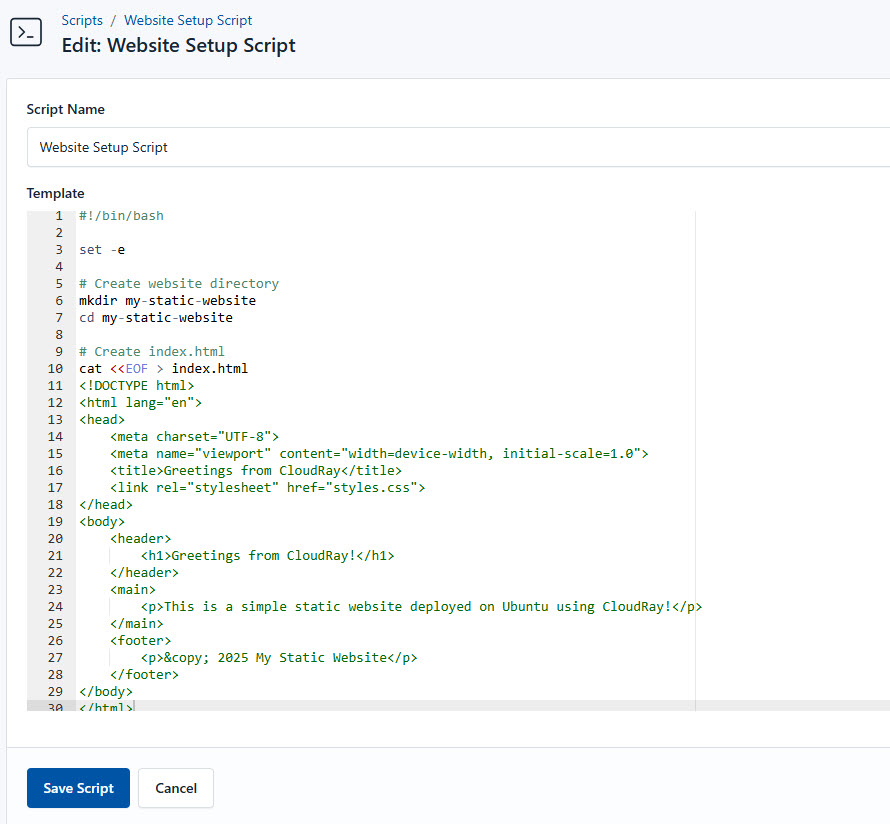
- Go to Scripts in your CloudRay project
- Click New Script
- Name:
Website Setup Script. You can give it any name of your choice - Copy this code:
#!/bin/bash
# Exit on error
set -e
# Create website directory
mkdir my-static-website
cd my-static-website
# Create index.html
cat <<EOF > index.html
<!DOCTYPE html>
<html lang="en">
<head>
<meta charset="UTF-8">
<meta name="viewport" content="width=device-width, initial-scale=1.0">
<title>Greetings from CloudRay</title>
<link rel="stylesheet" href="styles.css">
</head>
<body>
<header>
<h1>Greetings from CloudRay!</h1>
</header>
<main>
<p>This is a simple static website deployed on Ubuntu using CloudRay!</p>
</main>
<footer>
<p>© 2025 My Static Website</p>
</footer>
</body>
</html>
EOF
# Create styles.css
cat <<EOF > styles.css
body {
font-family: Arial, sans-serif;
margin: 0;
padding: 0;
background-color: #f4f4f4;
color: #333;
}
header {
background-color: #333;
color: #fff;
padding: 20px;
text-align: center;
}
main {
padding: 20px;
text-align: center;
}
footer {
background-color: #333;
color: #fff;
text-align: center;
padding: 10px;
position: fixed;
bottom: 0;
width: 100%;
}
EOF
# Go back to home directory
cd ~
echo "Setup completed!!!"Here is a breakdown of what each command in the Website Setup Script does:
- Creates a directory named
my-static-websiteto store the website files - Navigates into the newly created directory
- Generates an
index.htmlfile with basic HTML content - Creates a
styles.cssfile for styling - Moves back to the home directory after setting up the files
Website Deployment Script
After setting up the simple website, you can deploy the website using Caddy.
Similarly, follow these steps to create the deployment script:
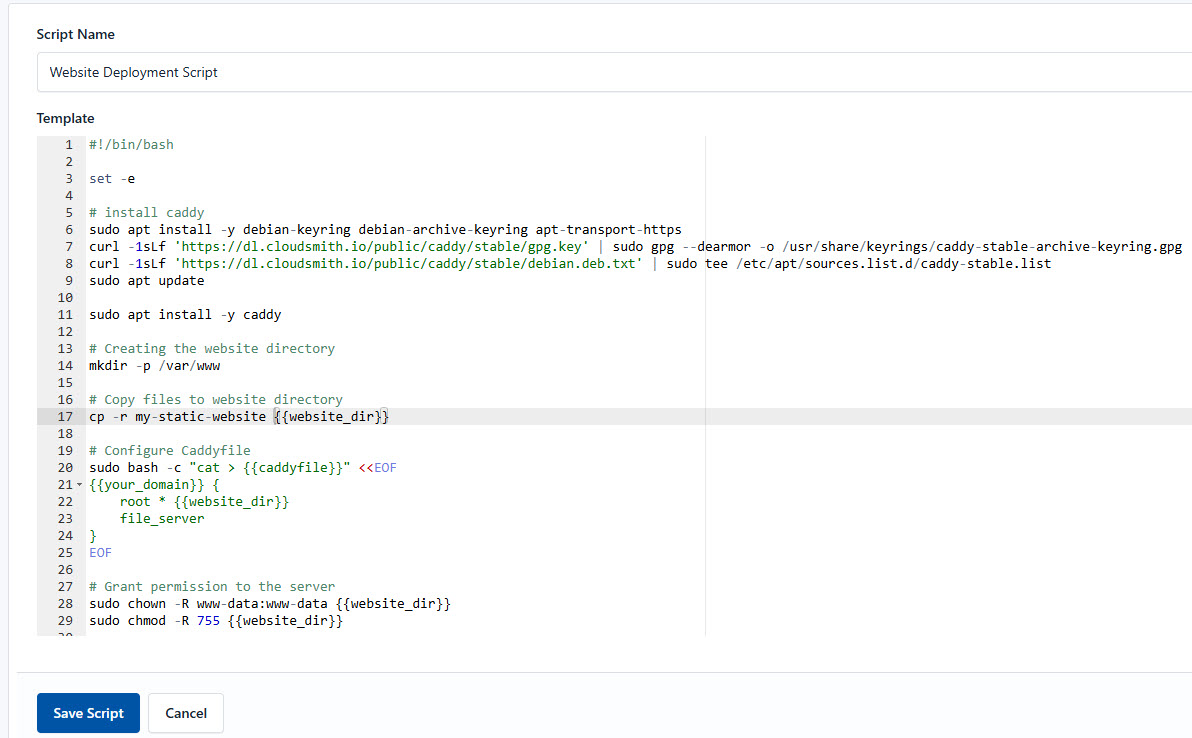
- Go to Scripts > New Script
- Name:
Website Deployment Script - Add code:
#!/bin/bash
# Exit on error
set -e
# install caddy
sudo apt install -y debian-keyring debian-archive-keyring apt-transport-https
curl -1sLf 'https://dl.cloudsmith.io/public/caddy/stable/gpg.key' | sudo gpg --dearmor -o /usr/share/keyrings/caddy-stable-archive-keyring.gpg
curl -1sLf 'https://dl.cloudsmith.io/public/caddy/stable/debian.deb.txt' | sudo tee /etc/apt/sources.list.d/caddy-stable.list
sudo apt update
sudo apt install -y caddy
# Creating the website directory
mkdir -p /var/www
# Copy files to website directory
cp -r my-static-website {{website_dir}}
# Configure Caddyfile
sudo bash -c "cat > {{caddyfile}}" <<EOF
{{your_domain}} {
root * {{website_dir}}
file_server
}
EOF
# Grant permission to the server
sudo chown -R www-data:www-data {{website_dir}}
sudo chmod -R 755 {{website_dir}}
# Reload Caddy
sudo systemctl reload caddy
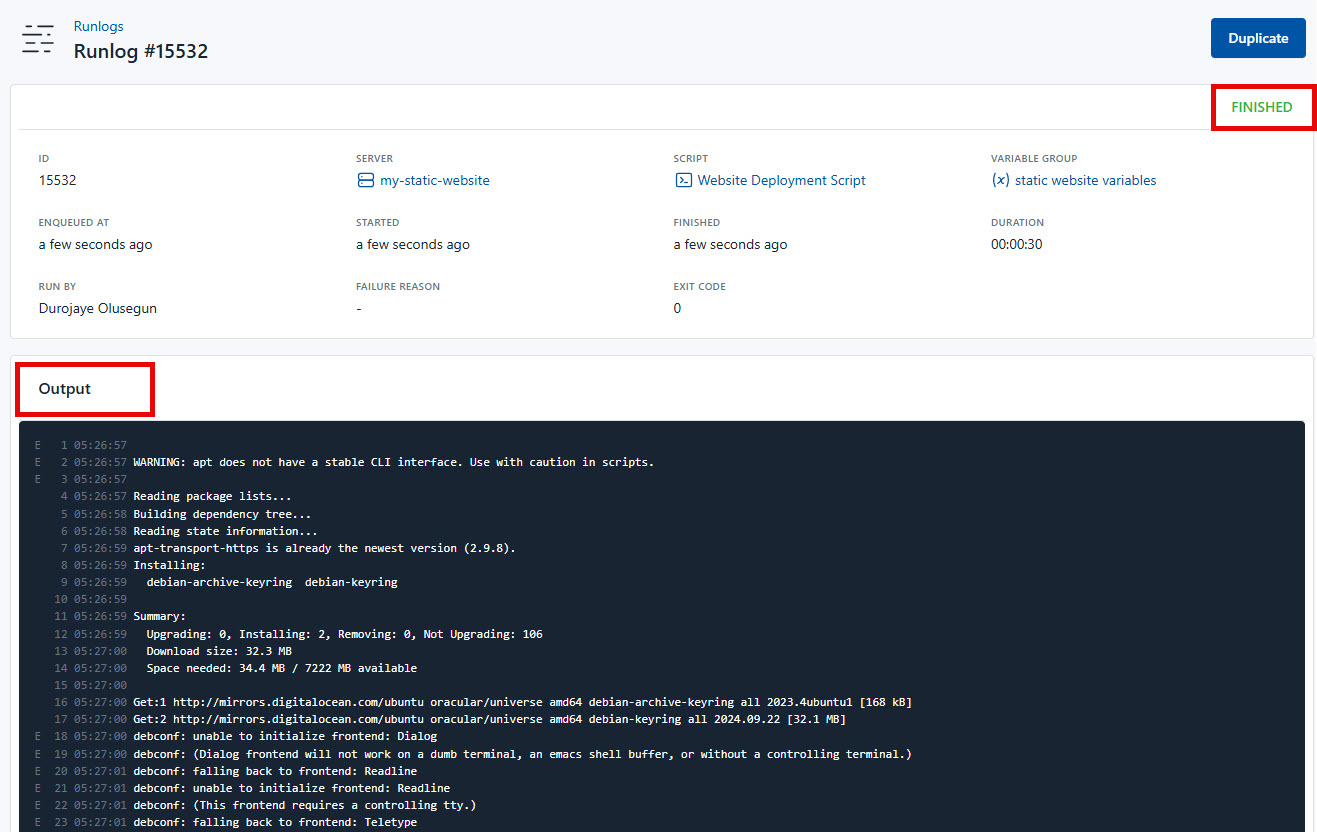
echo "Website deployed! Visit: http://mywebsite.com or https://mywebsite.com"This is what the Website Deployment Script does:
- Installs the necessary dependencies for the Caddy web server, and install Caddy server
- Copies the website files from
my-static-websiteto/var/www/my-static-website - Configures Caddy to serve the website using a domain name (mywebsite.com)
- Changes ownership of the website directory to www-data (web server user)
- Sets permissions to allow public access to the files
- Reloads the Caddy server to apply changes
Next, you need to create a variable group and run these scripts using CloudRay.
Create a Variable Group
Now, before running the scripts, you need to define values for the placeholders {{website_dir}}, {{caddyfile}}, and {{your_domain}} used in the scrips. CloudRay processes all scripts as Liquid templates. This allows you to use variables dynamically across different servers.
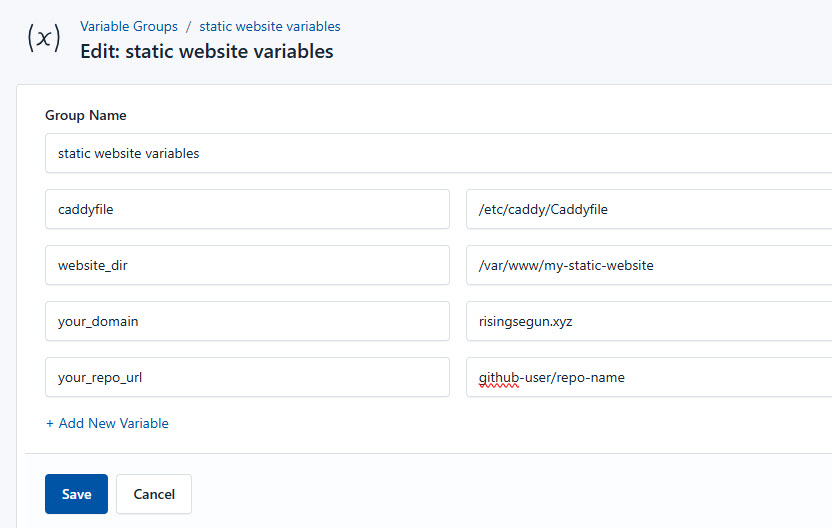
To ensure that these values are automatically substituted when the script runs, follow these steps to create a variable group:
- Navigate to Variable Groups: In your CloudRay project, go to “Scripts” in the top menu and click on “Variable Groups”.
- Create a new Variable Group: Click on “Variable Group”.
- Add the following variables:
website-dir: This specifies the directory where the website files are locatedcaddyfile: This specifies the path to the Caddy web server’s configuration fileyour_domain: This specifies your registered domainyour_repo_url: The URL of your GitHub repository (Example, https://github.com/GeoSegun/html-css-website.git)
Since the variables are setup, you can now run the scripts with CloudRay.
Running the Script with CloudRay
You can choose to run the scripts individually or execute them all at once using CloudRay’s Script Playlists. If you prefer to run them individually, follow these steps:
Run the setup script
CloudRay uses Runlogs to execute scripts on your servers while providing real-time logs of the execution process.
To run the Website Setup Script, follow these steps:
- Navigate to Runlogs: In your CloudRay project, go to the Runlogs section in the top menu.
- Create a New Runlog: Click on New Runlog.
- Configure the Runlog: Fill in the required details:
- Server: Select the server you added earlier.
- Script: Choose the “Website Setup Script”
- Variable Group (optional): Select the variable group you created earlier.
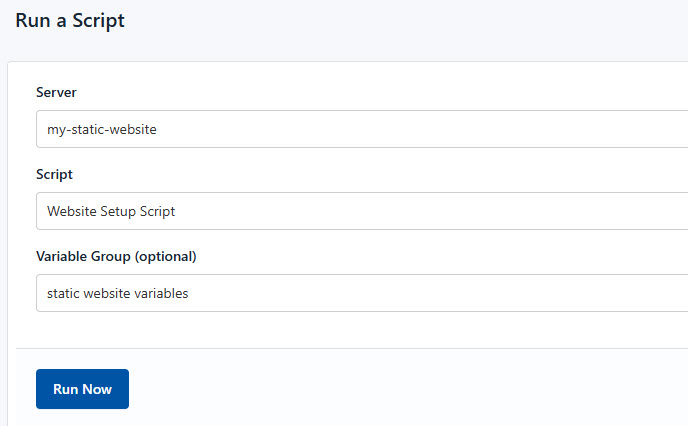
- Execute the Script: Click on Run Now to start the execution.
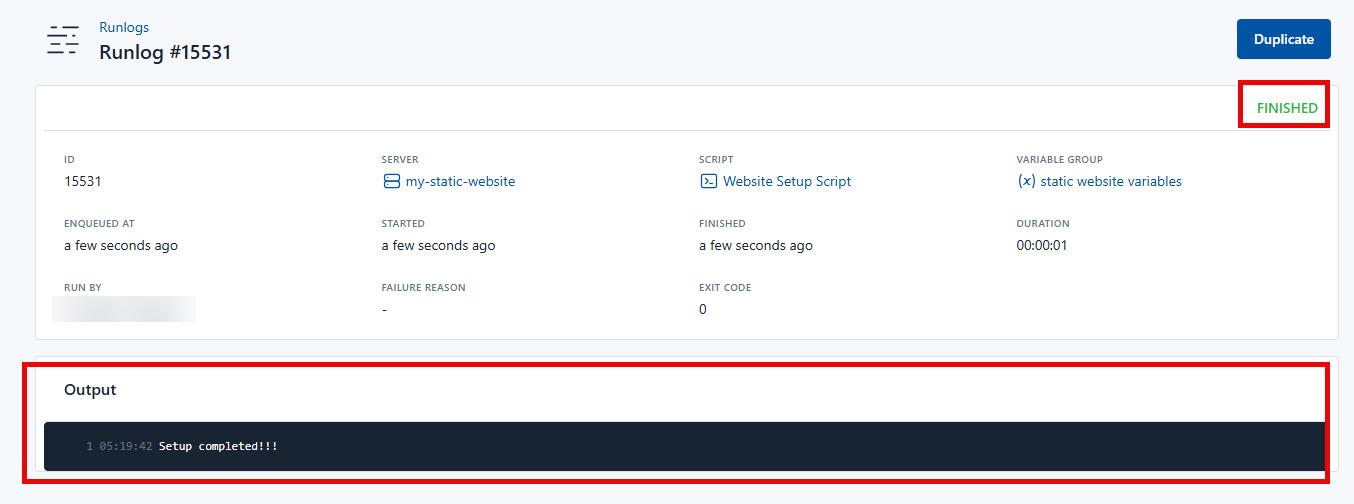
CloudRay will automatically connect to your server, run the Website Setup Script, and provide live logs to track the process. If any errors occur, you can review the logs to troubleshoot the issue.
Run the Deployment script
After successfully running the Website Setup Script, the next step is to execute the Website Deployment Script using CloudRay’s Runlogs. This script will configure and deploy your website on the server.
To run the Deployment Script, follow these steps:
- Navigate to Runlogs: In your CloudRay project, go to the Runlogs section in the top menu.
- Create a New Runlog: Click on New Runlog.
- Configure the Runlog: Provide the necessary details:
- Server: Select the same server used earlier.
- Script: Choose the “Website Deployment Script”.
- Variable Group: Select the variable group you created earlier.
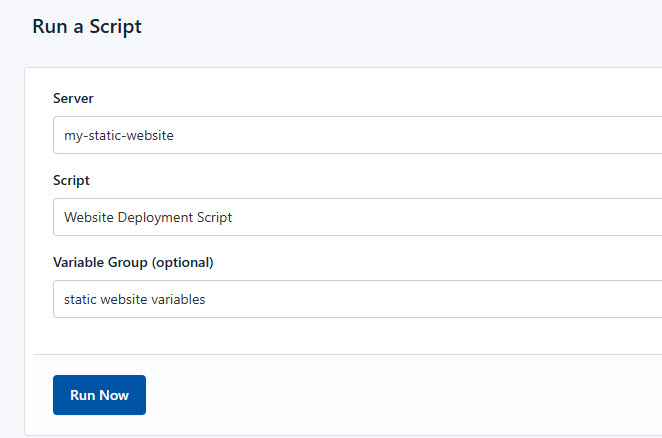
- Execute the Script: Click on Run Now to deploy your application.
Once the script runs successfully, your application will be fully deployed. You can now visit your application securely using your configured domain (https://yourdomain.com).
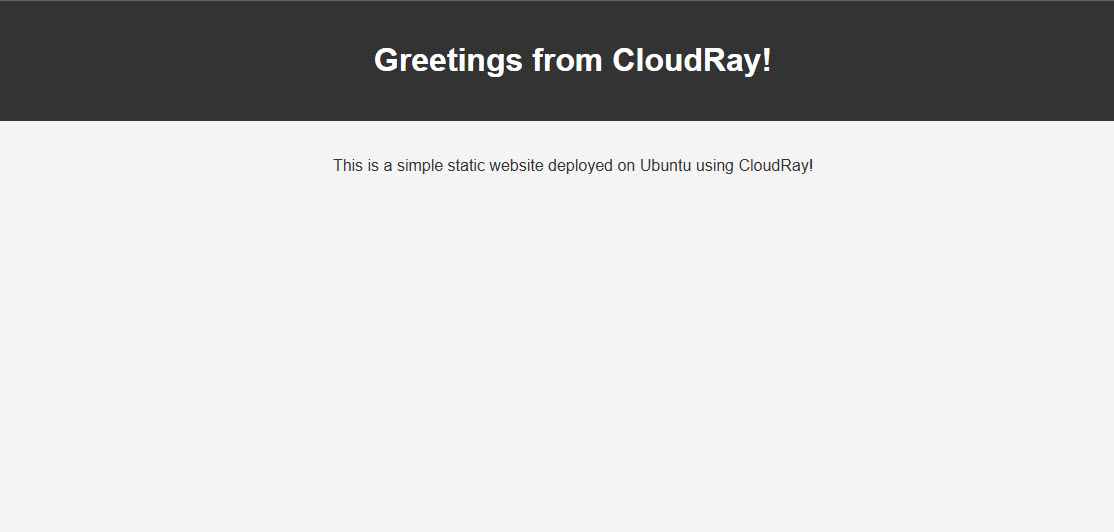
Your simple website (HTML/CSS) is now securely deployed and managed with CloudRay. That’s it! Happy deploying!
Troubleshooting
If you encounter issues during deployment, consider the following:
- Ensure your domain is properly registered and set the A record to point to your server’s IP address
- Verify that all necessary environment variables are correctly set on your CloudRay variable Group

Olusegun Durojaye
CloudRay Engineering Team