
IMPORTANT
Before implementation, make sure you have Nagios deployed on a separate server. However, if you want to automate the installation of Nagios, follow our guide on How to Automate the Installation of Nagios.
After setting up Nagios, you can extend its capabilities by monitoring remote hosts. This guide covers how to use CloudRay to automate configuring a remote Linux host and the Nagios server to track key metrics such as system load, active processes, and SSH status.
Contents
- Adding Servers to CloudRay
- Assumptions
- Setup NRPE on Remote Server
- Configure Nagios Server to Monitor Remote Server
- Running the Scripts with CloudRay
Adding Servers to CloudRay
Before getting started, make sure your target servers are connected to CloudRay. If you haven’t done this yet, follow our servers docs to add and manage your server
NOTE
This guide uses Bash scripts, providing a high degree of customisation. You can adapt the scripts to fit your specific Installations needs and environment.
Assumptions
- This guide assumes your Nagios is deployed already on Rocky Linux 9 and the Remote server to Monitor is using Ubuntu 24.04 LTS as your server’s operating system. If you’re using a different version or a different distribution, adjust the commands accordingly
Setup NRPE on Remote Server
To monitor a remote host, start by setting up NRPE on the remote-server. Create a new script in CloudRay:
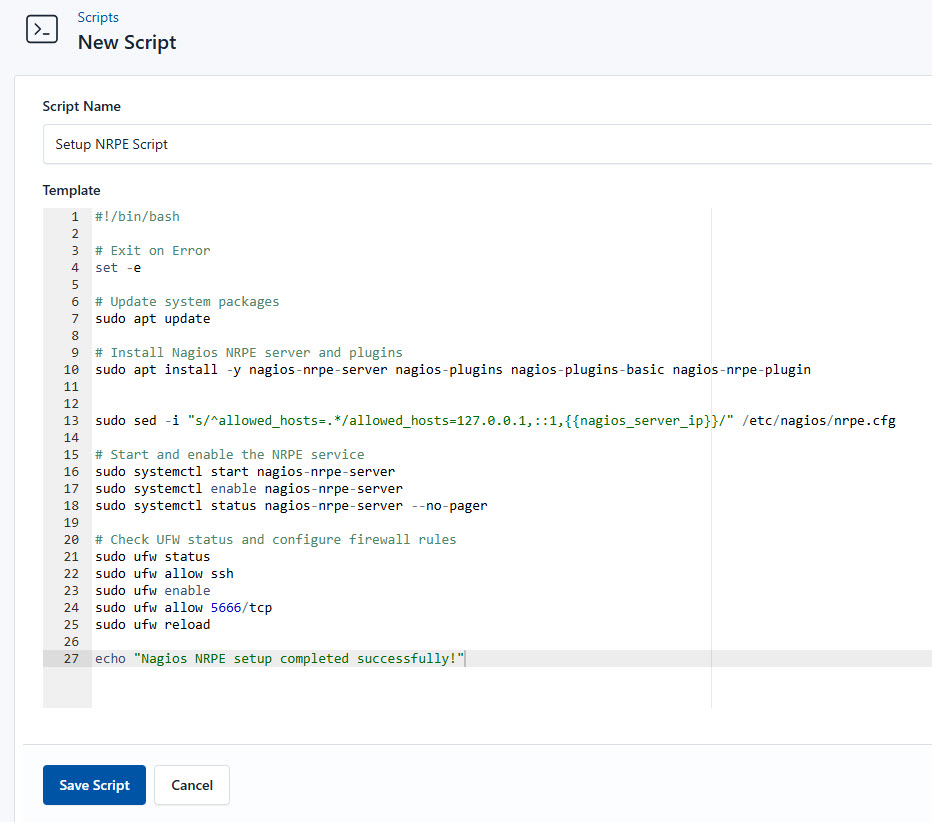
- Go to Scripts → New Script
- Name it
Setup NRPE Script - Add the following script:
#!/bin/bash

# Exit on error
set -e

# Update system packages
sudo apt update

# Install Nagios NRPE server and plugins
sudo apt install -y nagios-nrpe-server nagios-plugins nagios-plugins-basic nagios-nrpe-plugin


sudo sed -i "s/^allowed_hosts=.*/allowed_hosts=127.0.0.1,::1,{{nagios_server_ip}}/" /etc/nagios/nrpe.cfg

# Start and enable the NRPE service
sudo systemctl start nagios-nrpe-server
sudo systemctl enable nagios-nrpe-server
sudo systemctl status nagios-nrpe-server --no-pager

# Check UFW status and configure firewall rules
sudo ufw status
sudo ufw allow ssh
yes | sudo ufw enable
sudo ufw allow 5666/tcp
sudo ufw reload

echo "Nagios NRPE setup completed successfully!"
Here is a breakdown of what each command in the Setup NRPE Script does:
- Updates all installed packages
- Installs NRPE and the necessary Nagios plugins
- Configures NRPE to accept connections from the nagios-server IP address.
- Starts and enables the NRPE service
Configure Nagios Server to Monitor Remote Server
After setting up NRPE on the remote server, you need to configure the Nagios server to monitor it.
You can follow similar steps as the above:
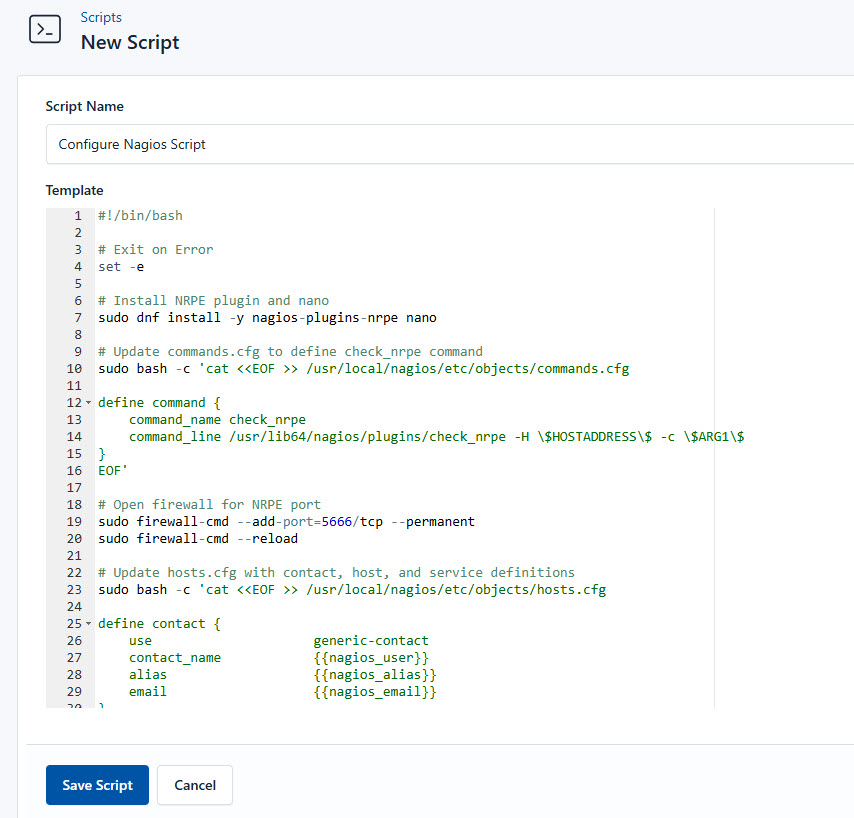
- Go to Scripts → New Script
- Name it
Configure Nagios Script - Add the following script:
#!/bin/bash

# Exit on error
set -e

# Install NRPE plugin and nano
sudo dnf install -y nagios-plugins-nrpe nano

# Update commands.cfg to define check_nrpe command
sudo bash -c 'cat <<EOF >> /usr/local/nagios/etc/objects/commands.cfg

define command {
    command_name check_nrpe
    command_line /usr/lib64/nagios/plugins/check_nrpe -H \$HOSTADDRESS\$ -c \$ARG1\$
}
EOF'

# Open firewall for NRPE port
sudo firewall-cmd --add-port=5666/tcp --permanent
sudo firewall-cmd --reload

# Update hosts.cfg with contact, host, and service definitions
sudo bash -c 'cat <<EOF >> /usr/local/nagios/etc/objects/hosts.cfg

define contact {
    use                     generic-contact
    contact_name            {{nagios_user}}
    alias                   {{nagios_alias}}
    email                   {{nagios_email}}
}

define host {
    use                     linux-server
    host_name               nagios-example
    address                 {{remote_server_ip}}
    max_check_attempts      5
    check_period            24x7
    notification_interval   30
    notification_period     24x7
}

define service {
    use                     generic-service
    host_name               nagios-example
    service_description     SSH
    check_command           check_ssh
    max_check_attempts      3
    check_interval          2
    retry_interval          1
}

define service {
    use                    generic-service
    host_name              nagios-example
    service_description    System Load
    check_command          check_nrpe!check_load
    max_check_attempts     5
    check_interval         2
    retry_interval         1
}

define service {
    use                    generic-service
    host_name              nagios-example
    service_description    Total Processes
    check_command          check_nrpe!check_total_procs
    max_check_attempts     5
    check_interval         2
    retry_interval         1
}
EOF'

# Add hosts.cfg reference in nagios.cfg
sudo bash -c 'echo "cfg_file=/usr/local/nagios/etc/objects/hosts.cfg" >> /usr/local/nagios/etc/nagios.cfg'

# Restart Nagios to apply changes
sudo systemctl restart nagios

echo "Nagios server configuration for remote host completed successfully!"
Here is a breakdown of what each command in the Configure Nagios Script does:
- Installs the
nagios-plugins-nrpepackage (which includes the NRPE plugin for remote checks) andnanofor editing - Adds a
check_nrpecommand definition to the Nagioscommands.cfgfile to allow remote checks via NRPE - Configures the system firewall to allow incoming TCP traffic on port 5666 (used by NRPE) and reloads firewall settings
- Updates the
hosts.cfgconfiguration file - Adds a reference to the
hosts.cfgfile in the main Nagios configuration (nagios.cfg) if not already present - Restarts the Nagios service to apply all configuration changes
Running the Scripts with CloudRay
You can automate this entire process using CloudRay by executing the scripts on both the nagios-server and remote-server.
NOTE
Ensure you use the same variables from the Nagios installation process. This ensures consistency across your Nagios monitoring setup. Follow our detailed guide on Automate the Installation of Nagios Using CloudRay for reference.
You can choose to run the scripts individually or execute them all at once using CloudRay’s Script Playlists. If you prefer to run them individually, follow these steps:
Run the Setup NRPE Script
CloudRay uses Runlogs to execute scripts on your servers while providing real-time logs of the execution process.
To run the Setup NRPE Script, follow these steps:
- Navigate to Runlogs: In your CloudRay project, go to the Runlogs section in the top menu.
- Create a New Runlog: Click on New Runlog.
- Configure the Runlog: Fill in the required details:
- Server: Select the server you added earlier.
- Script: Choose the “Setup NRPE Script”
- Variable Group (optional): Select the variable group you created earlier.
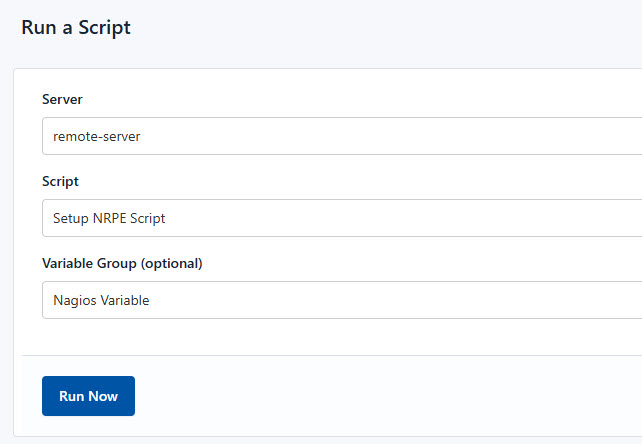
- Execute the Script: Click on Run Now to start the execution.
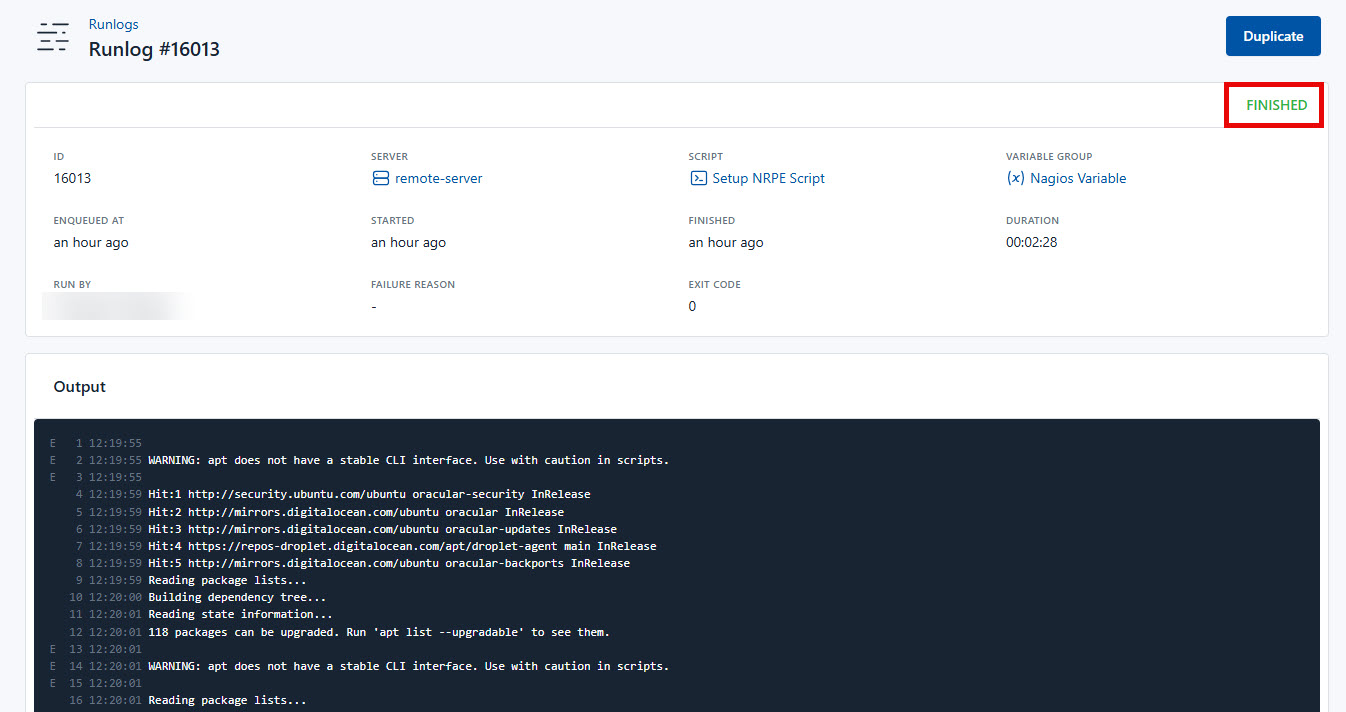
CloudRay will automatically connect to your server, run the Setup NRPE Script, and provide live logs to track the process. If any errors occur, you can review the logs to troubleshoot the issue.
Configure Nagios Script
Next, you need to run the second script to configure the Nagios server to monitor it.
To run the Configure Nagios Script, follow similar steps:
- Navigate to Runlogs: In your CloudRay project, go to the Runlogs section in the top menu.
- Create a New Runlog: Click on New Runlog.
- Configure the Runlog: Provide the necessary details:
- Server: Select the same server used earlier.
- Script: Choose the “Configure Nagios Script”.
- Variable Group: Select the variable group you created earlier.
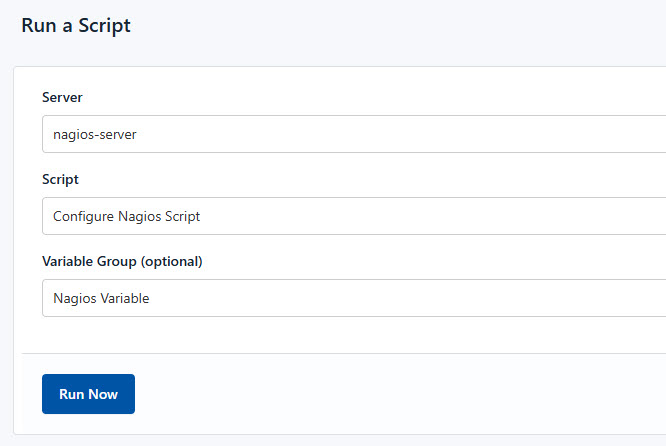
- Execute the Script: Click on Run Now to deploy your application.
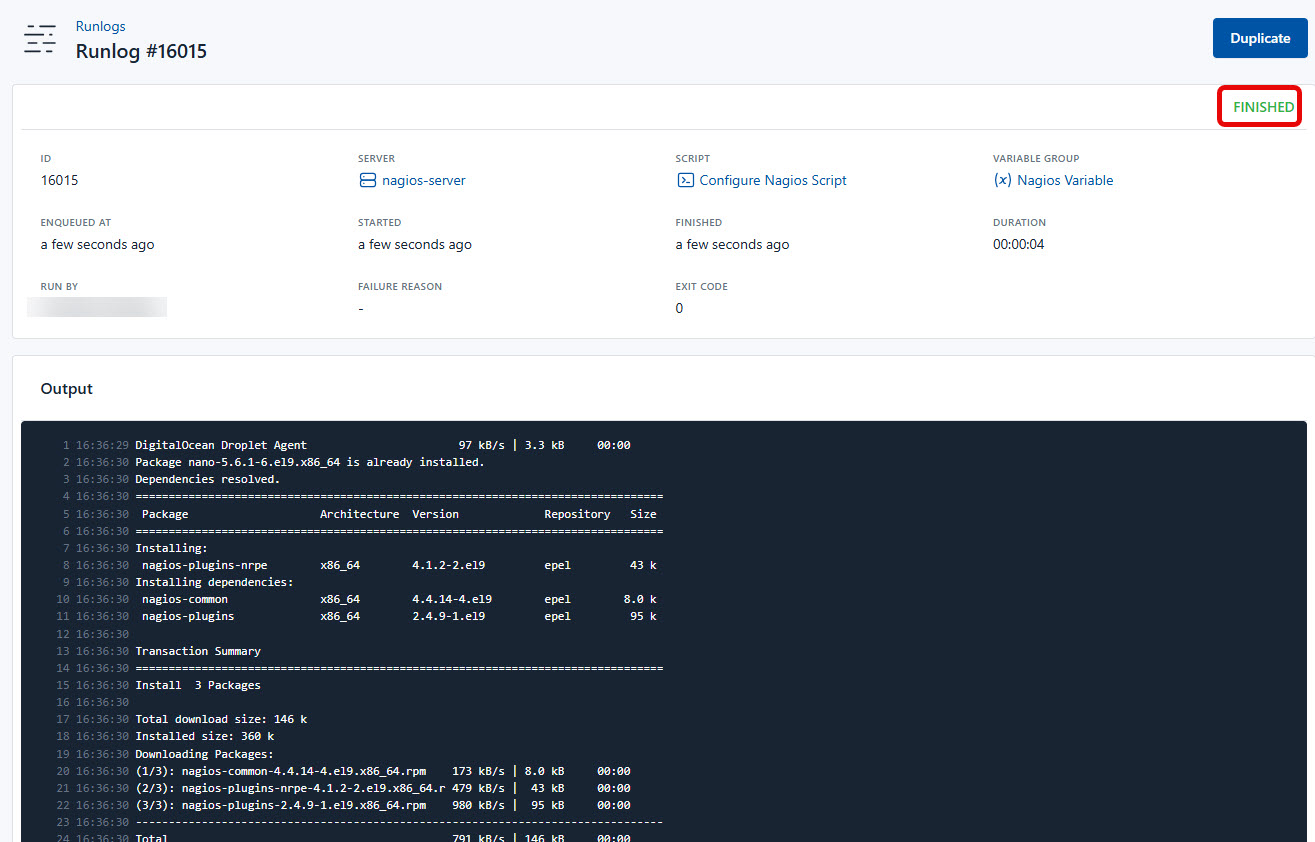
After executing the scripts, you verify the Nagios web interface (http://<nagios-server-ip>/nagios) to confirm the new remote host is being monitored successfully.

Olusegun Durojaye
CloudRay Engineering Team