
Automating the installation of Nagios on Rocky Linux 9 ensures consistency, reduces errors, and saves time when setting up monitoring for your environment. CloudRay, enables seamless setup, deployment, and management of Nagios. By leveraging CloudRay, you can automate the setting up, configurations, and deployment of Nagios.
In this guide, you will learn how to automate the installation of Nagios Core on Rocky Linux 9 using CloudRay.
IMPORTANT
This article focuses on installing Nagios Core on Rocky Linux 9 using CloudRay. If you’re looking to monitor remote hosts using NRPE, check out our companion guide: How to Monitor Remote Hosts with Nagios Using CloudRay
Contents
- Adding Servers to CloudRay
- Assumptions
- Create the Automation Script
- Create a Variable Group
- Running the Scripts to Install Nagios with CloudRay
- Troubleshooting
- Related Guide
Adding Servers to CloudRay
Before getting started with your automation, make sure your target servers are connected to CloudRay. If you haven’t done this yet, follow our servers docs to add and manage your server
NOTE
This guide uses Bash scripts, providing a high degree of customisation. You can adapt the scripts to fit your specific Installations needs and environment.
Assumptions
- This guide assumes you’re using Rocky Linux 9 as your server’s operating system. If you’re using a different version or a different distribution, adjust the commands accordingly
Create the Automation Script
To automate the installation of Nagios, you’ll need two Bash scripts:
- Setup Nagios Script: Installs the necessary dependencies and configures Nagios Core
- Deploy Nagios Script: Sets up the web interface, enables Nagios, and configures the firewall
Let’s begin with the setting up of Nagios
Setup Nagios Script
To create the Setup Nagios Script, you need to follow these steps:
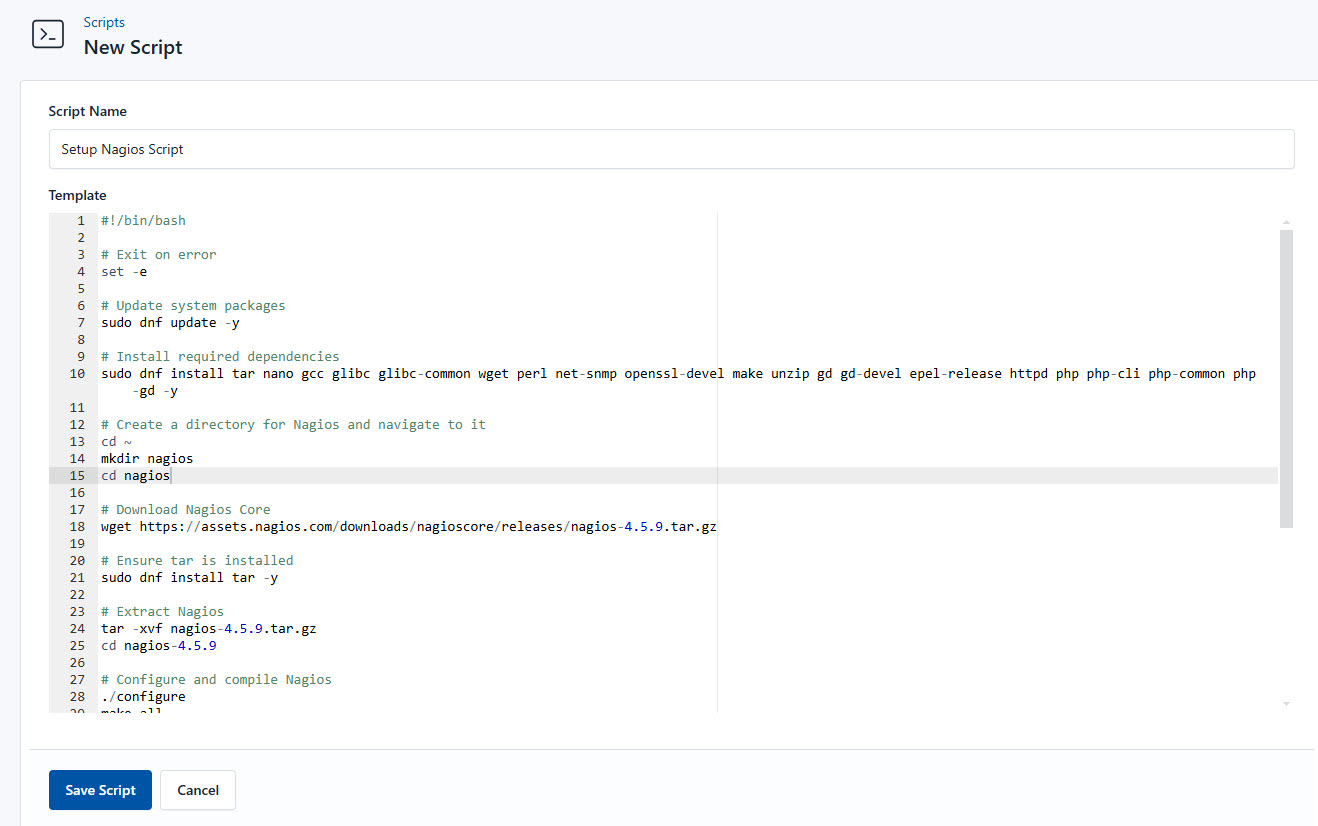
- Go to Scripts in your CloudRay project
- Click New Script
- Name:
Setup Nagios Script. You can give it any name of your choice - Copy this code:
#!/bin/bash

# Exit on error
set -e

# Update system packages
sudo dnf update -y

# Install required dependencies
sudo dnf install tar nano gcc glibc glibc-common wget perl net-snmp openssl-devel make unzip gd gd-devel epel-release httpd php php-cli php-common php-gd -y

# Create a directory for Nagios and navigate to it
cd ~
mkdir nagios
cd nagios

# Download Nagios Core
wget https://assets.nagios.com/downloads/nagioscore/releases/nagios-4.5.9.tar.gz

# Ensure tar is installed
sudo dnf install tar -y

# Extract Nagios
tar -xvf nagios-4.5.9.tar.gz
cd nagios-4.5.9

# Configure and compile Nagios
./configure
make all

# Create Nagios user and groups
sudo make install-groups-users
sudo usermod -a -G nagios apache

# Install Nagios and its components
sudo make install
sudo make install-init
sudo make install-commandmode
sudo make install-config
sudo make install-webconf

# Verify Nagios configuration
sudo /usr/local/nagios/bin/nagios -v /usr/local/nagios/etc/nagios.cfg

echo "Nagios core setup completed successfully!"
Here is a breakdown of what each command in the Setup Nagios Script does:
- Updates all installed packages to the latest version
- Installs essential packages like
gcc,nano,wget,perl,httpd, andphp - Creates and navigates to a directory for Nagios installation
- Downloads Nagios Core (version 4.5.9 in this case) and Extracts the Nagios archive
- Configures and compiles Nagios
- Creates the
nagiosuser and group and adds theapacheuser to thenagiosgroup for web interface access - Install Nagios components, including the core configuration, init scripts, and web interface
Deploy Nagios Script
Next, you need to create the deployment script for Nagios. To do so, follow similar steps as the above:
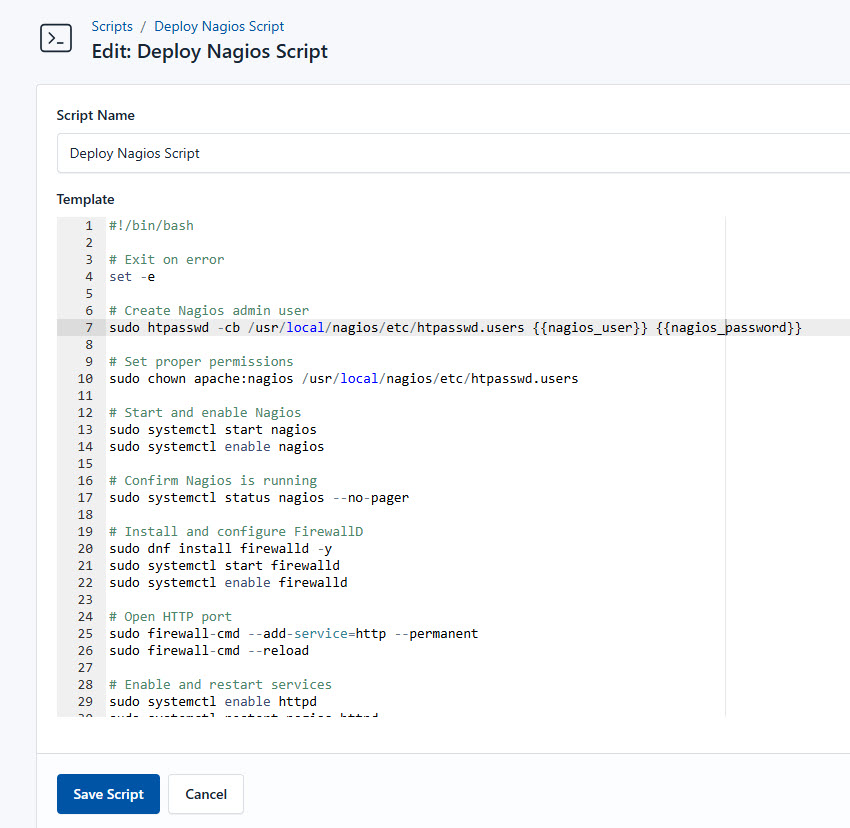
- Go to Scripts > New Script
- Name:
Deploy Nagios Script - Add code:
#!/bin/bash

# Exit on error
set -e

# Create Nagios admin user
sudo htpasswd -cb /usr/local/nagios/etc/htpasswd.users {{nagios_user}} {{nagios_password}}

# Set proper permissions
sudo chown apache:nagios /usr/local/nagios/etc/htpasswd.users

# Start and enable Nagios
sudo systemctl start nagios
sudo systemctl enable nagios

# Confirm Nagios is running
sudo systemctl status nagios --no-pager

# Install and configure FirewallD
sudo dnf install firewalld -y
sudo systemctl start firewalld
sudo systemctl enable firewalld

# Open HTTP port
sudo firewall-cmd --add-service=http --permanent
sudo firewall-cmd --reload

# Enable and restart services
sudo systemctl enable httpd
sudo systemctl restart nagios httpd

# Install Nagios plugins
cd ~/nagios/
wget https://nagios-plugins.org/download/nagios-plugins-2.4.11.tar.gz
tar -xvf nagios-plugins-2.4.11.tar.gz
cd nagios-plugins-2.4.11

./configure
make
sudo make install

# Final restart
sudo systemctl restart nagios httpd

echo "Nagios deployment completed successfully!"
This is what the Deploy Nagios Script does:
- Creates a Nagios web admin user with the password
- Ensures Apache and Nagios have the right permissions
- Starts, enables, and checks the status of the Nagios service
- Installs the firewall and opens port 80 for HTTP traffic
- Downloads and installs Nagios plugins for additional monitoring capabilities
- Restarts Nagios and the web server to apply changes
Create a Variable Group
Now, before running the scripts, you need to define values for the placeholders {{nagios-user}}, {{nagios-password}}, {{nagios-alias}}, {{nagios-email}}, {{nagios-server-ip}}, and {{remote-server-ip}} used in the scrips. CloudRay processes all scripts as Liquid templates. This allows you to use variables dynamically across different servers.

To ensure that these values are automatically substituted when the script runs, follow these steps to create a variable group:
- Navigate to Variable Groups: In your CloudRay project, go to “Scripts” in the top menu and click on “Variable Groups”.
- Create a new Variable Group: Click on “Variable Group”.
- Add the following variables:
nagios-user: This is the Nagios usernamenagios-password: This is the Nagios passwordnagios-alias: This is the Nagios aliasnagios-email: The email of the Nagios accountnagios-server-ip: The IP Address of the Nagios Serverremote-server-ip: The IP Address of the remote server to be monitored
Since the variables are setup, proceed to run the scripts with CloudRay.
Running the Scripts to Install Nagios with CloudRay
Now that everything is setup, you can use CloudRay to automate the installation of Nagios.
You can choose to run the scripts individually or execute them all at once using CloudRay’s Script Playlists. Since there are multiple scripts, using CloudRay playlists will help automate the execution sequence and save time.
Here are the steps to follow:
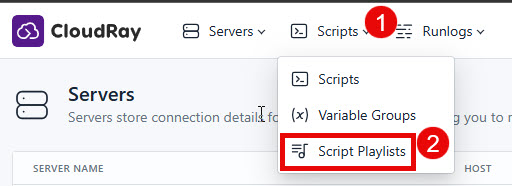
- Navigate to “Script Playlists”: Click on the Scripts tab in the CloudRay interface
- Click “Add Script Playlist”: This initiates the creation of a new playlist
- Provide a Name: Give your playlist a unique name (For example “Nagios Deployment Automation and Management”)
- Add Scripts in Order: Select and add the scripts sequentially
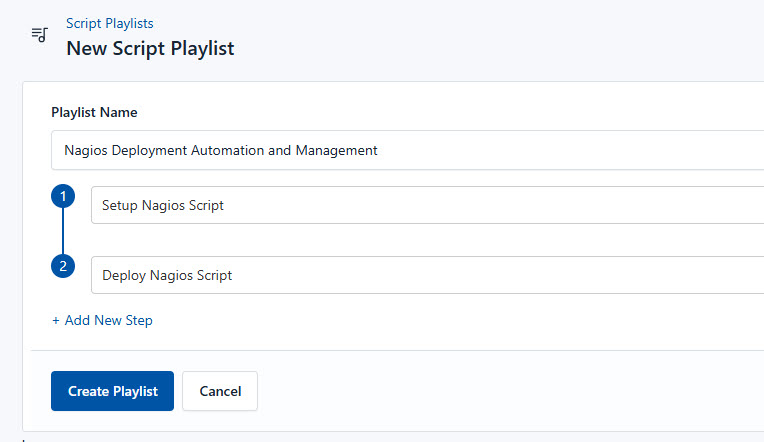
- Save the Playlist: Click “create playlist” to store your new playlist.
Once your script playlist is created, proceed with execution:
- Navigate to Runlogs: In your CloudRay project, go to the Runlogs section in the top menu.
- Create a New Runlog: Click on New Runlog.
- Configure the Runlog: Provide the necessary details:
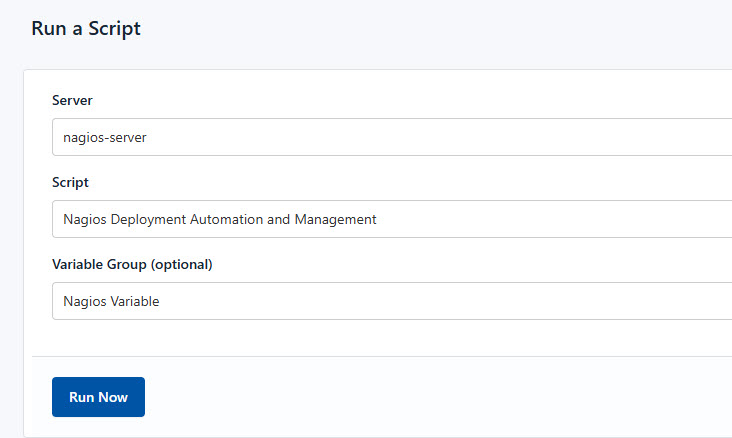
- Server: Select the server where Nagios will be installed
- Script Playlist: Choose the playlist you created (For example “Nagios Deployment Automation and Management”)
- Variable Group: Select the variable group you set up earlier
- Execute the Script: Click on Run Now to start the execution
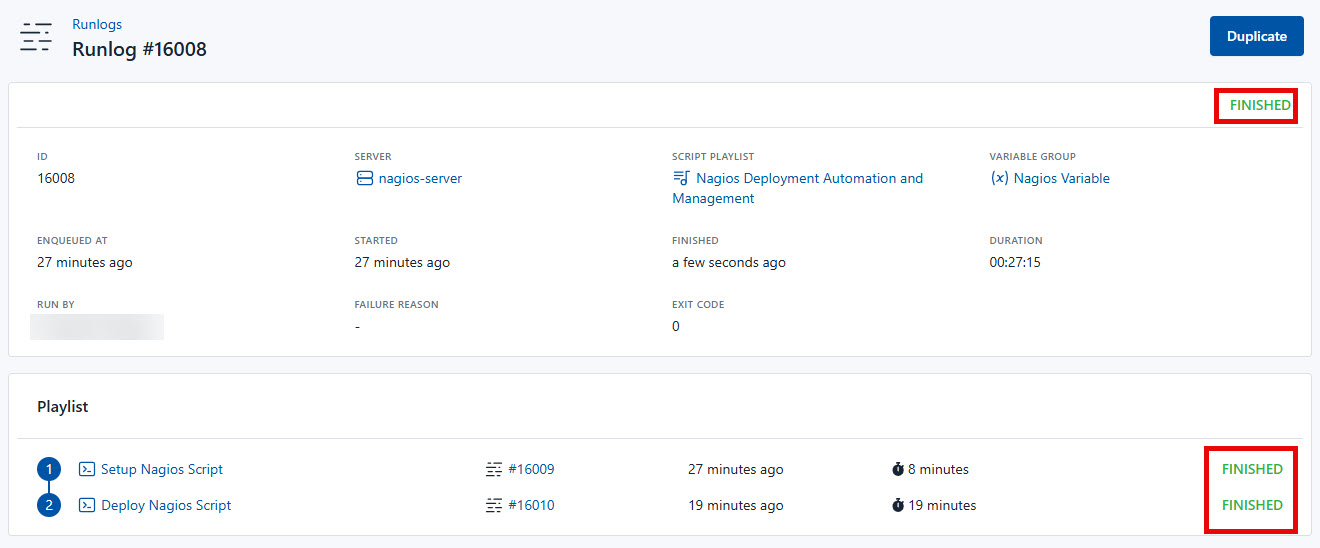
Your Nagios is now seamlessly deployed and managed with CloudRay. That’s it! Happy deploying!. You can access it by visiting http://<nagios-server-ip>/nagios
Troubleshooting
If you encounter issues during deployment, consider the following:
- Nagios Web Interface Not Loading: Ensure Apache is running with
sudo systemctl status httpdand restart it usingsudo systemctl restart httpd - Nagios Service Not Starting: Check the service status with
sudo systemctl status nagiosand restart it usingsudo systemctl restart nagios
If the issue persists, consult the Nagios Core Documentation for further assistance.
Related Guide

Olusegun Durojaye
CloudRay Engineering Team