
CloudRay, a cloud automation platform, allows you to automate the installation and configuration of Apache Airflow using Bash scripts, ensuring a seamless and repeatable deployment process.
In this guide, we will walk through the steps to install and configure Apache Airflow on an Ubuntu 24.04 server using CloudRay. This guide covers:
- Writing automation script for installing Airflow, configuring it, and setting up a reverse proxy with Caddy
- Running the scripts on a remote server using CloudRay
By the end of this article, you will have a fully functional Apache Airflow setup, accessible through a web UI, and ready to run your workflows.
Contents
- Adding Servers to CloudRay
- Assumptions
- Create the Automation Script
- Create a Variable Group
- Running the Script with CloudRay
- Troubleshooting
- Related Guide
Adding Servers to CloudRay
Before getting started with your automation, make sure your target servers are connected to CloudRay. If you haven’t done this yet, follow our servers docs to add and manage your server
NOTE
This guide uses Bash scripts, providing a high degree of customisation. You can modify these scripts based on your environment and deployment needs
Assumptions
- This guide assumes you’re using Ubuntu 24.04 LTS as your server’s operating system. If you’re using a different version or a different distribution, adjust the commands accordingly.
Create the Automation Script
To automate the installation of Apache Airflow, you will use four Bash scripts:
- Installation and Setup Script: This script will install required dependencies, sets up the PostgreSQL database, and install Apache Airflow
- Airflow Configuration Script: This script will configures Airflow’s database connection and initializes it
- Start Airflow Script: This script create an admin user and starts the Airflow services
- Install and Configure Caddy Script: This script will installs and configures Caddy as a reverse proxy
Let’s begin with the installation and configuration of Apache Airflow.
Creating Installation and Setup Script
To create the installation and setup script, you need to follow these steps:
- Go to Scripts in your CloudRay project
- Click New Script
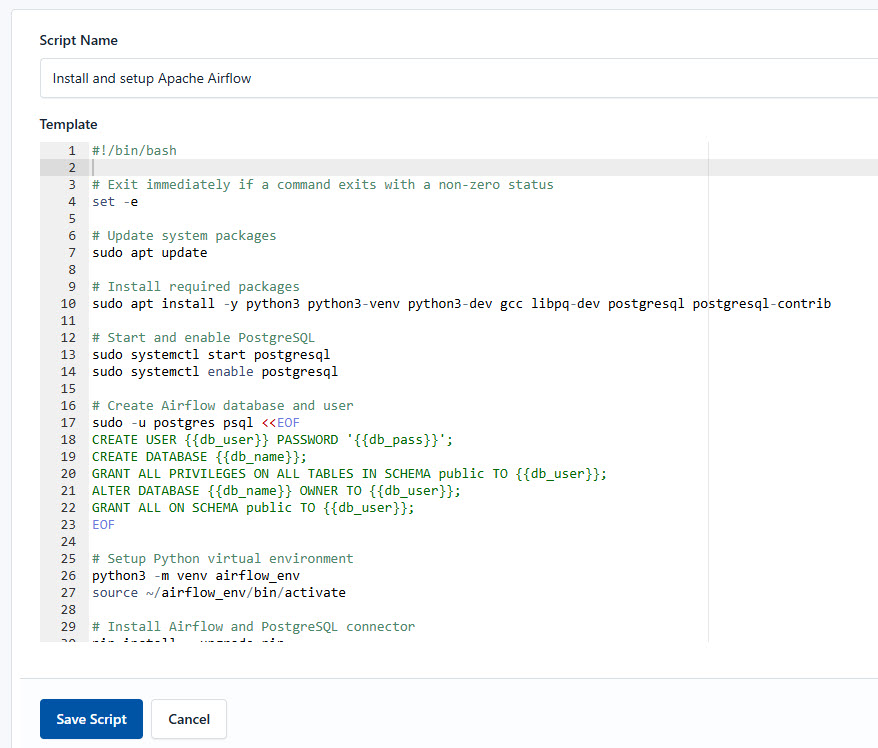
- Name:
Install and setup Apache Airflow. You can give it any name of your choice - Copy this code:
#!/bin/bash

# Exit immediately if a command exits with a non-zero status
set -e

# Update system packages
sudo apt update

# Install required packages
sudo apt install -y python3 python3-venv python3-dev gcc libpq-dev postgresql postgresql-contrib

# Start and enable PostgreSQL
sudo systemctl start postgresql
sudo systemctl enable postgresql

# Create Airflow database and user
sudo -u postgres psql <<EOF
CREATE USER {{db_user}} PASSWORD '{{db_pass}}';
CREATE DATABASE {{db_name}};
GRANT ALL PRIVILEGES ON ALL TABLES IN SCHEMA public TO {{db_user}};
ALTER DATABASE {{db_name}} OWNER TO {{db_user}};
GRANT ALL ON SCHEMA public TO {{db_user}};
EOF

# Setup Python virtual environment
python3 -m venv airflow_env
source ~/airflow_env/bin/activate

# Install Airflow and PostgreSQL connector
pip install --upgrade pip
pip install psycopg2-binary apache-airflow[postgres]

echo "Installation and setup completed"
Here is a breakdown of what each command in the Install and setup Apache Airflow does:
- Updates system packages
- Installs Python and PostgreSQL dependencies starts, and enables PostgreSQL
- Creates an Airflow database and user
- Sets up a Python virtual environment
- Installs Apache Airflow and PostgreSQL connector
If you’re looking to back up or manage your Airflow database effectively, check out our PostgreSQL guide.
Apache Airflow Configuration Script
After the installation and setup of Airflow, you need to configure its settings
Similarly, follow these steps to setup the database:
- Go to Scripts > New Script
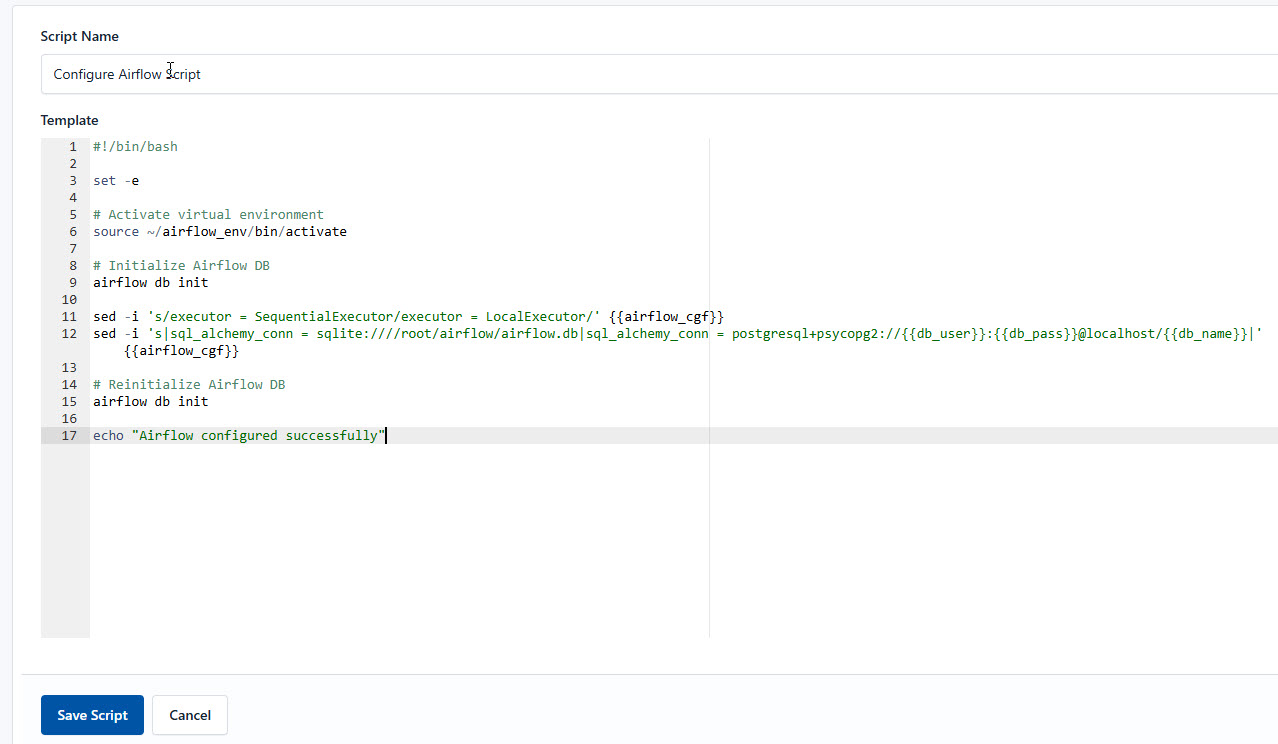
- Name:
Configure Airflow Script - Add code:
#!/bin/bash

set -e

# Activate virtual environment
source ~/airflow_env/bin/activate

# Initialize Airflow DB
airflow db init

sed -i 's/executor = SequentialExecutor/executor = LocalExecutor/' {{airflow_cgf}}
sed -i 's|sql_alchemy_conn = sqlite:////root/airflow/airflow.db|sql_alchemy_conn = postgresql+psycopg2://{{db_user}}:{{db_pass}}@localhost/{{db_name}}|' {{airflow_cgf}}

# Reinitialize Airflow DB
airflow db init

echo "Airflow configured successfully"
This is what the Configure Airflow Script does:
- Activates the Python virtual environment
- Initializes the Airflow database
- Modifies the Airflow configuration file to use LocalExecutor instead of the default SequentialExecutor
- Updates the database connection to use PostgreSQL
Start Apache Service Script
Moving forward, you need to start Airflow and create an admin user. Here, you follow similar steps as the previous ones to create the backup script:
- Go to Scripts > New Script
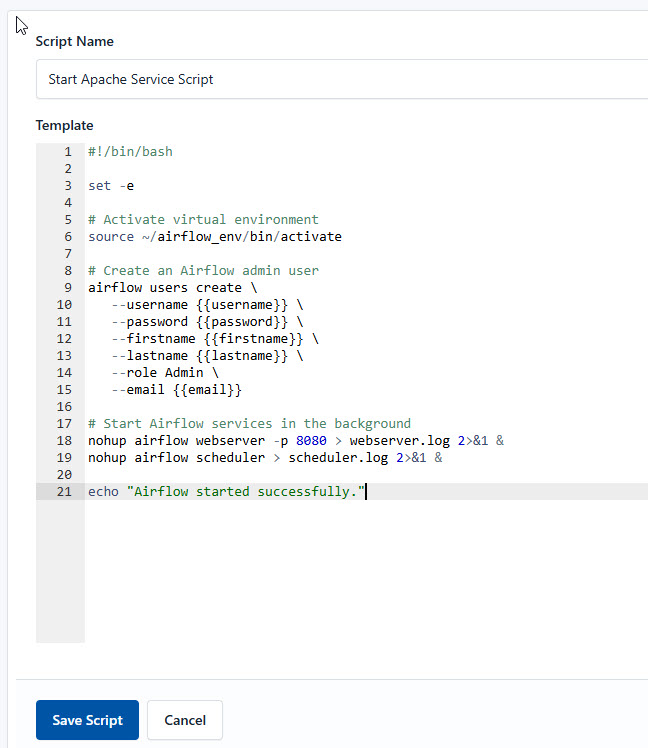
- Name:
Start Apache Service Script - Add code:
#!/bin/bash

set -e

# Activate virtual environment
source ~/airflow_env/bin/activate

# Create an Airflow admin user
airflow users create \
   --username {{username}} \
   --password {{password}} \
   --firstname {{firstname}} \
   --lastname {{lastname}} \
   --role Admin \
   --email {{email}}

# Start Airflow services in the background
nohup airflow webserver -p 8080 > webserver.log 2>&1 &
nohup airflow scheduler > scheduler.log 2>&1 &

echo "Airflow started successfully."
This is what the Start Apache Service Script does:
- Activates the virtual environment
- Creates an admin user for Airflow
- Starts the Airflow webserver and scheduler in the background
Install and Configure Caddy Script
After starting the Airflow service, you can configure caddy server as a reverse proxy and secure the domain. This ensures airflow runs on port 80/443 with HTTPS enabled.
Similarly, follow these steps to create the installation and configuration script:
- Go to Scripts > New Script
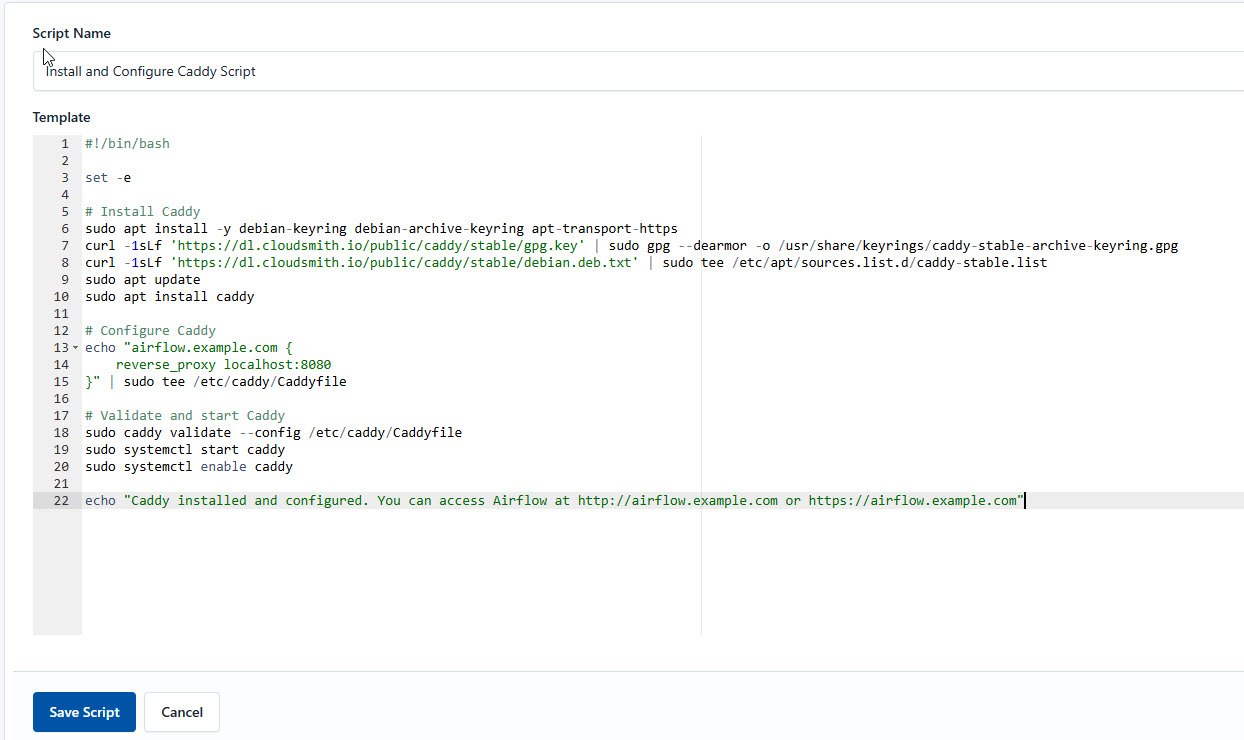
- Name:
Install and Configure Caddy Script - Add code:
#!/bin/bash

set -e

# Install Caddy
sudo apt install -y debian-keyring debian-archive-keyring apt-transport-https
curl -1sLf 'https://dl.cloudsmith.io/public/caddy/stable/gpg.key' | sudo gpg --dearmor -o /usr/share/keyrings/caddy-stable-archive-keyring.gpg
curl -1sLf 'https://dl.cloudsmith.io/public/caddy/stable/debian.deb.txt' | sudo tee /etc/apt/sources.list.d/caddy-stable.list
sudo apt update
sudo apt install caddy

# Configure Caddy
echo "airflow.example.com {
    reverse_proxy localhost:8080
}" | sudo tee /etc/caddy/Caddyfile

# Validate and start Caddy
sudo caddy validate --config /etc/caddy/Caddyfile
sudo systemctl start caddy
sudo systemctl enable caddy

echo "Caddy installed and configured. You can access Airflow at http://airflow.example.com or https://airflow.example.com"
This is what the Install and Configure Caddy Script does:
- Installs Caddy from the official repository
- Configures it as a reverse proxy for Airflow
- Starts and enables the Caddy service
Create a Variable Group
Now, before running the scripts, you need to define values for the placeholders {{db_name}}, {{db_user}}, {{db_pass}}, {{airflow_cgf}}, {{username}}, {{password}},{{firstname}}, {{lastname}} and {{email}} used in the scrips. CloudRay processes all scripts as Liquid templates. This allows you to use variables dynamically across different servers.
To ensure that these values are automatically substituted when the script runs, follow these steps to create a variable group:
- Navigate to Variable Groups: In your CloudRay project, go to “Scripts” in the top menu and click on “Variable Groups”.
- Create a new Variable Group: Click on “Variable Group”.
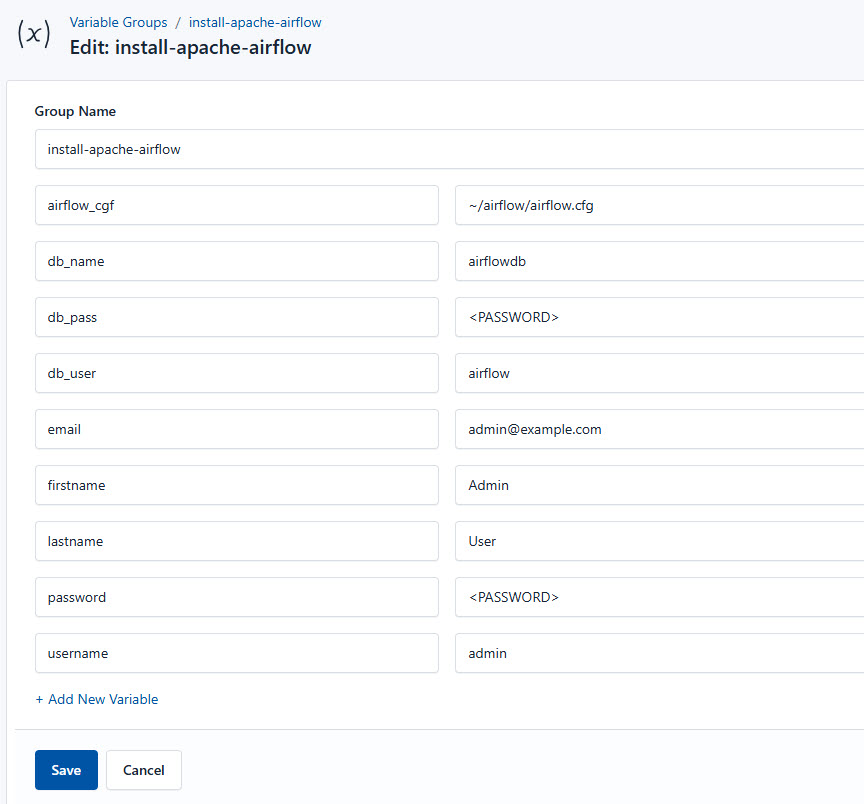
- Add the following variables:
airflow_cfg: This is the file path to Airflow’s configuration file, which contains settings for the Airflow environmentdb_name: This is the name of the database used to store Airflow’s metadata and operational datadb_user: The username for accessing the Airflow databasedb_pass: The password for the database user to authenticate and access the Airflow databaseusername: This is the username for the default admin account in the Airflow web interfacepassword: This is the password for the default admin account to log in to the Airflow web interfacefirstname: This is the first name associated with the default admin account in Airflowlastname: The last name associated with the default admin account in Airflowemail: The email address associated with the default admin account, used for notifications and alerts
Since the variables are setup, proceed with running the scripts with CloudRay.
Running the Script with CloudRay
You can choose to run the scripts individually or execute them all at once using CloudRay’s Script Playlists. Since there are multiple scripts, using CloudRay playlists will help automate the execution sequence and save time.
Here are the steps to follow:
- Navigate to “Script Playlists”: Click on the Scripts tab in the CloudRay interface
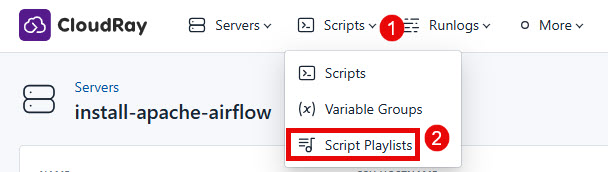
- Click “Add Script Playlist”: This initiates the creation of a new playlist
- Provide a Name: Give your playlist a unique name (For example “Automate Installation and Configuration of Airflow”)
- Add Scripts in Order: Select and add the scripts sequentially
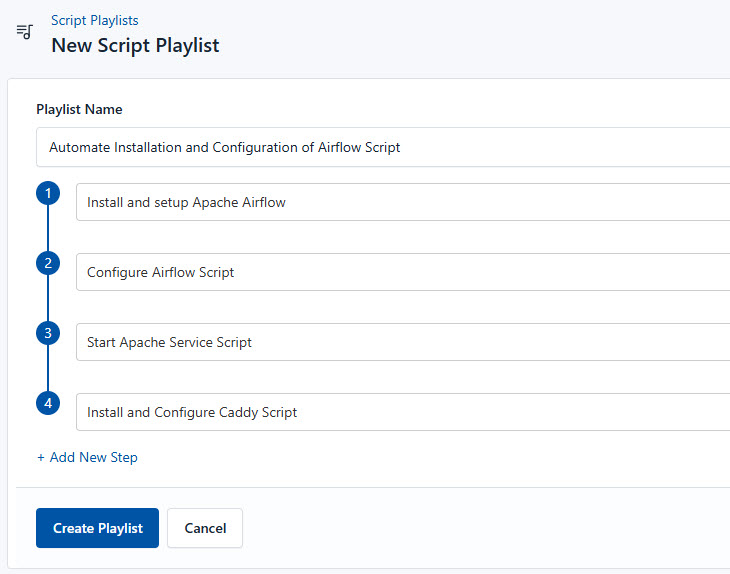
- Save the Playlist: Click “create playlist” to store your new playlist.
Once your script playlist is created, proceed with execution:
- Navigate to Runlogs: In your CloudRay project, go to the Runlogs section in the top menu.
- Create a New Runlog: Click on New Runlog.
- Configure the Runlog: Provide the necessary details:
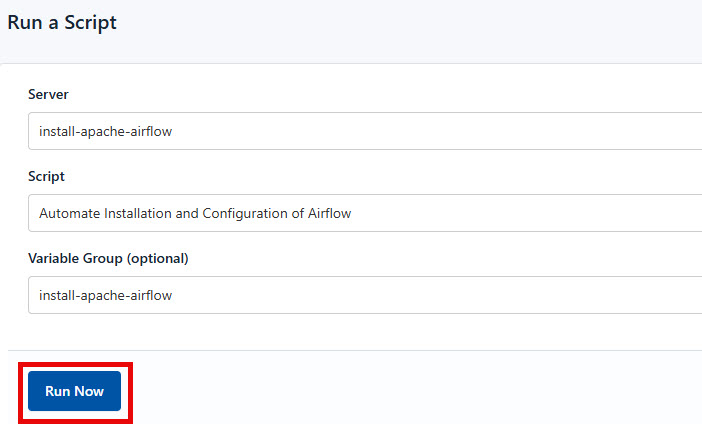
- Server: Select the server where you need Apache Airflow to be installed
- Script Playlist: Choose the playlist you created (For example “Automate Installation and Configuration of Airflow”)
- Variable Group: Select the variable group you set up earlier
- Execute the Script: Click on Run Now to start the execution
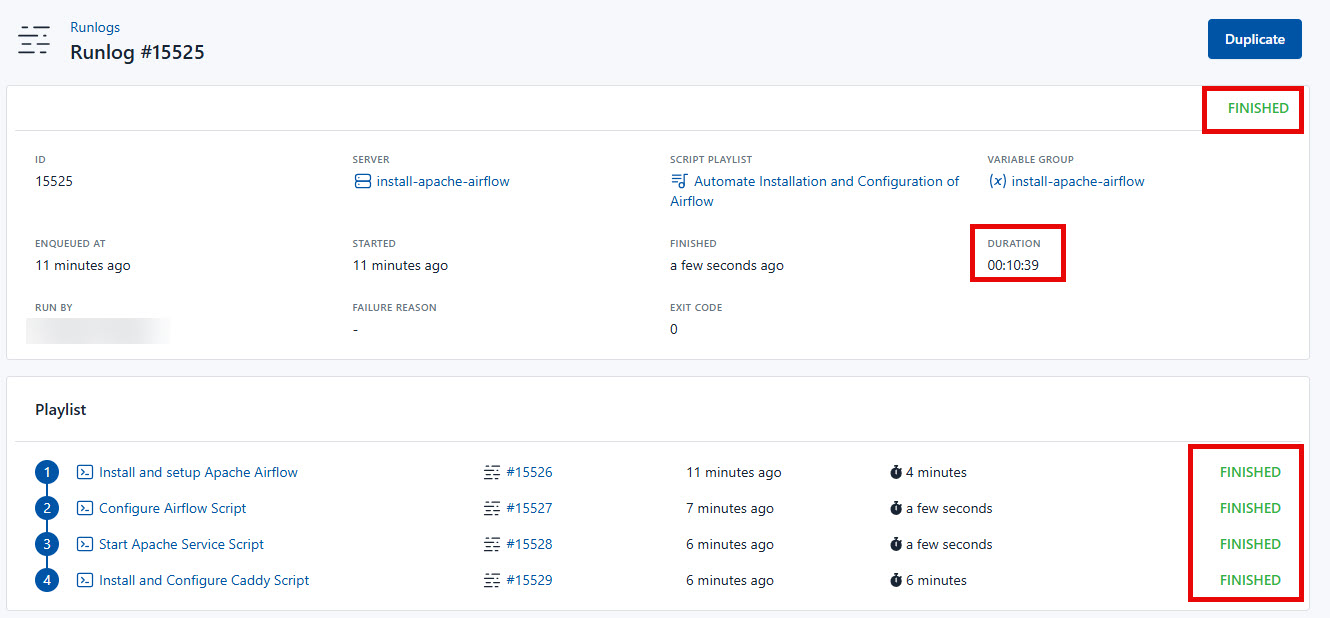
Your Apache Airflow is now installed, setup, and managed with CloudRay. That’s it! Happy deploying!
Troubleshooting
If you encounter issues during deployment, consider the following:
- Ensure your domain is properly registered and set the A record to point to your server’s IP address.
- Verify that all necessary environment variables are correctly set on your CloudRay variable Group
Related Guide

Olusegun Durojaye
CloudRay Engineering Team