
Installing and hardening phpMyAdmin can be a multi-step job which includes setting up packages, configuring web-server rules, enabling SSL, and tightening access controls.
In this tutorial we will automate the whole workflow with CloudRay, turning those steps into a repeatable Bash script. When you are done, you will have a secure phpMyAdmin instance ready for MySQL or MariaDB administration—and you can redeploy it the same way on any server.
Contents
- Adding Servers to CloudRay
- Assumptions
- Create the Automation Script
- Create a Variable Group
- Running the Script with CloudRay
- Troubleshooting
- Related Guides
Adding Servers to CloudRay
Before getting started, make sure your target servers are connected to CloudRay. If you haven’t done this yet, follow our servers docs to add and manage your server.
NOTE
This guide uses Bash scripts, providing a high degree of customisation. You can adapt the scripts to fit your specific Installations needs and environment.
Assumptions
- This guide assumes you’re using Rocky Linux 9 as your server’s operating system. If you’re using a different version or a different distribution, adjust the commands accordingly
Create the Automation Script
To automate the installation of Nagios, you’ll need three Bash scripts:
- Setup MySQL Script: Installs and configures MySQL server, creates a database, and sets up a user with appropriate privileges
- Install phpMyAdmin Script: Downloads, installs, and configures phpMyAdmin to provide a web-based interface for managing MySQL databases
- Secure phpMyAdmin Script: Implements security measures such as restricting access, setting up authentication, and configuring firewalls to protect the phpMyAdmin instance
Let’s begin with the setting up of MySQL
Setup MySQL Script
To create the Setup MySQL Script, you need to follow these steps:
- Go to Scripts in your CloudRay project
- Click New Script
- Name:
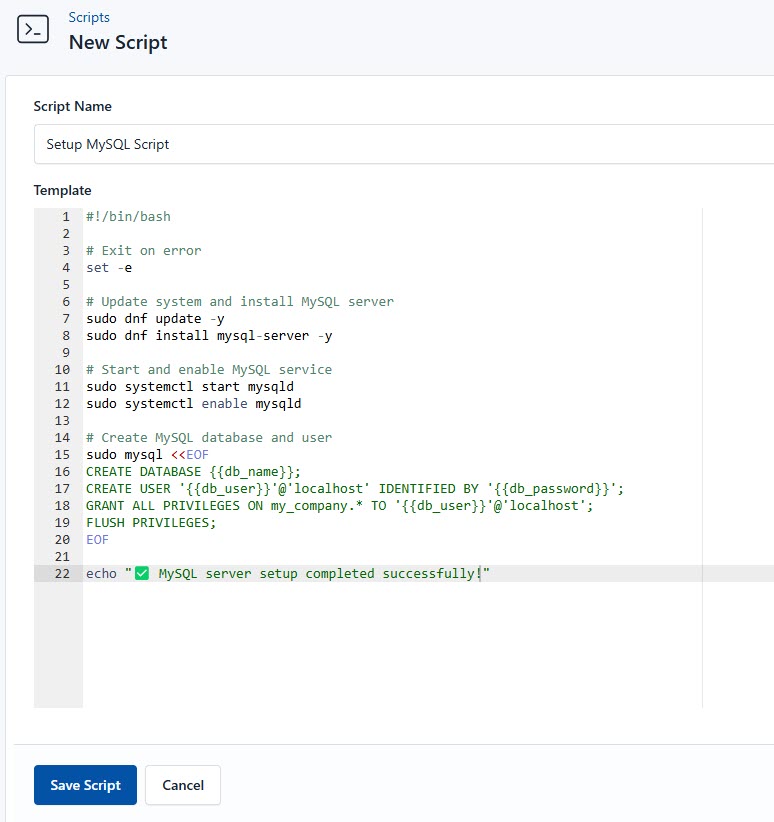
Setup MySQL Script. You can give it any name of your choice - Copy this code:
#!/bin/bash

# Exit on error
set -e

# Update system and install MySQL server
sudo dnf update -y
sudo dnf install mysql-server -y

# Start and enable MySQL service
sudo systemctl start mysqld
sudo systemctl enable mysqld

# Create MySQL database and user
sudo mysql <<EOF
CREATE DATABASE {{db_name}};
CREATE USER '{{db_user}}'@'localhost' IDENTIFIED BY '{{db_password}}';
GRANT ALL PRIVILEGES ON my_company.* TO '{{db_user}}'@'localhost';
FLUSH PRIVILEGES;
EOF

echo "✅ MySQL server setup completed successfully!"
Here is a breakdown of what each command in the Setup MySQL Script does:
- Updates the system packages to the latest versions
- Installs the MySQL server package
- tarts MySQL immediately and ensures it starts on boot
- Creates a Database and a user
- Grants all privileges on the database to the new user
- Flushes privileges to apply the changes
IMPORTANT
If you’d like to learn more about managing, backing up, and optimizing your MySQL database, check out our comprehensive guide: How to Deploy & Manage a MySQL Server Using CloudRay.
Install phpMyAdmin Script
Next, you need to create the installation script for phpMyAdmin. To do so, follow similar steps as the above:
- Go to Scripts > New Script
- Name:
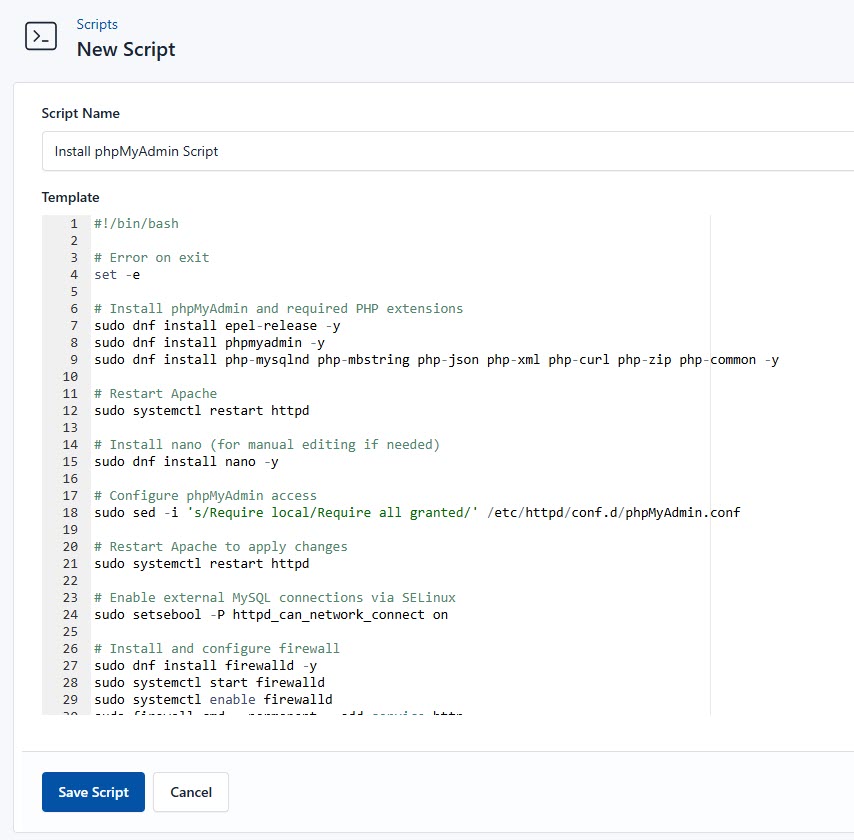
Install phpMyAdmin Script - Add code:
#!/bin/bash

# Exit on error
set -e

# Install phpMyAdmin and required PHP extensions
sudo dnf install epel-release -y
sudo dnf install phpmyadmin -y
sudo dnf install php-mysqlnd php-mbstring php-json php-xml php-curl php-zip php-common -y

# Restart Apache
sudo systemctl restart httpd

# Install nano (for manual editing if needed)
sudo dnf install nano -y

# Configure phpMyAdmin access
sudo sed -i 's/Require local/Require all granted/' /etc/httpd/conf.d/phpMyAdmin.conf

# Restart Apache to apply changes
sudo systemctl restart httpd

# Enable external MySQL connections via SELinux
sudo setsebool -P httpd_can_network_connect on

# Install and configure firewall
sudo dnf install firewalld -y
sudo systemctl start firewalld
sudo systemctl enable firewalld
sudo firewall-cmd --permanent --add-service=http
sudo firewall-cmd --permanent --add-service=https
sudo firewall-cmd --reload

echo "✅ phpMyAdmin installation and configuration completed successfully!"
This is what the Install phpMyAdmin Script does:
- Enables access to extra packages (including phpMyAdmin) and necessary PHP extensions for phpMyAdmin
- Ensures the webserver is running and reloads configurations
- Access configuration to allow external access (not just local)
- Allows Apache to connect to the MySQL database
- Opens HTTP (80) and HTTPS (443) ports for external access
Secure phpMyAdmin Script
To secure your phpMyAdmin instance, follow these steps:
- Go to Scripts in your CloudRay project
- Click New Script
- Name:
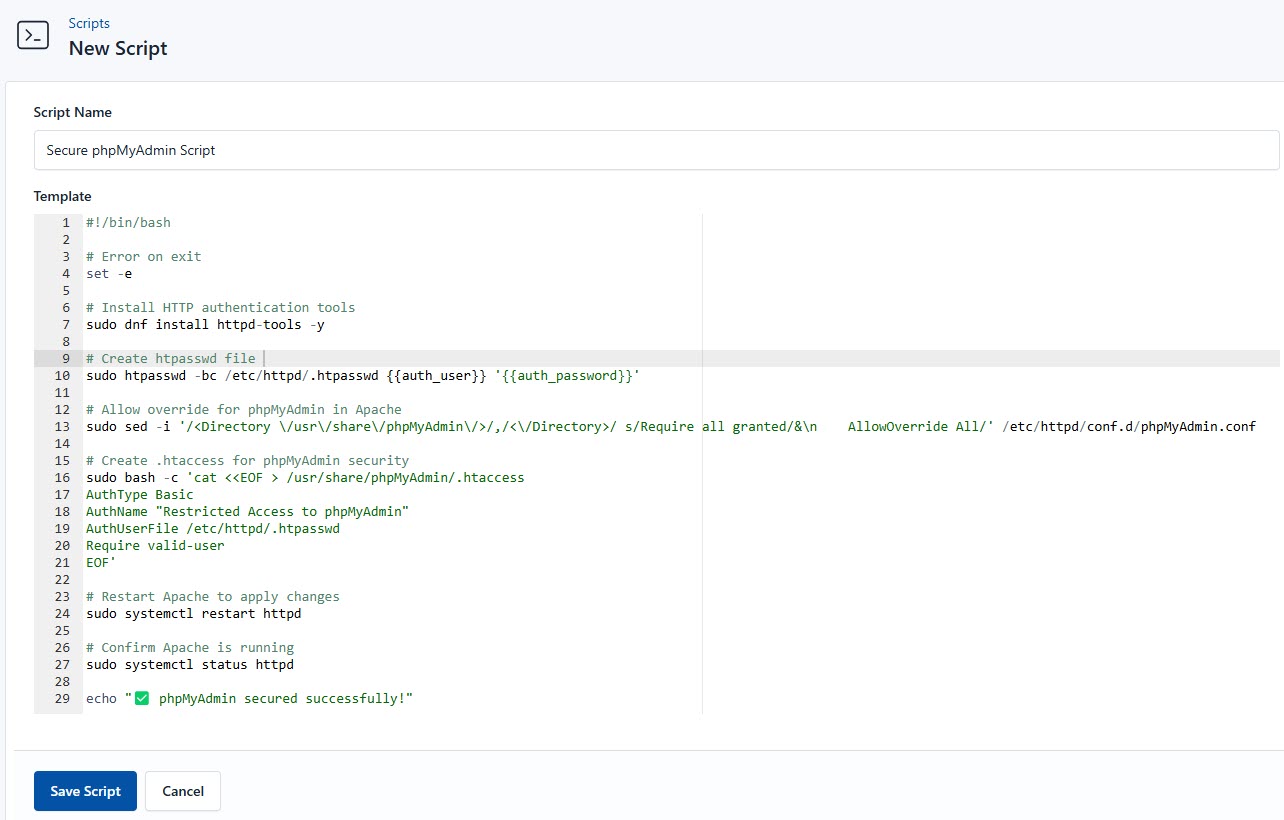
Secure phpMyAdmin Script. You can give it any name of your choice - Copy this code:
#!/bin/bash

# Exit on error
set -e

# Install HTTP authentication tools
sudo dnf install httpd-tools -y

# Create htpasswd file
sudo htpasswd -bc /etc/httpd/.htpasswd {{auth_user}} '{{auth_password}}'

# Allow override for phpMyAdmin in Apache
sudo sed -i '/<Directory \/usr\/share\/phpMyAdmin\/>/,/<\/Directory>/ s/Require all granted/&\n    AllowOverride All/' /etc/httpd/conf.d/phpMyAdmin.conf

# Create .htaccess for phpMyAdmin security
sudo bash -c 'cat <<EOF > /usr/share/phpMyAdmin/.htaccess
AuthType Basic
AuthName "Restricted Access to phpMyAdmin"
AuthUserFile /etc/httpd/.htpasswd
Require valid-user
EOF'

# Restart Apache to apply changes
sudo systemctl restart httpd

# Confirm Apache is running
sudo systemctl status httpd

echo "✅ phpMyAdmin secured successfully!"
Here is a breakdown of what each command in the Secure phpMyAdmin Script does:
- Installs the
htpasswdcommand for basic authentication - Creates a new password file (
/etc/httpd/.htpasswd) - Enables user authentication via
.htaccess - Sets up basic authentication using the credentials stored in
/etc/httpd/.htpasswd - Restarts Apache and checks its status
Create a Variable Group
Now, before running the scripts, you need to define values for the placeholders {{db_name}}, {{db_user}}, {{db_password}}, {{auth_user}}, and {{auth_password}} used in the scrips. CloudRay processes all scripts as Liquid templates.
This allows you to use variables dynamically across different servers.
To ensure that these values are automatically substituted when the script runs, follow these steps to create a variable group:
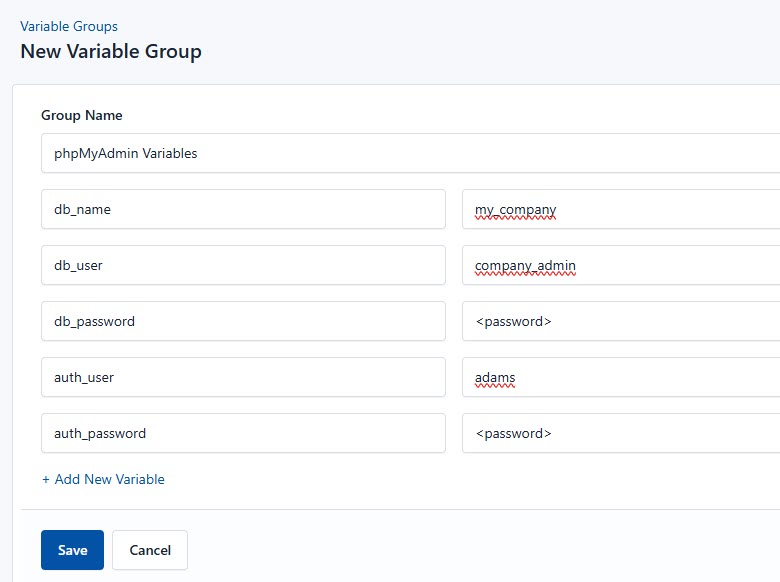
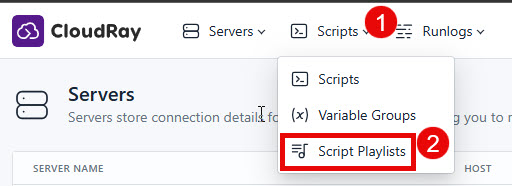
- Navigate to Variable Groups: In your CloudRay project, go to “Scripts” in the top menu and click on “Variable Groups”.
- Create a new Variable Group: Click on “Variable Group”.
- Add the following variables:
db_name: This is the name of the databasedb_user: The name of the userdb_password: The password of the for the database userauth_user: The username of your basic authentication for phpMyAdminauth_password: The password of your basic authentication for phpMyAdmin
Since the variables are setup, proceed to run the scripts with CloudRay.
Running the Script with CloudRay
Now that everything is setup, you can use CloudRay to automate deploying and securing phpMyAdmin.
You can choose to run the scripts individually or execute them all at once using CloudRay’s Script Playlists. Since there are multiple scripts, using CloudRay playlists will help automate the execution sequence and save time.
Here are the steps to follow:
- Navigate to “Script Playlists”: Click on the Scripts tab in the CloudRay interface
- Click “Add Script Playlist”: This initiates the creation of a new playlist
- Provide a Name: Give your playlist a unique name (For example “Automate Deployment and Management of phpMyAdmin”)
- Add Scripts in Order: Select and add the scripts sequentially
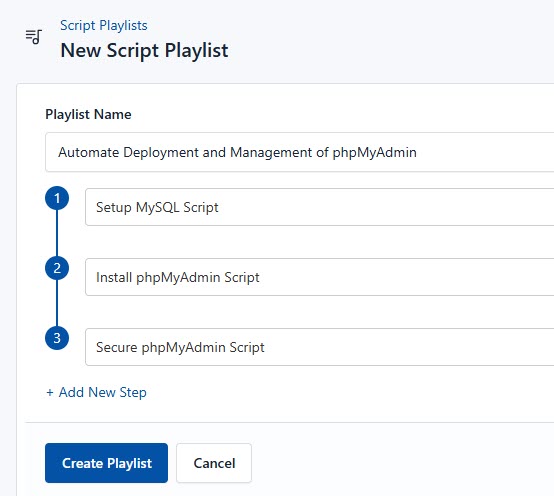
- Save the Playlist: Click “create playlist” to store your new playlist.
Once your script playlist is created, proceed with execution:
- Navigate to Runlogs: In your CloudRay project, go to the Runlogs section in the top menu.
- Create a New Runlog: Click on New Runlog.
- Configure the Runlog: Provide the necessary details:
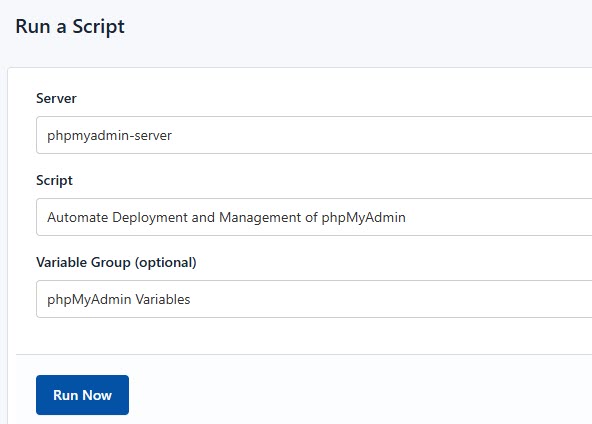
- Server: Select the server where Nagios will be installed
- Script Playlist: Choose the playlist you created (For example “Automate Deployment and Management of phpMyAdmin”)
- Variable Group: Select the variable group you set up earlier
- Execute the Script: Click on Run Now to start the execution
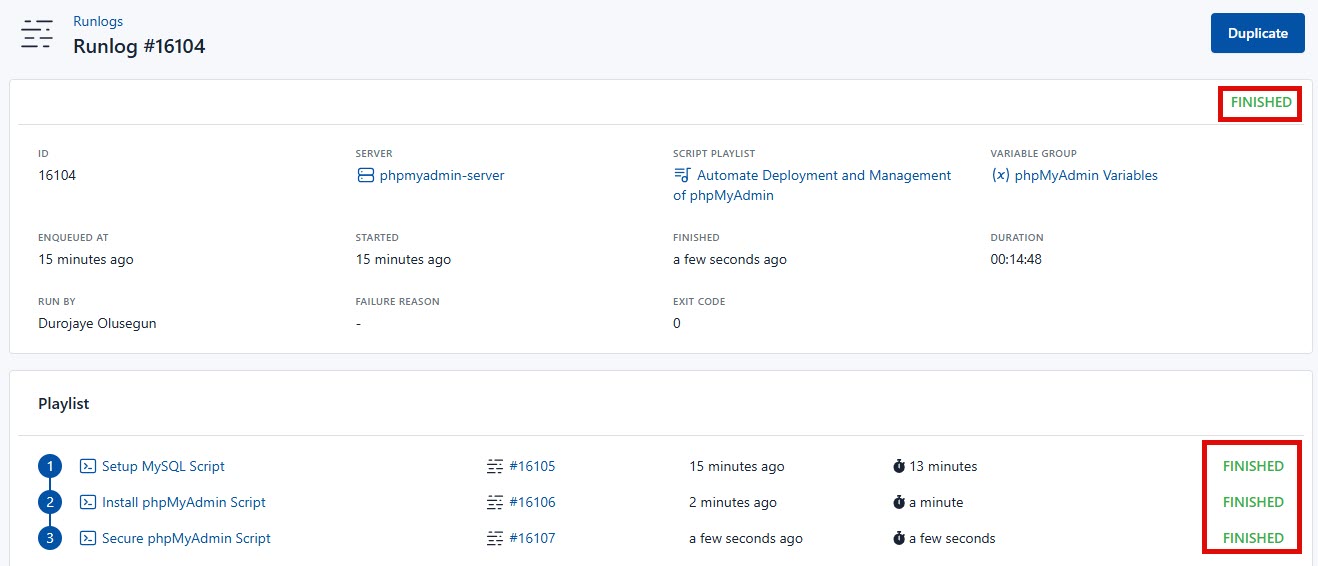
Your phpMyAdmin is now seamlessly deployed and managed with CloudRay. That’s it! Happy deploying!. You can access it by visiting http://<nagios-server-ip>/phpmyadmin
Troubleshooting
If you encounter issues during deployment, consider the following:
- phpMyAdmin Web Interface Not Loading: Ensure Apache is running with
sudo systemctl status httpdand restart it usingsudo systemctl restart httpd. Also, verify that the firewall allows HTTP (port 80) and HTTPS (port 443) traffic. - MySQL Service Not Starting: Check the MySQL service status with
sudo systemctl status mysqldand restart it usingsudo systemctl restart mysqld. Ensure the service is enabled to start on boot with sudo systemctl enable mysqld - Authentication Issues: If you cannot log in to phpMyAdmin, verify the
.htaccessfile in/usr/share/phpMyAdmin/is correctly configured and that the/etc/httpd/.htpasswdfile contains the correct credentials
If the issue persists, consult the phpMyAdmin Documentation for further assistance.
Related Guides

Olusegun Durojaye
CloudRay Engineering Team