
In this article, you will learn how to deploy and manage MySQL server on Ubuntu 24.04 using CloudRay, an automation tool that simplifies server management. This guide will cover setting up MySQL, configuring it for remote access, creating a database with a user, implementing automated backups, and executing these tasks using CloudRay.
The deployment strategy involves:
- The installation and configuration of MySQL Server
- Creating databases, user, and sample table
- Automating Database backups
By the end of this article, you will have a fully functional MySQL server deployed on Ubuntu 24.04, managed seamlessly through CloudRay automation.
Contents
- Adding Servers to CloudRay
- Assumptions
- Create the Automation Script
- Create a Variable Group
- Running the Script with CloudRay
- Scheduling MySQL Database Backup with CloudRay’s Schedules (Optional)
- Related Guides
Adding Servers to CloudRay
Before getting started, make sure your target servers are connected to CloudRay. If you haven’t done this yet, follow our servers docs to add and manage your server.
NOTE
This guide uses Bash scripts, providing a high degree of customisation. You can adapt the scripts to fit your specific Installations needs and environment.
Assumptions
- This guide assumes you’re using Ubuntu 24.04 LTS as your server’s operating system. If you’re using a different version or a different distribution, adjust the commands accordingly.
Create the Automation Script
To streamline the deployment and management processes, you’ll need three Bash scripts:
- Installation and Configuration Script: This script will install MySQL, secure it, and configure it for remote access.
- Database setup Script: This script will Creates a MySQL database, user, and a sample table.
- Backup Script: This script will automate the backup processes for MySQL database
Installation and Configuration Script
To create the Installation and configuration script, you need to follow these steps:

- Go to Scripts in your CloudRay project
- Click New Script
- Name:
Install and Configure MySQL Server. You can give it any name of your choice. - Copy this code:
#!/bin/bash

# Stop executing the script if any of the commands fail
set -e

# Update system package lists
sudo apt update

# Install MySQL Server
sudo apt install -y mysql-server

# Secure MySQL Installation
printf "y\n2\ny\ny\ny\ny\n" | sudo mysql_secure_installation

# Modify or add port configuration
sudo sed -i "s/^port\s*=.*/port = 5231/" {{mysql_conf}}

# Check if bind-address exists, modify it; otherwise, add it
if grep -q "^bind-address" {{mysql_conf}}; then
    sudo sed -i "s/^bind-address\s*=.*/bind-address = 0.0.0.0/" {{mysql_conf}}
else
    echo "bind-address = 0.0.0.0" | sudo tee -a {{mysql_conf}}
fi

# Restart MySQL to apply changes
sudo systemctl restart mysql

echo "MySQL configuration updated successfully!"
Below is a breakdown of what each command in the Install and Configure MySQL Server does:
- Updates the system’s package list to ensure that the latest versions of software packages are installed
- Installs the latest version of MySQL Server
- Secures MySQL by setting a strong password, removing anonymous users, disallowing remote root login, and deleting test databases
- Changes the default MySQL port to
5231and enabling remote connections by settingbind-address = 0.0.0.0 - Restarts MySQL to apply the changes
Database setup Script
After the installation of MySQL, you need to create a MySQL database, a dedicated user with privileges, and a table if necessary.
Similarly, follow these steps to setup the database:

- Go to Scripts > New Script
- Name:
Setup MySQL Database - Add code:
#!/bin/bash

set -e

# Enter MySQL and execute commands
sudo mysql <<EOF
CREATE DATABASE IF NOT EXISTS {{db_name}};
CREATE USER IF NOT EXISTS '{{db_user}}'@'%' IDENTIFIED BY '{{db_pass}}';
GRANT ALL PRIVILEGES ON {{db_name}}.* TO '{{db_user}}'@'%' WITH GRANT OPTION;
FLUSH PRIVILEGES;

USE {{db_name}};
CREATE TABLE IF NOT EXISTS students (
    id INT AUTO_INCREMENT PRIMARY KEY,
    name VARCHAR(100) NOT NULL,
    age INT NOT NULL,
    department VARCHAR(100) NOT NULL
);

EOF

echo "Database {{db_name}}, user {{db_user}}, and students table created successfully!"
This is what the Setup MySQL Database does:
- Creates the database if it doesn’t exist
- Creates a MySQL user with a specified password
- Grants full privileges to the user on the database
- Reloads privileges to apply changes
- Creates the students table with columns for id, name, age, and department (you can adjust this based on your need)
Create a Variable Group
Before running the scripts, you need to define values for the placeholders {{mysql_conf}}, {{db_name}}, {{db_user}} {{db_pass}}, and {{backup_dir}} used in the scrips. CloudRay processes all scripts as Liquid templates. This allows you to use variables dynamically across different servers.

To ensure that these values are automatically substituted when the script runs, follow these steps to create a variable group:
- Navigate to Variable Groups: In your CloudRay project, go to “Scripts” in the top menu and click on “Variable Groups”.
- Create a new Variable Group: Click on “Variable Group”.
- Add the following variables:
mysql_conf: This is the Bash variable that stores the file path of the MySQL configuration filedb_name: This is the name of the databasedb_user: The name of the userdb_pass: The password of the for the database userbackup_dir: The directory where MySQL database backups will be stored
Running the Script with CloudRay
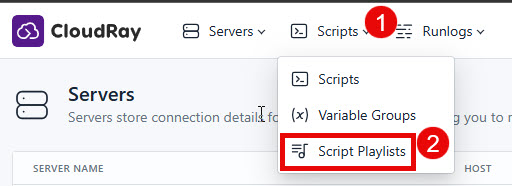
You can choose to run the scripts individually or execute them all at once using CloudRay’s Script Playlists. Since there are multiple scripts, using CloudRay playlists will help automate the execution sequence and save time.
Here are the steps to follow:
- Navigate to “Script Playlists”: Click on the Scripts tab in the CloudRay interface
- Click “Add Script Playlist”: This initiates the creation of a new playlist
- Provide a Name: Give your playlist a unique name (For example “MySQL Deployment Automation and Management”)
- Add Scripts in Order: Select and add the scripts sequentially

- Save the Playlist: Click “create playlist” to store your new playlist.
Once your script playlist is created, proceed with execution:
- Navigate to Runlogs: In your CloudRay project, go to the Runlogs section in the top menu.
- Create a New Runlog: Click on New Runlog.
- Configure the Runlog: Provide the necessary details:

- Server: Select the server where MySQL will be installed
- Script Playlist: Choose the playlist you created (For example “MySQL Deployment Automation and Management”)
- Variable Group: Select the variable group you set up earlier
- Execute the Script: Click on Run Now to start the execution

Your MySQL Server is now seamlessly deployed and managed with CloudRay. That’s it! Happy deploying!
Scheduling MySQL Database Backup with CloudRay’s Schedules (Optional)
CloudRay also offers Schedules, allowing you to execute scripts automatically at specific intervals or times. This feature is useful for tasks such as automating database backups.
To automate MySQL database backups with CloudRay, you first need to create a backup script that the scheduler will execute.
You can follow similar steps as the previous ones to create the backup script:

- Go to Scripts > New Script
- Name:
Backup MySQL Database - Add code:
#!/bin/bash

set -e

BACKUP_FILE="{{backup_dir}}/{{db_name}}_$(date +%F_%H-%M-%S).sql"

# Ensure backup directory exists
mkdir -p {{backup_dir}}

# Perform database backup
sudo mysqldump -u root {{db_name}} > $BACKUP_FILE

# Confirm backup success
if [ $? -eq 0 ]; then
    echo "Backup successful: $BACKUP_FILE"
else
    echo "Backup failed!"
    exit 1
fi
This is what the Setup MySQL Database does:
- Ensures the backup directory exists
- Backs up the database to a timestamped file
- Checks if the backup was successful: If successful, it prints the backup path; otherwise, it reports failure and exits with an error code.
For example, if you want to back up your database on the first day of every month at 12:00 AM, you can configure a CloudRay schedule to handle this automatically.
Here are the steps to achieve this:
- Navigate to Schedules: In your CloudRay dashboard, go to the “Schedules” tab.

- Click “Add Schedule”: Start creating a new schedule.

- Submit Schedule: Click “Submit” to activate your new schedule.

CloudRay will automatically execute the backup script at the scheduled time, ensuring that your database is regularly backed up without manual intervention.
Related Guides

Olusegun Durojaye
CloudRay Engineering Team