
CloudRay provides a flexible automation framework to deploy and manage infrastructure and applications. Using CloudRay, you can automate the provisioning of essential services like Jenkins using Docker and Docker Compose, enabling seamless CI/CD pipeline setups. This guide walks through deploying Jenkins using Docker Compose and configuring Caddy as a reverse proxy for improved security and ease of access.
By the end of this article, you will have a fully functional Jenkins instance running in Docker, exposed securely via Caddy, and automated through CloudRay.
Contents
- Adding Servers to CloudRay
- Assumptions
- Create the Automation Script
- Create a Variable Group
- Running the Script with CloudRay
- Troubleshooting
- Related Guides
Adding Servers to CloudRay
Before getting started, make sure your target servers are connected to CloudRay. If you haven’t done this yet, follow our servers docs to add and manage your server.
NOTE
This guide uses Bash scripts, providing a high degree of customisation. You can adapt the scripts to fit your specific deployment needs and environment.
Assumptions
- This guide assumes you’re using Ubuntu 24.04 LTS as your server’s operating system. If you’re using a different version or a different distribution, adjust the commands accordingly.
Create the Automation Script
To streamline the deployment and management processes, you’ll need three Bash scripts:
- Install Docker and Docker Compose: This script will installs Docker and Docker Compose, adds a new user for Docker management, and sets up Docker to run on startup
- Set up Docker Compose for Jenkins: This script sets up a Docker Compose configuration for Jenkins and starts the service
- Install and Configure Caddy: This script will installs Caddy, sets up a reverse proxy for Jenkins, and ensures Caddy runs on system boot
Install Docker and Docker Compose
To create the install Docker and Docker Compose script, you need to follow these steps:

- Go to Scripts in your CloudRay project
- Click New Script
- Name:
Install Docker and Docker Compose. You can give it any name of your choice. - Copy this code:
#!/bin/bash

# Stop executing the script if any of the commands fail
set -e

# Update package lists and install required dependencies
sudo apt-get update
sudo apt-get install ca-certificates curl -y

# Add Docker's official GPG key
sudo install -m 0755 -d /etc/apt/keyrings
sudo curl -fsSL https://download.docker.com/linux/ubuntu/gpg -o /etc/apt/keyrings/docker.asc
sudo chmod a+r /etc/apt/keyrings/docker.asc

# Add Docker repository to Apt sources
echo \
  "deb [arch=$(dpkg --print-architecture) signed-by=/etc/apt/keyrings/docker.asc] https://download.docker.com/linux/ubuntu \
  $(. /etc/os-release && echo "${UBUNTU_CODENAME:-$VERSION_CODENAME}") stable" | \
  sudo tee /etc/apt/sources.list.d/docker.list > /dev/null

# Update package lists and install Docker packages
sudo apt-get update
sudo apt-get install docker-ce docker-ce-cli containerd.io docker-buildx-plugin docker-compose-plugin -y

# Create a new user "user" with the password "kali"
sudo adduser --gecos "" --disabled-password user
echo "user:{{user_password}}" | sudo chpasswd

# Add "user" to the docker group for Docker permissions
sudo usermod -aG docker user

# Restart and enable Docker service
sudo systemctl restart docker
sudo systemctl enable docker

# Download Docker Compose binary
mkdir bin
cd /bin
wget https://github.com/docker/compose/releases/download/v2.28.1/docker-compose-linux-x86_64 -O docker-compose
chmod +x docker-compose

# Add Docker Compose to PATH if not already present
if ! grep -q 'export PATH="${HOME}/bin:${PATH}"' ~/.bashrc; then
    echo 'export PATH="${HOME}/bin:${PATH}"' >> ~/.bashrc
    source ~/.bashrc
fi

echo "Docker and Docker Compose installation completed successfully!"
Below is a breakdown of what each command in the Install Docker and Docker Compose does:
- Ensures the system has the required packages for Docker installation
- Allows secure installation from Docker’s official repository
- Installs the latest Docker engine, CLI tools, and Compose
- Creates a user named with password and grants Docker access
- Enables and starts Docker to ensure it runs on system boot
- Downloads and configures Docker Compose for container orchestration
Setup Docker Compose for Jenkins
After the installation of Docker and Docker Compose, you create a script to sets up a Docker Compose configuration for Jenkins and start the service.
Similarly, follow these steps to setup Docker Compose for Jenkins:
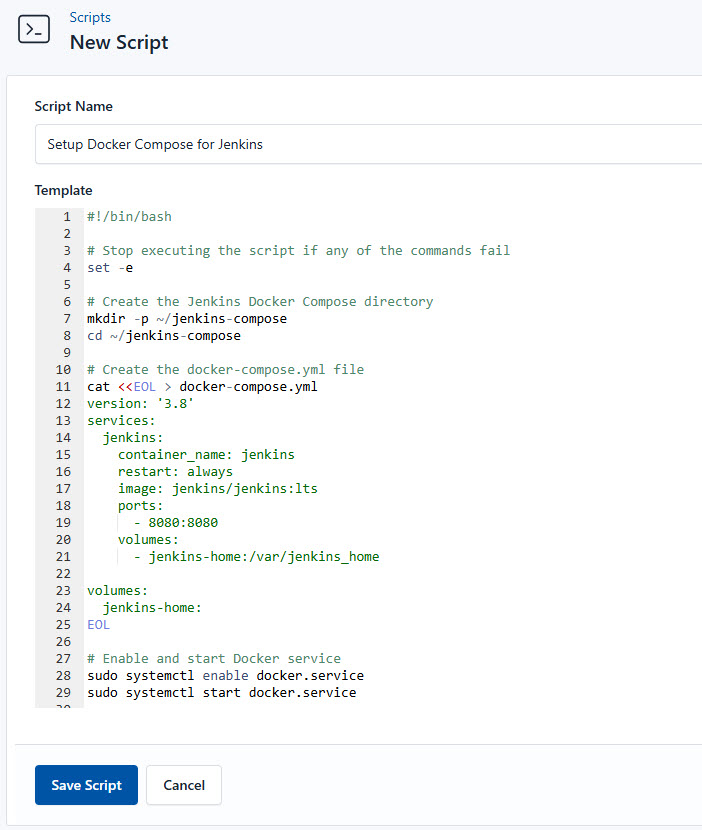
- Go to Scripts > New Script
- Name:
Setup Docker Compose for Jenkins - Add code:
#!/bin/bash

# Stop executing the script if any of the commands fail
set -e

# Create the Jenkins Docker Compose directory
mkdir -p ~/jenkins-compose
cd ~/jenkins-compose

# Create the docker-compose.yml file
cat <<EOL > docker-compose.yml
version: '3.8'
services:
  jenkins:
    container_name: jenkins
    restart: always
    image: jenkins/jenkins:lts
    ports:
      - 8080:8080
    volumes:
      - jenkins-home:/var/jenkins_home

volumes:
  jenkins-home:
EOL

# Enable and start Docker service
sudo systemctl enable docker.service
sudo systemctl start docker.service

# Start Jenkins using Docker Compose
docker-compose up -d
This is what the Setup Docker Compose for Jenkins does:
- Sets up a dedicated directory for the Jenkins deployment
- Defines the Jenkins service with persistent storage
- Ensures Docker is running and Jenkins starts automatically
- Uses Docker Compose to run Jenkins in detached mode
Install and Configure Caddy
After setting up Docker Compose for Jenkins, you can secure the deployment using Caddy.
To create the script, you need to follow these steps:
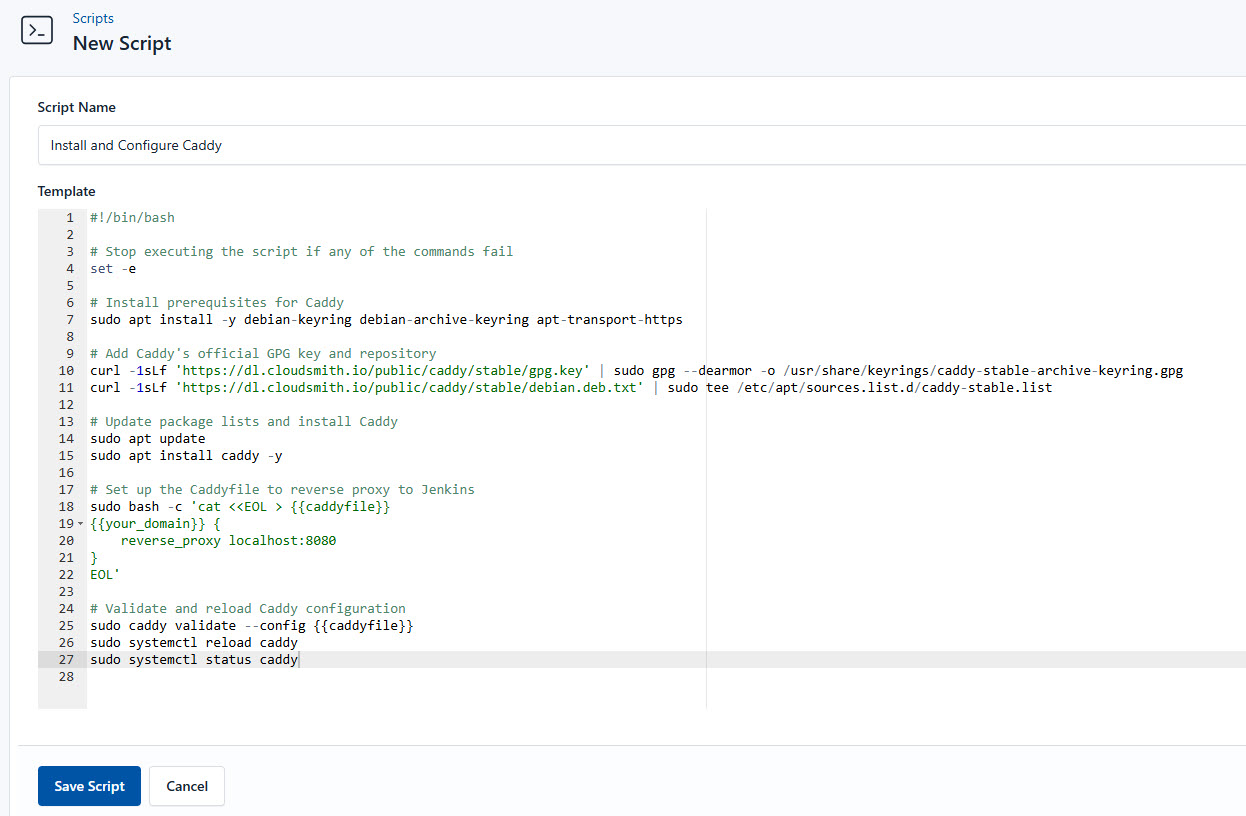
- Go to Scripts in your CloudRay project
- Click New Script
- Name:
Install and Configure Caddy - Copy this code:
#!/bin/bash

# Stop executing the script if any of the commands fail
set -e

#!/bin/bash

# Install prerequisites for Caddy
sudo apt install -y debian-keyring debian-archive-keyring apt-transport-https

# Add Caddy's official GPG key and repository
curl -1sLf 'https://dl.cloudsmith.io/public/caddy/stable/gpg.key' | sudo gpg --dearmor -o /usr/share/keyrings/caddy-stable-archive-keyring.gpg
curl -1sLf 'https://dl.cloudsmith.io/public/caddy/stable/debian.deb.txt' | sudo tee /etc/apt/sources.list.d/caddy-stable.list

# Update package lists and install Caddy
sudo apt update
sudo apt install caddy -y

# Set up the Caddyfile to reverse proxy to Jenkins
sudo bash -c 'cat <<EOL > {{caddyfile}}
{{your_domain}} {
    reverse_proxy localhost:8080
}
EOL'

# Validate and reload Caddy configuration
sudo caddy validate --config {{caddyfile}}
sudo systemctl reload caddy
sudo systemctl status caddy
Below is a breakdown of what each command in the Install and Configure Caddy does:
- Downloads and installs the Caddy web server
- Ensures the installation is secure and from an official source
- Creates a reverse proxy configuration to expose Jenkins externally
- Checks for syntax errors and reloads the Caddy service
Create a Variable Group
Before running the scripts, you need to define values for the placeholders {{user_password}}, {{caddyfile}}, and {{your_domain}} used in the scrips. CloudRay processes all scripts as Liquid templates. This allows you to use variables dynamically across different servers.

To ensure that these values are automatically substituted when the script runs, follow these steps to create a variable group:
- Navigate to Variable Groups: In your CloudRay project, go to “Scripts” in the top menu and click on “Variable Groups”.
- Create a new Variable Group: Click on “Variable Group”.
- Add the following variables:
your_domain: This specifies your registered domaincaddyfile: This specifies the path to the Caddy web server’s configuration fileuser_password: The password of the docker user
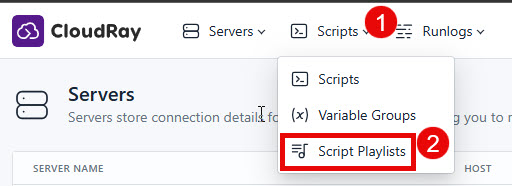
Running the Script with CloudRay
You can choose to run the scripts individually or execute them all at once using CloudRay’s Script Playlists. Since there are multiple scripts, using CloudRay playlists will help automate the execution sequence and save time.
Here are the steps to follow:
- Navigate to “Script Playlists”: Click on the Scripts tab in the CloudRay interface
- Click “Add Script Playlist”: This initiates the creation of a new playlist
- Provide a Name: Give your playlist a unique name (For example “Jenkins Deployment Automation and Management”)
- Add Scripts in Order: Select and add the scripts sequentially
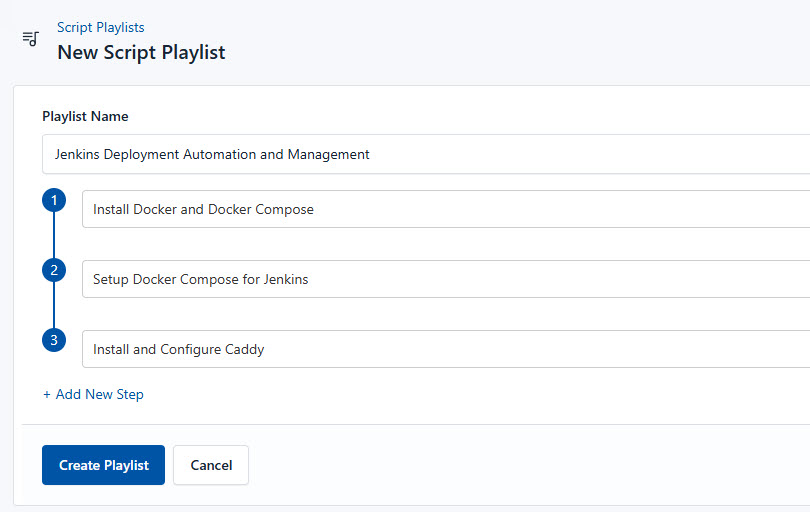
- Save the Playlist: Click “create playlist” to store your new playlist.
Once your script playlist is created, proceed with execution:
- Navigate to Runlogs: In your CloudRay project, go to the Runlogs section in the top menu.
- Create a New Runlog: Click on New Runlog.
- Configure the Runlog: Provide the necessary details:
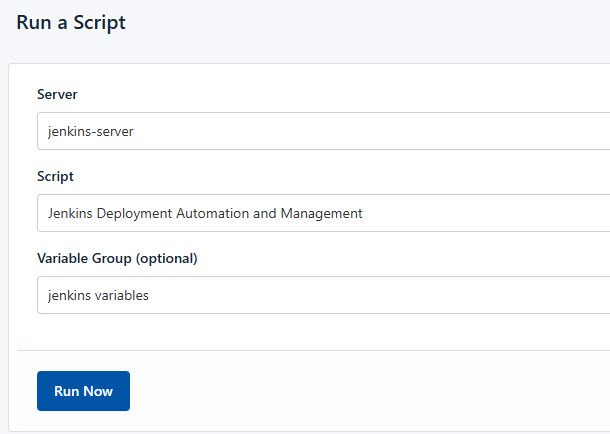
- Server: Select the server where Jenkins will be installed
- Script Playlist: Choose the playlist you created (For example “Jenkins Deployment Automation and Management”)
- Variable Group: Select the variable group you set up earlier
- Execute the Script: Click on Run Now to start the execution
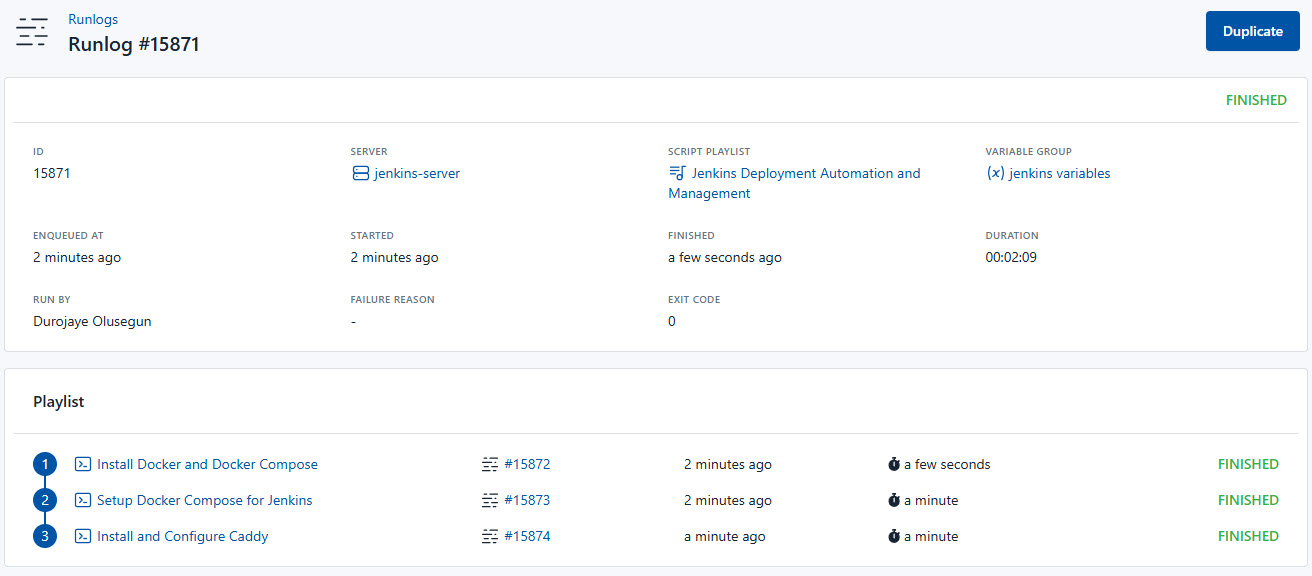
Your Jenkins is now successfully deployed and managed by CloudRay. That’s it! Happy deploying!
You can use the command (docker exec -it jenkins cat /var/jenkins_home/secrets/initialAdminPassword) to retrieve the Administrator password.
Troubleshooting
If you encounter issues during deployment, consider the following:
- Jenkins service not starting: Ensure Docker is running by checking
sudo systemctl status dockerand restart if necessary - Permission issues: Ensure the
userhas Docker permissions by verifying membership in thedockergroup withgroups user - Caddy reverse proxy not working: Verify the Caddyfile configuration and ensure your domain points to the server’s IP address
- Unable to access Jenkins UI: Check if ports 8080 (Jenkins) and 80/443 (Caddy) are open in your firewall
- Caddy service failing: Validate the Caddyfile with
sudo caddy validate --config /path/to/Caddyfileand check logs withsudo journalctl -u caddy
Related Guides
- Deploy Ruby on Rails
- Deploy Express Application
- Deploy Laravel
- Deploy SonarQube
- Deploy Static Website from GitHub
- Deploy Next.js Application

Olusegun Durojaye
CloudRay Engineering Team