
CloudRay simplifies cloud infrastructure automation by allowing users to execute Bash scripts on remote servers.
In this guide, you will learn how to automate the deployment of SonarQube on an Ubuntu server using CloudRay. SonarQube is an open-source platform for continuous inspection of code quality, providing static code analysis and detecting bugs, vulnerabilities, and code smells.
By the end of this guide, SonarQube will be running on your Ubuntu server, fully automated through CloudRay.
Contents
- Adding Servers to CloudRay
- Assumptions
- Create the Automation Script
- Create a Variable Group
- Running the Script with CloudRay
- Troubleshooting
- Related Guides
Adding Servers to CloudRay
Before getting started, make sure your target servers are connected to CloudRay. If you haven’t done this yet, follow our servers docs to add and manage your server
NOTE
This guide uses Bash scripts, providing a high degree of customisation. You can adapt the scripts to fit your specific Installations needs and environment.
Assumptions
- This guide assumes you’re using Ubuntu 24.04 LTS as your server’s operating system. If you’re using a different version or a different distribution, adjust the commands accordingly.
Create the Automation Script
To streamline the setup and management processes, you’ll need four Bash scripts:
- Install and Configure PostgreSQL: This script installs PostgreSQL, creates a SonarQube database, and sets up a user with appropriate privileges
- Install Java: This script installs Java 17, which is required to run SonarQube
- Install and Configure SonarQube: This script downloads, extracts, and configures SonarQube to work with PostgreSQL
- Configure System: This script adjusts system settings for performance optimization and sets up SonarQube as a systemd service
Let’s begin with the installation and configuration of PostgreSQL.
Install and Configure PostgreSQL Script
o create the Install and Configure PostgreSQL script, follow these steps:
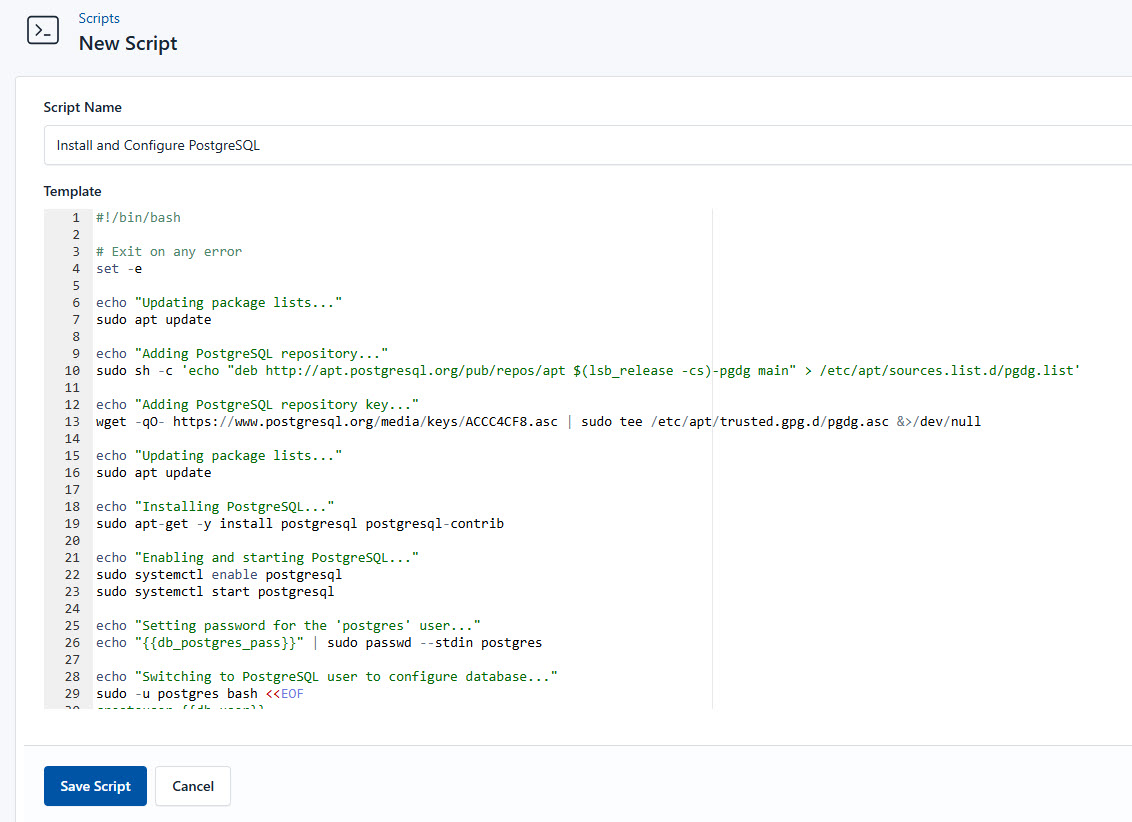
- Go to Scripts in your CloudRay project
- Click New Script
- Name:
Install and Configure PostgreSQL. You can give it any name of your choice. - Copy this code:
#!/bin/bash

# Exit on any error
set -e

echo "Updating package lists..."
sudo apt update

echo "Adding PostgreSQL repository..."
sudo sh -c 'echo "deb http://apt.postgresql.org/pub/repos/apt $(lsb_release -cs)-pgdg main" > /etc/apt/sources.list.d/pgdg.list'

echo "Adding PostgreSQL repository key..."
wget -qO- https://www.postgresql.org/media/keys/ACCC4CF8.asc | sudo tee /etc/apt/trusted.gpg.d/pgdg.asc &>/dev/null

echo "Updating package lists..."
sudo apt update

echo "Installing PostgreSQL..."
sudo apt-get -y install postgresql postgresql-contrib

echo "Enabling and starting PostgreSQL..."
sudo systemctl enable postgresql
sudo systemctl start postgresql

echo "Setting password for the 'postgres' user..."
echo "{{db_postgres_pass}}" | sudo passwd --stdin postgres

echo "Switching to PostgreSQL user to configure database..."
sudo -u postgres bash <<EOF
createuser {{db_user}}
psql -c "ALTER USER {{db_user}} WITH ENCRYPTED PASSWORD '{{db_pass}}';"
psql -c "CREATE DATABASE {{db_name}} OWNER {{db_user}};"
psql -c "GRANT ALL PRIVILEGES ON DATABASE {{db_name}} TO {{db_user}};"
EOF

echo "PostgreSQL installation and database setup completed!"
Here is a breakdown of what each command in the Install and Configure PostgreSQL does:
- Updates the package lists to get the latest version of available packages
- Adds the official PostgreSQL repository to the system
- Downloads and adds the PostgreSQL repository’s GPG key for verifying package authenticity
- Updates the package lists again to include the newly added PostgreSQL repository
- Installs PostgreSQL and additional utilities for managing the database
- Enables PostgreSQL to start automatically on system boot and starts the PostgreSQL service
- Switches to the PostgreSQL user (
postgres) and performs the following: creates a new database user with a password, creates a database and assigns its owner, and grants full access to the user on the database
Install Java
After the installation and configuration of PostgreSQL, you need to install Java.
Similarly, follow these steps to install Java:
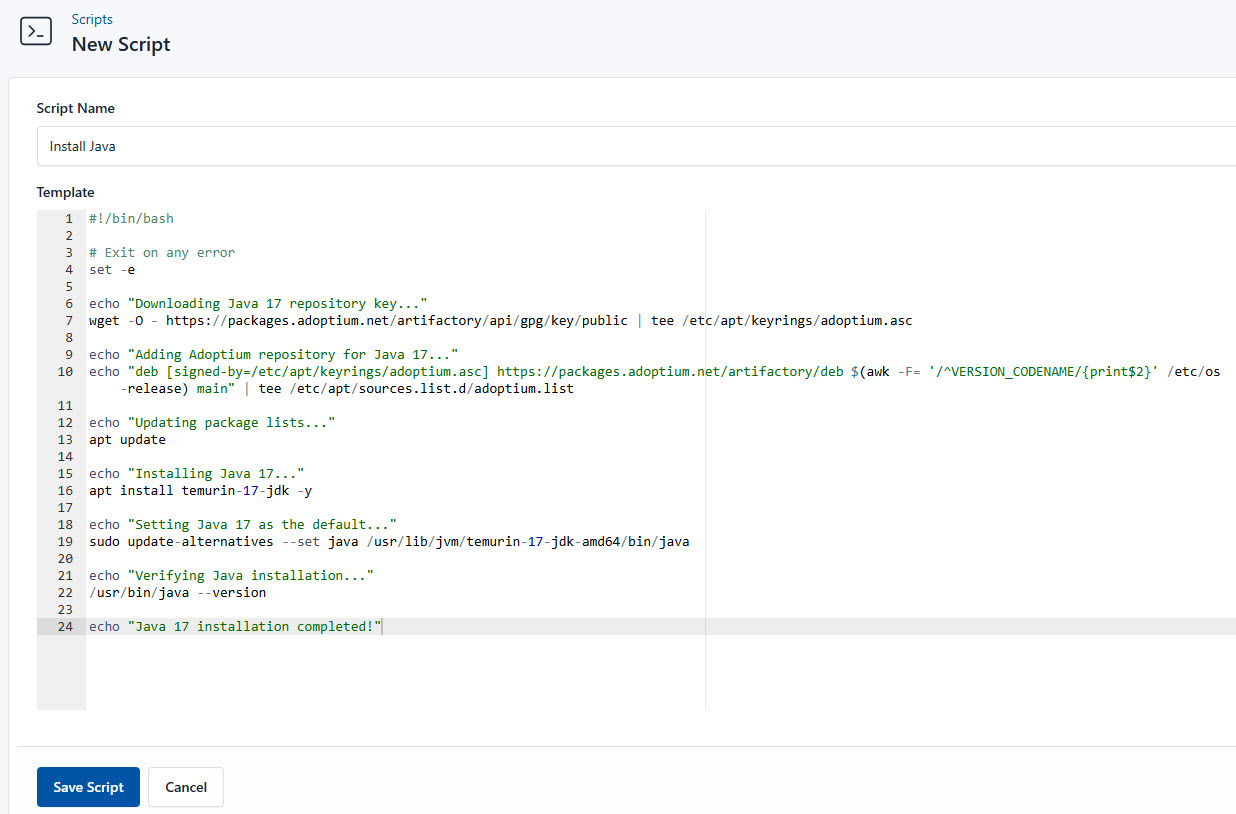
- Go to Scripts > New Script
- Name:
Install Java - Add code:
#!/bin/bash

# Exit on any error
set -e

echo "Downloading Java 17 repository key..."
wget -O - https://packages.adoptium.net/artifactory/api/gpg/key/public | tee /etc/apt/keyrings/adoptium.asc

echo "Adding Adoptium repository for Java 17..."
echo "deb [signed-by=/etc/apt/keyrings/adoptium.asc] https://packages.adoptium.net/artifactory/deb $(awk -F= '/^VERSION_CODENAME/{print$2}' /etc/os-release) main" | tee /etc/apt/sources.list.d/adoptium.list

echo "Updating package lists..."
apt update

echo "Installing Java 17..."
apt install temurin-17-jdk -y

echo "Setting Java 17 as the default..."
sudo update-alternatives --set java /usr/lib/jvm/temurin-17-jdk-amd64/bin/java

echo "Verifying Java installation..."
/usr/bin/java --version

echo "Java 17 installation completed!"
This is what the Install Java does:
- Downloads and saves the GPG key for the Adoptium repository (Java 17 provider) and adds the Adoptium repository to the system
- Updates the package lists to recognize the newly added Adoptium repository
- Installs Java 17 from the Adoptium repository and sets Java 17 as the default version for the system
Install and Configure SonarQube Script
Moving forward, you need to create the install and configure SonarQube script.
You need to follow similar steps:
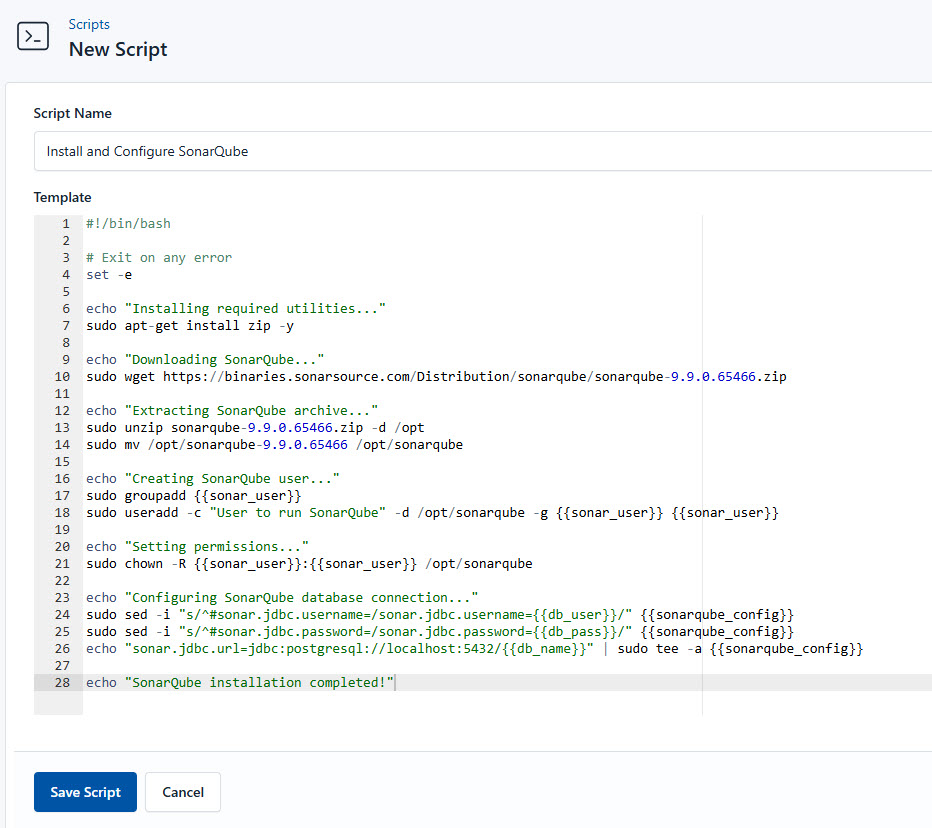
- Go to Scripts in your CloudRay project
- Click New Script
- Name:
Install and Configure SonarQube - Copy this code:
#!/bin/bash

# Exit on any error
set -e

echo "Installing required utilities..."
sudo apt-get install zip -y

echo "Downloading SonarQube..."
sudo wget https://binaries.sonarsource.com/Distribution/sonarqube/sonarqube-9.9.0.65466.zip

echo "Extracting SonarQube archive..."
sudo unzip sonarqube-9.9.0.65466.zip -d /opt
sudo mv /opt/sonarqube-9.9.0.65466 /opt/sonarqube

echo "Creating SonarQube user..."
sudo groupadd {{sonar_user}}
sudo useradd -c "User to run SonarQube" -d /opt/sonarqube -g {{sonar_user}} {{sonar_user}}

echo "Setting permissions..."
sudo chown -R {{sonar_user}}:{{sonar_user}} /opt/sonarqube

echo "Configuring SonarQube database connection..."
sudo sed -i "s/^#sonar.jdbc.username=/sonar.jdbc.username={{db_user}}/" {{sonarqube_config}}
sudo sed -i "s/^#sonar.jdbc.password=/sonar.jdbc.password={{db_pass}}/" {{sonarqube_config}}
echo "sonar.jdbc.url=jdbc:postgresql://localhost:5432/{{db_name}}" | sudo tee -a {{sonarqube_config}}

echo "SonarQube installation completed!"
Here is a breakdown of what each command in the Install and Configure SonarQube does:
- Installs the zip package, which is required for extracting SonarQube files
- Downloads the SonarQube package and extracts the SonarQube package into the
/optdirectory - Renames the extracted folder for easier access
- Creates a new user group. Then, creates a new user and assigns them to the new group
- Changes ownership of the SonarQube directory to the sonar user
- Configures the SonarQube database username and database
- Sets the SonarQube database connection URL
Configure System Script
Finally, you create the script to configure the system for SonarQube
Similarly, follow these steps to create the configure system script:
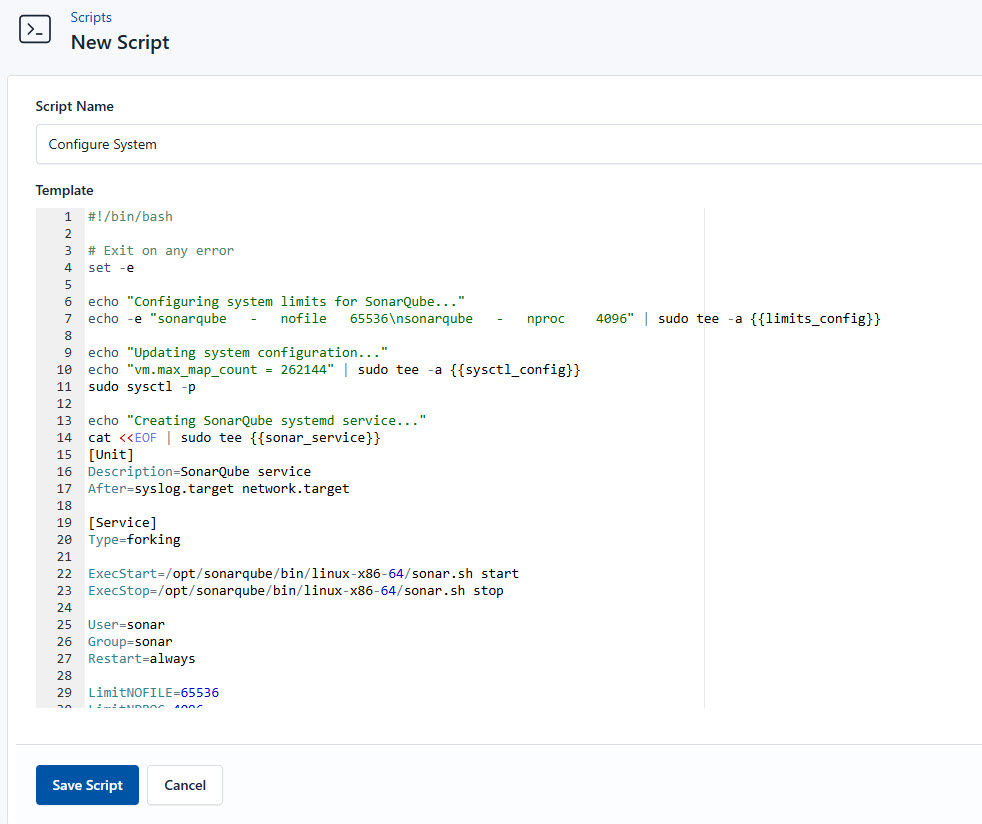
- Go to Scripts > New Script
- Name:
Configure System Script - Add code:
#!/bin/bash

# Exit on any error
set -e

echo "Configuring system limits for SonarQube..."
echo -e "sonarqube   -   nofile   65536\nsonarqube   -   nproc    4096" | sudo tee -a {{limits_config}}

echo "Updating system configuration..."
echo "vm.max_map_count = 262144" | sudo tee -a {{sysctl_config}}
sudo sysctl -p

echo "Creating SonarQube systemd service..."
cat <<EOF | sudo tee {{sonar_service}}
[Unit]
Description=SonarQube service
After=syslog.target network.target

[Service]
Type=forking

ExecStart=/opt/sonarqube/bin/linux-x86-64/sonar.sh start
ExecStop=/opt/sonarqube/bin/linux-x86-64/sonar.sh stop

User=sonar
Group=sonar
Restart=always

LimitNOFILE=65536
LimitNPROC=4096

[Install]
WantedBy=multi-user.target
EOF

echo "Reloading systemd daemon..."
sudo systemctl daemon-reload

echo "Starting and enabling SonarQube service..."
sudo systemctl start sonar
sudo systemctl enable sonar
sudo systemctl status sonar --no-pager

echo "rebooting the server"

echo "System configuration for SonarQube completed!"
This is what the Configure System Script does:
- Increases file and process limits for SonarQube to enhance performance
- Adjusts kernel memory settings for better performance
- Creates a systemd service file for managing SonarQube as a background service
- Reloads systemd to recognize the new SonarQube service
- Starts the SonarQube service and enables SonarQube to start automatically on boot
Create a Variable Group
Now, before running the scripts, you need to define values for the placeholders {{sonar_user}}, {{db_user}}, {{db_name}}, {{db_user}}, {{db_pass}}, {{sonarqube_config}}, {{limits_config}}, {{sysctl_config}}, {{sonar_service}}, and {{db_postgres_pass}} used in the scrips. CloudRay processes all scripts as Liquid templates. This allows you to use variables dynamically across different servers.
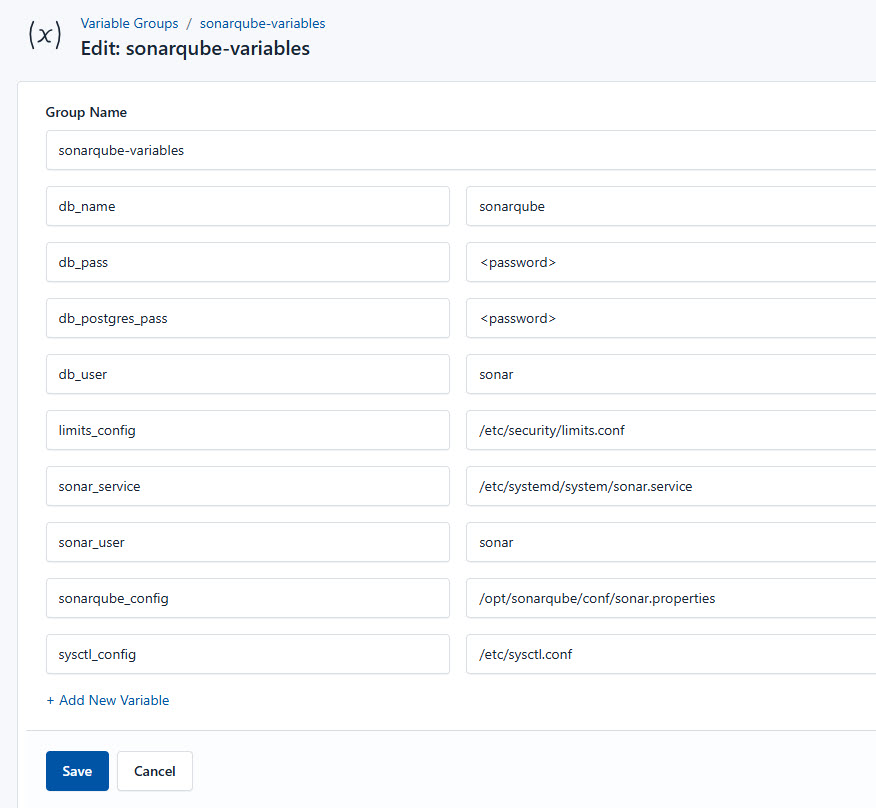
To ensure that these values are automatically substituted when the script runs, follow these steps to create a variable group:
- Navigate to Variable Groups: In your CloudRay project, go to “Scripts” in the top menu and click on “Variable Groups”.
- Create a new Variable Group: Click on “Variable Group”.
- Add the following variables:
sonar_user: Defines the username and group name for the SonarQube service, which is used to run and manage SonarQube securelydb_user: This specifies the PostgreSQL database username for SonarQubedb_name: This sets the name of the PostgreSQL database used by SonarQubedb_pass: The password for the SonarQube database userdb_postgres_pass: Specifies the password for the PostgreSQLpostgressuperuser accountsonarqube_config: Points to the SonarQube configuration file where database and application settings are storedlimits_config: This specifies the system limits configuration file that controls resource limits for users and processessysctl_config: This represents the system configuration file that manages kernel parameters like memory and file descriptor limitssonar_service: This defines the systemd service file used to manage the SonarQube service as a background process
Since the variables are setup, proceed with running the scripts with CloudRay
Running the Script with CloudRay
You can choose to run the scripts individually or execute them all at once using CloudRay’s Script Playlists. Since there are multiple scripts, using CloudRay playlists will help automate the execution sequence and save time.
Here are the steps to follow:
- Navigate to “Script Playlists”: Click on the Scripts tab in the CloudRay interface
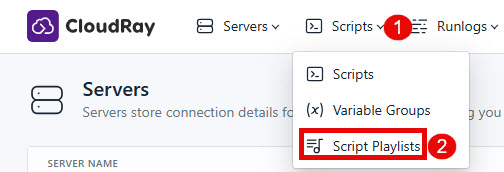
- Click “Add Script Playlist”: This initiates the creation of a new playlist
- Provide a Name: Give your playlist a unique name (For example “SonarQube Deployment Automation and Management”)
- Add Scripts in Order: Select and add the scripts sequentially
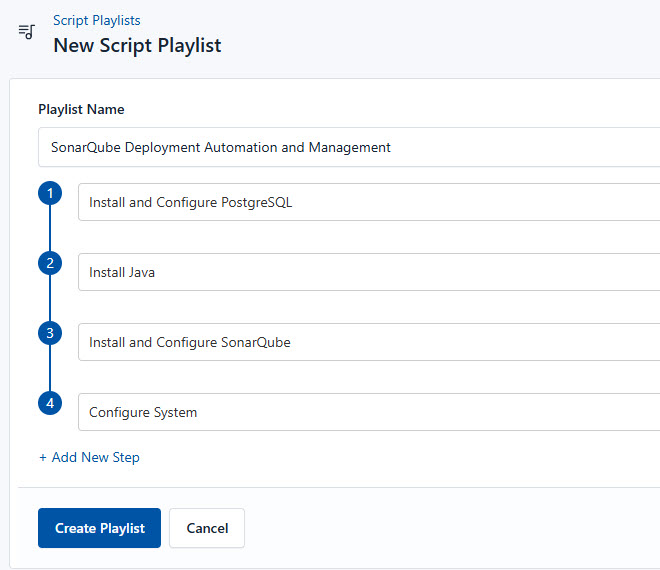
- Save the Playlist: Click “create playlist” to store your new playlist.
Once your script playlist is created, proceed with execution:
- Navigate to Runlogs: In your CloudRay project, go to the Runlogs section in the top menu.
- Create a New Runlog: Click on New Runlog.
- Configure the Runlog: Provide the necessary details:
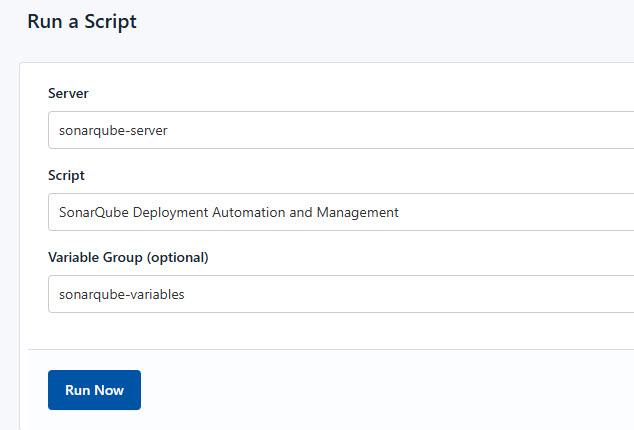
- Server: Select the server where you need PostgreSQL to be installed
- Script Playlist: Choose the playlist you created (For example “SonarQube Deployment Automation and Management”)
- Variable Group: Select the variable group you set up earlier
- Execute the Script: Click on Run Now to start the execution

Once the script runs successfully, your SonarQube will be fully deployed. You can now visit your SonarQube using your server’s public IP address on port 9000 (https://server-ip-address.com).

Your SonarQube is now deployed and managed with CloudRay. That’s it! Happy deploying!
Troubleshooting
If you encounter issues during deployment, consider the following:
- PostgreSQL Installation Fails: Verify repository configuration, GPG key, and
postgresuser permissions. Check logs withjournalctl -u postgresql - SonarQube Fails to Start: Check database credentials in
sonar.properties, increase system limits, and ensure port 9000 is free. Usesudo tail -f /opt/sonarqube/logs/sonar.logto monitor logs - Web Interface Inaccessible: Open port
9000on the firewall, confirm SonarQube is running, and verify the server’s IP or domain
Related Guides
- Deploy Delayed Jobs
- Deploy Ruby on Rails
- Deploy Express Application
- Deploy Laravel
- Deploy Static Website from GitHub
- Deploy Next.js Application
- How to Deploy phpMyAdmin

Olusegun Durojaye
CloudRay Engineering Team