
CloudRay simplifies infrastructure deployment through automation, making it an ideal choice for managing Laravel applications with Caddy. It automates the entire deployment process, reducing manual effort and ensuring a seamless, repeatable setup.
In this guide, you will learn the process of deploying a Laravel application with Caddy using CloudRay. You will learn how to create a detailed automation script for setting up the system, installing dependencies, deploying Laravel, and configuring Caddy as the web server. Caddy simplifies the process by automatically handling HTTPS (SSL/TLS) with Let’s Encrypt, ensuring your application is secure by default.
By the end of this guide, you will have a fully functional Laravel application hosted on an optimised server environment with automatic SSL support provided by Caddy.
Contents
- Adding Servers to CloudRay
- Assumptions
- Create the Automation Script
- Create a Variable Group
- Running the Script with CloudRay
- Troubleshooting
- Related Guides
Adding Servers to CloudRay
Before getting started, make sure your target servers are connected to CloudRay. If you haven’t done this yet, follow our servers docs to add and manage your server.
NOTE
This guide uses Bash scripts, providing a high degree of customisation. You can adapt the scripts to fit your specific Installations needs and environment. Additionally, if you’re using a different version or a different distribution, adjust the commands accordingly
Assumptions
- This guide assumes you’re using Rocky Linux 9 as your server’s operating system. If you’re using a different version or a different distribution, adjust the commands accordingly
Create the Automation Script
To streamline the deployment process, you can use three automation scripts
- System Setup Script: Installs all the Lavarel application and systems dependencies
- Install Composer and Database Setup Script: Installs composer and setup the Laravel database
- Laravel Deployment Script: automates cloning, configuring, and deploying a Laravel app with Caddy
Let’s begin with the System Setup Script
System Setup Script
To create the System Setup Script, you need to follow these steps:
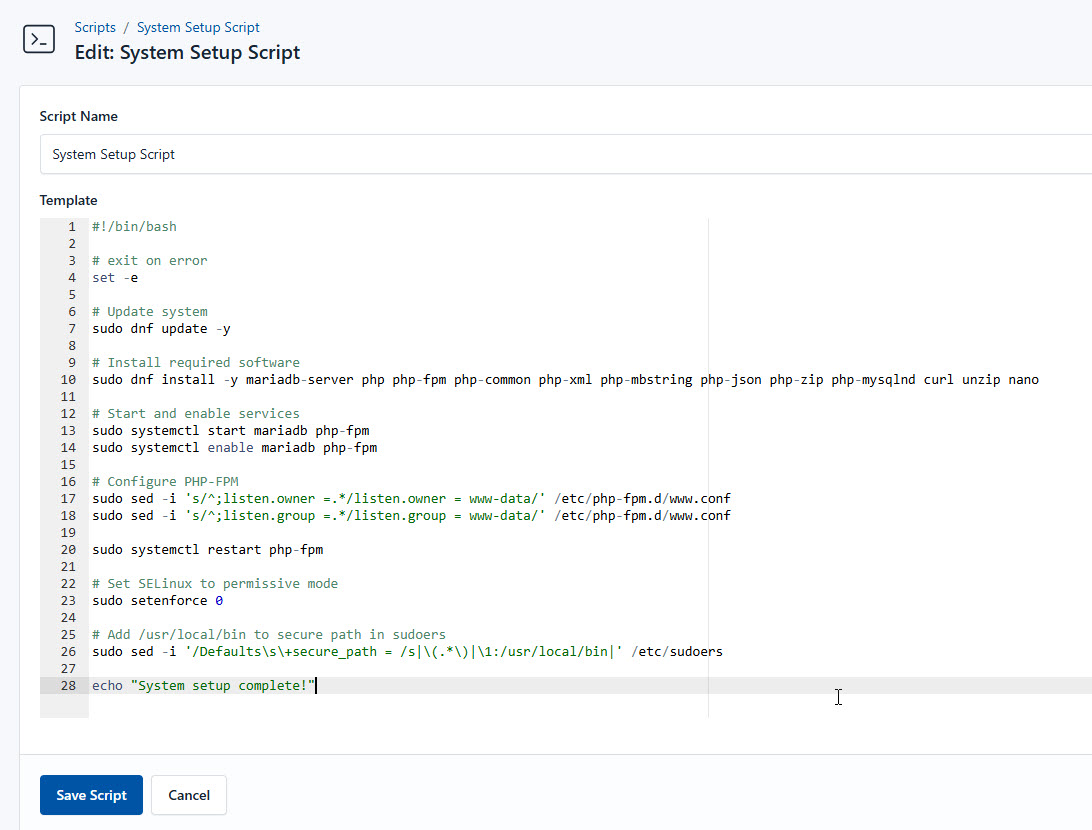
- Go to Scripts in your CloudRay project
- Click New Script
- Name:
System Setup Script. You can give it any name of your choice - Copy this code:
#!/bin/bash

# exit on error
set -e

# Update system
sudo dnf update -y

# Install required software
sudo dnf install -y mariadb-server php php-fpm php-common php-xml php-mbstring php-json php-zip php-mysqlnd curl unzip nano

# Start and enable services
sudo systemctl start mariadb php-fpm
sudo systemctl enable mariadb php-fpm

# Configure PHP-FPM
sudo sed -i 's/^;listen.owner =.*/listen.owner = www-data/' /etc/php-fpm.d/www.conf
sudo sed -i 's/^;listen.group =.*/listen.group = www-data/' /etc/php-fpm.d/www.conf

sudo systemctl restart php-fpm

# Set SELinux to permissive mode
sudo setenforce 0

# Add /usr/local/bin to secure path in sudoers
sudo sed -i '/Defaults\s\+secure_path = /s|\(.*\)|\1:/usr/local/bin|' /etc/sudoers

echo "System setup complete!"
Here is a breakdown of what each command in the System Setup Script does:
- Updates the system to the latest packages
- Installs MariaDB, PHP, and dependencies required for Laravel
- Starts and enables services to launch on boot
- Configures PHP-FPM to use www-data as the owner
- Configures SELinux to be permissive (optional, for easier troubleshooting)
- Adds
/usr/local/binto the secure path for sudo commands
Install Composer and Database Setup Script
Next, you need to install and setup the database for the Laravel application. To do so, follow similar steps as the above:
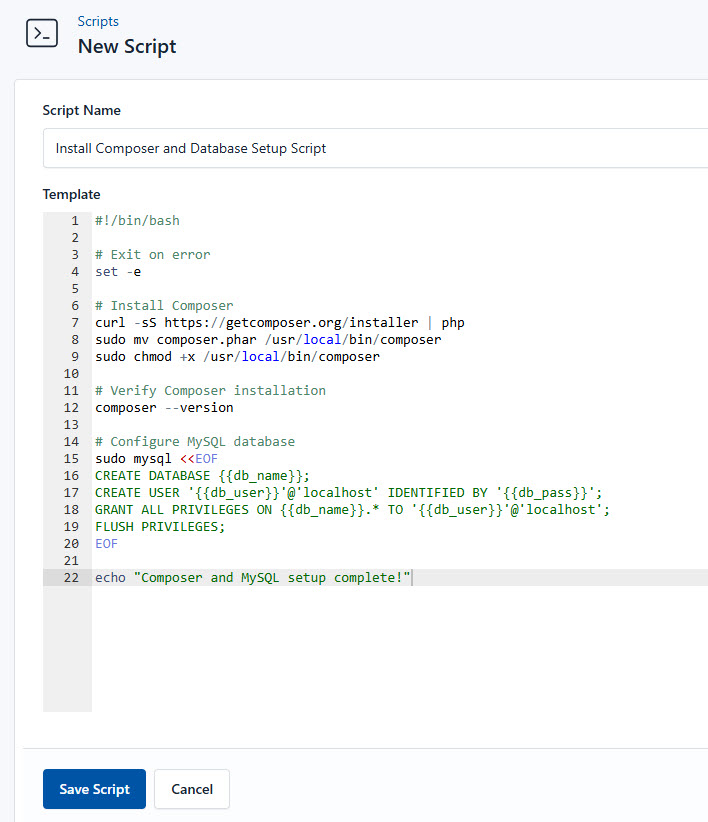
- Go to Scripts > New Script
- Name:
Install Composer and Database Setup Script - Add code:
#!/bin/bash

# Exit on error
set -e

# Install Composer
curl -sS https://getcomposer.org/installer | php
sudo mv composer.phar /usr/local/bin/composer
sudo chmod +x /usr/local/bin/composer

# Verify Composer installation
composer --version

# Configure MySQL database
sudo mysql <<EOF
CREATE DATABASE {{db_name}};
CREATE USER '{{db_user}}'@'localhost' IDENTIFIED BY '{{db_pass}}';
GRANT ALL PRIVILEGES ON {{db_name}}.* TO '{{db_user}}'@'localhost';
FLUSH PRIVILEGES;
EOF

echo "Composer and MySQL setup complete!"
This is what the Install Composer and Database Setup Script does:
- Installs Composer, a dependency manager for PHP
- Verifies Composer installation to ensure it’s available system-wide
- Configures MariaDB database by creating a database, user, and granting permissions
Laravel Deployment Script
The final script automates the cloning, configuration, and deployment of your Laravel application with Caddy. This script will handle the deployment process, ensuring your application is ready to serve traffic.
To create the Laravel Deployment Script, follow these steps:

- Go to Scripts > New Script
- Name:
Laravel Deployment Script - Add code:
#!/bin/bash

# Exit on error
set -e

# install git
sudo dnf install git -y

# Install Caddy
sudo dnf install 'dnf-command(copr)' -y
sudo dnf copr enable @caddy/caddy -y
sudo dnf install caddy -y

# Start and enable Caddy
sudo systemctl start caddy
sudo systemctl enable caddy

# Clone Laravel project from GitHub
if [ ! -d "/var/www/html/{{repo_name}}" ]; then
    echo "Cloning Laravel repository from GitHub..."
    sudo git clone https://{{github_access_token}}@github.com/{{github_user}}/{{repo_name}}.git /var/www/html/{{repo_name}}
else
    echo "Repository already exists. Fetching latest changes..."
    cd /var/www/html/{{repo_name}}
    sudo git fetch --all
    echo "Resetting to the latest version of the main branch..."
    sudo git reset --hard origin/main
fi

# Set correct permissions
sudo chown -R www-data:www-data /var/www/html/{{repo_name}}/storage
sudo chown -R www-data:www-data /var/www/html/{{repo_name}}/bootstrap/cache
sudo chmod -R 775 /var/www/html/{{repo_name}}/storage
sudo chmod -R 775 /var/www/html/{{repo_name}}/bootstrap/cache

# Update Laravel environment file
if [ -f "/var/www/html/{{repo_name}}/.env" ]; then
    echo "Updating existing .env file..."
    # Update existing variables
    sudo sed -i "s|^APP_URL=.*|APP_URL={{domain}}|" /var/www/html/{{repo_name}}/.env
    sudo sed -i "s|^DB_CONNECTION=.*|DB_CONNECTION=mysql|" /var/www/html/{{repo_name}}/.env
    sudo sed -i "s|^DB_HOST=.*|DB_HOST=127.0.0.1|" /var/www/html/{{repo_name}}/.env
    sudo sed -i "s|^DB_PORT=.*|DB_PORT=3306|" /var/www/html/{{repo_name}}/.env
    sudo sed -i "s|^DB_DATABASE=.*|DB_DATABASE={{db_name}}|" /var/www/html/{{repo_name}}/.env
    sudo sed -i "s|^DB_USERNAME=.*|DB_USERNAME={{db_user}}|" /var/www/html/{{repo_name}}/.env
    sudo sed -i "s|^DB_PASSWORD=.*|DB_PASSWORD={{db_pass}}|" /var/www/html/{{repo_name}}/.env
else
    echo "Creating new .env file..."
    cat <<EOL | sudo tee /var/www/html/{{repo_name}}/.env
APP_URL={{domain}}

DB_CONNECTION=mysql
DB_HOST=127.0.0.1
DB_PORT=3306
DB_DATABASE={{db_name}}
DB_USERNAME={{db_user}}
DB_PASSWORD={{db_pass}}
EOL
fi

# Run Laravel setup commands
cd /var/www/html/{{repo_name}}
sudo php artisan key:generate
sudo php artisan migrate

# Configure Caddy
cat <<EOL | sudo tee /etc/caddy/Caddyfile
{{domain}} {
    root * /var/www/html/{{repo_name}}/public # Serve files from the Laravel public directory
    php_fastcgi unix//run/php-fpm/www.sock # Pass PHP requests to PHP-FPM
    file_server # Serve static files
}
EOL

# Start and enable Caddy
sudo systemctl start caddy
sudo systemctl enable caddy

# Install Firewall & Configure Rules
sudo dnf install -y firewalld
sudo systemctl start firewalld
sudo systemctl enable firewalld
sudo firewall-cmd --zone=public --permanent --add-service=http
sudo firewall-cmd --zone=public --permanent --add-service=https
sudo firewall-cmd --reload

echo "Laravel deployment and SSL setup complete!"
This is what the Laravel Deployment Script does:
- Installs Git for repository cloning
- Defines the GitHub repository and target directory
- Clones the Laravel project or updates it if it already exists
- Sets proper permissions for storage and cache directories
- Runs Laravel migration and key generation to prepare the application
- Deploy the application with Caddy
Create a Variable Group
Now, before running the scripts, you need to define values for the placeholders {{db_name}}, {{db_user}}, {{db_pass}}, {{github_access_token}}, {{github_user}}, {{repo_name}}, and {{domain}} used in the scrips. CloudRay processes all scripts as Liquid templates. This allows you to use variables dynamically across different servers.
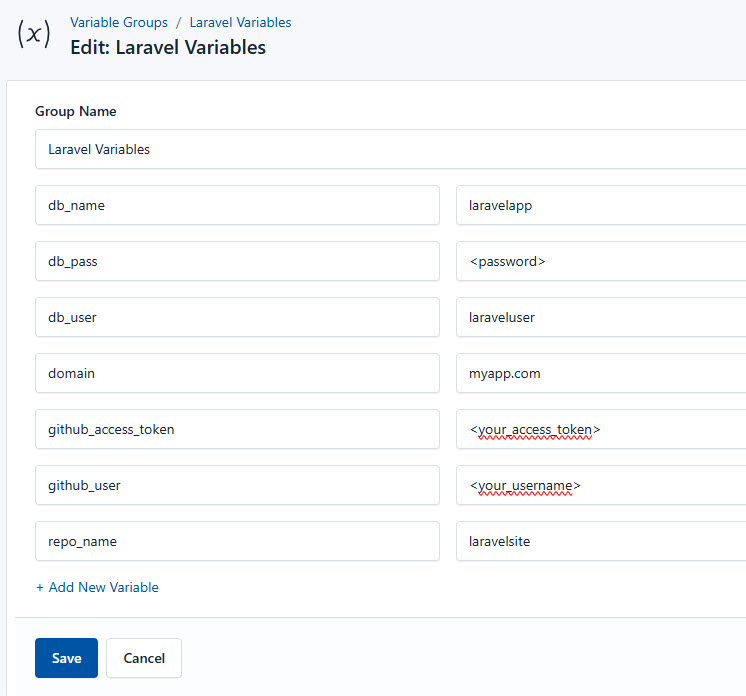
To ensure that these values are automatically substituted when the script runs, follow these steps to create a variable group:
- Navigate to Variable Groups: In your CloudRay project, go to “Scripts” in the top menu and click on “Variable Groups”.
- Create a new Variable Group: Click on “Variable Group”.
- Add the following variables:
db_name: This is the name database for the Laravel applicationdb_user: Database user for the Laravel applicationdb_pass: Password for the database usergithub_access_token: This is your GitHub personal access token for cloning the repositorygithub_user: This is your GitHub Usernamerepo_name: This is the name of the GitHub repositorydomain: Domain name for the Laravel application e.g.,myapp.com
Since the variables are setup, proceed to run the scripts with CloudRay.
Running the Script with CloudRay
Now that everything is setup, you can use CloudRay to automate the deployment of your Laravel Application
You can choose to run the scripts individually or execute them all at once using CloudRay’s Script Playlists. Since there are multiple scripts, using CloudRay playlists will help automate the execution sequence and save time.
Here are the steps to follow:
- Navigate to “Script Playlists”: Click on the Scripts tab in the CloudRay interface
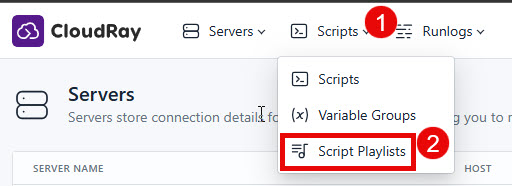
- Click “Add Script Playlist”: This initiates the creation of a new playlist
- Provide a Name: Give your playlist a unique name (For example “Automate Deployment and Management of Laravel Application”)
- Add Scripts in Order: Select and add the scripts sequentially
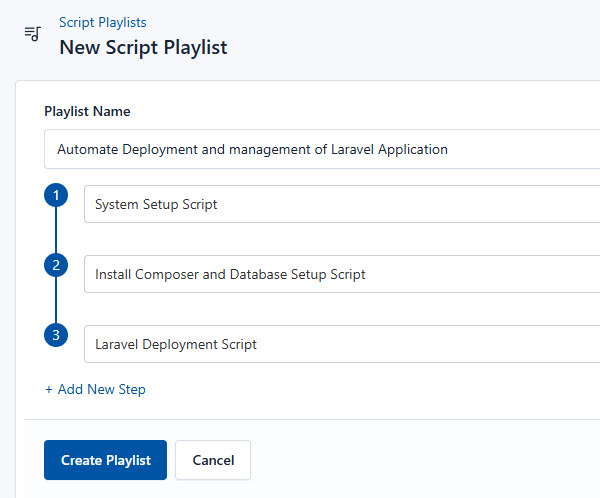
- Save the Playlist: Click “create playlist” to store your new playlist.
Once your script playlist is created, proceed with execution:
- Navigate to Runlogs: In your CloudRay project, go to the Runlogs section in the top menu.
- Create a New Runlog: Click on New Runlog
- Configure the Runlog: Provide the necessary details:
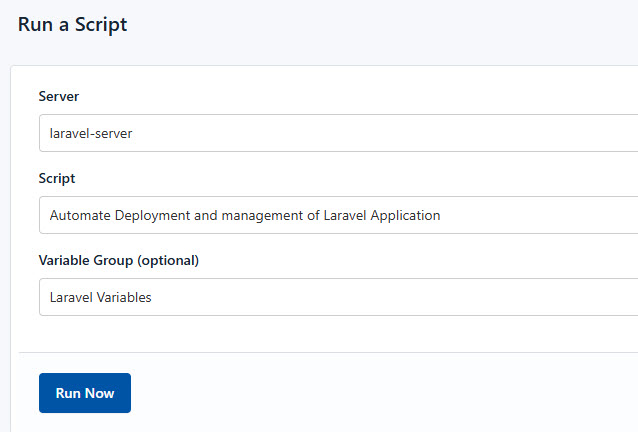
- Server: Select the server where your Laravel application will be installed
- Script Playlist: Choose the playlist you created (For example “Automate Deployment and Management of Laravel Application”)
- Variable Group: Select the variable group you set up earlier
- Execute the Script: Click on Run Now to start the execution

Your Laravel Application is now seamlessly deployed and managed with CloudRay. That’s it! Happy deploying!. You can access it by visiting http://myapp.com
Troubleshooting
If you encounter issues during deployment, consider the following:
- Caddy Fails to Start: Check the Caddy service status with
sudo systemctl status caddyand restart it usingsudo systemctl restart caddy - PHP-FPM Not Working: Ensure PHP-FPM is running with
sudo systemctl status php-fpmand restart it usingsudo systemctl restart php-fpm - SSL Certificate Not Issued: Verify your domain’s DNS records and ensure ports 80 and 443 are open in the firewall.
- Laravel Application Not Loading: Check the
.envfile for correct database credentials and ensure the storage andbootstrap/cachedirectories have the correct permissions. - Database Connection Issues: Verify the database credentials in the
.envfile and ensure MariaDB is running withsudo systemctl status mariadb
If the issue persists, consult the Caddy Documentation or the Laravel Documentation for further assistance.
Related Guides
- Deploy Ruby on Rails
- Deploy Express Application
- Deploy SonarQube
- Deploy Static Website from GitHub
- Deploy Next.js Application
- How to Deploy phpMyAdmin

Olusegun Durojaye
CloudRay Engineering Team